

Navigation Lights
- You are required to display the appropriate lights at night or during times of reduced visibility.
Navigation lights are used to prevent collisions at night or in times of reduced visibility, and are an essential tool in keeping you and your vessel safe. Nav lights allow you to see other nearby vessels, and allow other vessels to see you.
Nav lights also provide information about the size, activity, and direction of travel. By understanding the characteristics of Nav lights, you can determine an appropriate course of action as you approach another vessel.
On any vessel, navigation lights have a specific color, (white, red, green, yellow, blue), arc of illumination, range of visibility, and location, as required by law and regulations. For the purposes of this course, we will concentrate on pleasure boats under 65 feet in length. Knowledge of navigation lights is important to a small-boat skipper for separate, but important, reasons.
- You are legally responsible for displaying lights of the proper color, intensity, location and visibility on your boat.
- Knowing the type and heading of another boat.
Legal Requirements
Vessels are required to show the proper navigation lights from sunset to sunrise in all weather conditions, good and bad. During these times, no other lights that could be mistaken for lights specified in the Rules of the Road can be displayed, nor any lights that impair the visibility or distinctive character of navigation lights, or interfere with the keeping of a proper lookout. The Rules also state that navigation lights must be shown in conditions of reduced visibility, and may be shown at other times considered necessary.
It's Your Responsibility
It is the responsibility of the owner/operator of a vessel that she show the proper navigation lights for her size and the waters in which she is operating. It is not the responsibility of the manufacturer, importer, or selling dealer. Many boats are delivered with lights that do not meet legal requirements with respect to technical characteristics or placement on the vessel. Remember also, that the angles of visibility must be met when the boat is underway-if your boat rides at a significant bow-up angle, take that into consideration when installing and/or checking your lights.
Navigation Lights for Powerboats
Power driven vessels underway shall exhibit a masthead light forward, sidelights and a stern light. Vessels less than 12 meters in length may exhibit an all around white light and side lights. Power driven boats on the Great Lakes may carry an all around white light in stead of a second masthead light and stern light combination.

Sidelights - Colored lights - red on port and green on starboard - showing an unbroken arc of the horizon of 112.5 degrees, from dead ahead to 22.5 degrees abaft the beam on each side.
Combination lights - Sidelights may be combined in a single fixture carried at the centerline of the vessel.
Stern light - A white light showing over an unbroken arc of the horizon of 135 degrees, centered on dead astern.
Navigation Lights for Sailing

A sailing vessel of less than 7 meters in length shall, if practicable, exhibit regular navigation lights, but if not practical, she shall have ready at hand an electric torch or lantern showing a white light which shall be exhibited in sufficient time to prevent collision.
Diving Lights
Another light display that you may see in resort areas, or waters that have wrecks or reefs, is the night diving configuration. This has three vertical masthead lights, that have a red-white-red sequence. You must maintain a good distance from these vessels, and you should also be aware that there may be divers near you.
Interpreting what you see

It's great that you're learning the basics of lights - what is required and when they're required. But, this in only the beginning. You must also learn how to interpret the navigation lights that you see when you are underway at night- and for your safety-learn it well.
For instance, if you see a vessel approaching that shows a light pattern such as the ones to the right, you immediately know that you are in a crossing situation, and that you must yield to the other vessel - that's why it is red.

Seeing a green light over a white light indicates a fishing vessel actively trawling. You not only need to avoid the vessel, but you also need to remember that it could potentially have a very large net deployed that you will also need to avoid.
And there are numerous other lights and combinations of lights that you must be able to instantly recognize - the lights for a sailboat that is privileged over a motorboat, the special lights of various fishing vessels, a dredge or a vessel not under command. Study the requirements for navigation from the viewpoint of a "looker" as well as a boat owner.
Navigation Lights for Sailboats (And How To Read Them)

Navigation lights on a sailboat can be confusing. If you understand the reason behind why they are the way they are however, they can make a lot more sense.
At their heart, sailboats are really just a power boat and as such must adhere to all power boat rules such as navigation lights. Other times however, a sailboat is classified in a special category. They have a set of additional lights they CAN show as an option, but are not always required to do so.
That’s about as clear as mud if you ask me and I contend that that is where the confusion about lighting a sailboat begins.
Just because you can show a light to identify yourself in times of low visibility, does not mean you have to and then we add in a little sibling rivalry between power and sail and things get downright adversarial when it comes to navigation and the night.
Table of contents
The USCG says You’re a Power Boat Whether You Like It or Not
Much to the consternation of many a sailor who has earned a commercial license to drive their sailboat, when you received your credential from the USCG it says you are a master of steam and power across the top with no mention of wind as a source of propulsion.
It is not until you read the back pages of your little red book that feels like a passport and looks like a US Sailing credential, that you will see the term “sail auxiliary”. That is because most of the time the U.S. Coast Guard knows that you are primarily reliant on your mechanical power to propel your vessel.
It's a sad thing, but the days of commercially viable sail boats are done and all but the most select few even have sails let alone use them as their primary power source. All sail boats by law are powerboats, but not all powerboats are sailboats.
Navigation Lights for a Power Boat
As a power boat, you are required to show certain lights and have been required to do so before power was even invented.
In the days of man powered vessels like the viking ships who relied on oars while in close quarters to power their vessels, they needed to show other boats, friend or foe, where they were by showing lanterns in the dark to identify themselves. As you know, it is a time honored rule among all the nations of the world both past and present, that you must avoid a collision at all costs while at sea and even the viking knew that you should not run into things.
By lighting the front and back of your boat, you could warn other boats of your presence as well as identify which way you were heading. As such there is a very specific rule in the Code of Federal Regulations Number 46 (CFR46 by common name) that spells out with detail how many, the color, the luminosity or brightness, the angle of visibility and the location of all of the lights required for navigation on every single boat, seaplane, submarine and other nondescript vessel conceived by man to date that they must show while underway in reduced visibility.
And there is no flexibility in the rules.
As such a power boat, and by extension all sailboats, MUST, without question show one green light on the starboard bow and one red light on the port bow and one all around white light or lights while operating in reduced visibility. These lights should shine at all 360 degrees of visibility with the bow lights shining at an angle of dead ahead to 22.5 degrees abaft the beam and the stern lights shining 225 degrees dead aft. A forward facing masthead light that is white in color shall shine forward to comply with the directive that all vessels must carry an all around white light. For more read here .
As you can see, there isn’t much wiggle room when it comes to lights that must be shown.
Sailboats get a little flexibility with lights
Sailboats however, are a little different when they are in fact sailboats, which is only when you are entirely reliant on the wind for power and in no way reliant on any mechanical or manual means of propulsion. And for good reason.
Back in the day when men were men and sailboats were wooden, fire was a major concern. Sails were coated with wax and other flammable substances and the wood on boats was saturated with oils and grease. Even the ropes were plant materials saturated with oils to keep them pliable and strong.
Add those highly flammable substances to a parching environment like the sea and you had what was essentially a giant floating tinderbox.
Then tell that giant floating tinderbox that they need to identify themselves to the world at large at night using oil lamps with flames because batteries and lights were not invented yet. It didn't take very long or very many ships burning to the water line for the Governments to say to the sailboats, you get to do things a little different.
As such, sailboats are given special dispensation when it comes to lights aloft. They don't have to show an all around white light in their rigging because no one wanted to set their rig on fire with oil lamps 60 feet up in their rig.
However, when a sailboat takes their sails down such as when they are powered or at anchor, they must resume the display of an all around white light or lights aloft. That became a real challenge with aluminum masts and the disappearance of rat lines on the shrouds because there was no easy way to climb the rig and check the bulbs up the mast on a regular basis.
Red over Green Sailing Machine
I have no idea where the history of this particular light comes from, but if you ever take a deck exam with the USCG, you better remember this mnemonic. An all around red light over an all around green may be displayed on a vessel during times of reduced visibility to indicate that a vessel is operating under sail power alone.
I won’t even speculate on how or why they came up with this particular light configuration, but if you want to use these lights as a sailing vessel, you can do so, but that means that you will need three all round lights at the top of your mast, an all around white, an all around red and an all around green, just in that order.
The red over green is to be displayed in addition to the running lights or the red and green bow lights with the 225 degree stern light. As always, when the motor comes on, so does the steaming light or the forward facing white light that is also usually about ¾ of the way up on your mast to complete the requirement of an all around white light that indicates a power vessel.
What is a “steaming light” and why are you mentioning it now?
Most sailboat electrical panels will have a switch that is labelled “steaming light” and it will only come on when your anchor light is off. This is probably the most confusing part of sailboat navigation lights so if you are confused about this, you're in good company as most people are.
A “steaming” light is named thusly, going back to the days of steam powered sailboats where when they fired up their boilers and doused the sails, they became a power boat once again. There aren’t too many steam powered boats, let alone steam powered sailboats, but the name stuck and it is a vestige of a bygone era.
Either way, when you fire up your motor, you turn on your “steaming light” and that locks out the all around white light which is used for anchoring to minimize the number of switches on your panel and reduce the number of wires in your mast. The fewer wires, the less chance of something not working or becoming disconnected.
The steaming light and the anchor light both go up the mast, but you can’t use an all around white light while using the 225 degree stern light at the deck level because to other boaters you would look like you have two white lights from the stern and that would be confusing.
The anchor light is used exclusively for anchoring while the steaming light is used to indicate you are a power vessel while underway.
As to why I am mentioning it now in the article, is because this would have blown your mind if I started with this subject cause it can be really confusing stuff.
Aspect Recognition with Lights
Remember when I said earlier that lights can help you tell others which way you are heading as well as tell you which way other boats are heading? That is called the aspect of the vessel and the USCG tests you on this for your deck exam as well.
Knowing that the bow lights go 22.5 degrees abaft the beam on both sides or 112.5 degrees on each side, and the stern light faces 225 degrees aft for a total of 360 degrees of visibility, you can tell a lot about where a boat is heading and who has the right of way.
One thing that's easy to remember is red means stop and if you see a vessel's red light, it means stop as you are the give way vessel and approaching the other vessel from his port side. Conversely it works with green as well as that means you are approaching from the other vessel's starboard side and you are the standon vessel.
If you see a red and green light equally low on the horizon, that means your heading dead on into another vessel's path and conversely if all you see is a white light low on the horizon, it means you are overtaking another vessel power or sail, we don’t care because it is an overtaking situation. However, any time you do see a white light aloft in addition to the red and green bow lights, you know you are encountering a power boat.
Then there are angular approaches as well, where you see white and red or white and green light low on the horizon. You know in that case you are seeing a portion of the bow lights and stern lights from the side approaches of a vessel. Based on which direction those lights are heading, you can deduce which way that boat is going in relation to your boat.
So put it all together and you see a green light and a white light low on the horizon with a red over green light aloft, you know that you are approaching a sailboat that is traveling to your port and that might make you the standon vessel. That is of course, if we didn’t concern ourselves with windward and leeward and port tacks and starboard tacks, but that is a discussion for another article. So stay tuned when we talk about sailing rules and the right of way. But for now, do good, have fun and sail far.
Related Articles
Capt Chris German
Capt Chris German is a life long sailor and licensed captain who has taught thousands to sail over the last 20 years. In 2007, he founded a US Sailing-based community sailing school in Bridgeport, CT for inner city youth and families. When Hurricane Sandy forced him to abandon those efforts, he moved to North Carolina where he set out to share this love for broadcasting and sailing with a growing web-based television audience through The Charted Life Television Network.
by this author

Most Recent

What Does "Sailing By The Lee" Mean?
Daniel Wade
October 3, 2023

The Best Sailing Schools And Programs: Reviews & Ratings
September 26, 2023
Important Legal Info
Lifeofsailing.com is a participant in the Amazon Services LLC Associates Program, an affiliate advertising program designed to provide a means for sites to earn advertising fees by advertising and linking to Amazon. This site also participates in other affiliate programs and is compensated for referring traffic and business to these companies.
Similar Posts

How To Choose The Right Sailing Instructor
August 16, 2023

Cost To Sail Around The World
May 16, 2023

How To Drive A Pontoon Boat
Jacob Collier
December 19, 2022
Popular Posts

Best Liveaboard Catamaran Sailboats
December 28, 2023

Can a Novice Sail Around the World?
Elizabeth O'Malley
June 15, 2022

4 Best Electric Outboard Motors

How Long Did It Take The Vikings To Sail To England?

10 Best Sailboat Brands (And Why)
December 20, 2023

7 Best Places To Liveaboard A Sailboat
Get the best sailing content.
Top Rated Posts
© 2024 Life of Sailing Email: [email protected] Address: 11816 Inwood Rd #3024 Dallas, TX 75244 Disclaimer Privacy Policy
Ultimate Guide To Marine Navigation Lighting

If you drive a car or even ride a bicycle, you might be well aware of the necessity of lighting systems (though in the second case the word ‘system’ doesn’t quite apply) for the safety of you and the people around you. The thing applies just as well for ships. But since they are much larger than a car, the lighting system or navigation lights on ships is a little bit more complicated as well. Marine navigation lighting is also one of the most critical aspects of nautical studies.
It is mandatory for boats of all sizes to have a navigation system . This is to make sure that the chances of any significant accident are minimized. The United States introduced the system in 1838, and the United Kingdom followed suit. Before being internationally adopted in 1897 suitable guidelines were established by the International Maritime Conference which was established in 1889. Three colors were chosen that were to be used for the light colors. They were red, green and white. This was based on a set of rules specified by the US and are followed around the world to this date.
This article discusses the different rules and regulations of using navigation lights, their importance, and also some basic marine navigation lighting systems along with their positions and ranges.
Marine Navigational Lights, Rules and Regulations
A standard pattern of marine navigation lighting is followed for the identification of both the vessel as well as the IALA buoyage system at night. If you are required to move from sea to a channel you need to have a list of all the IALA as well as the other fixed navigational lights that are visible on entering the channel. This includes distant lighthouses as well.
If you also make a note of the inland features like the radio and television transmitter masts it will benefit you because they act as good navigational aids due to their height and warning lights.
The helmsman should not be using any bright light source in the cockpit area and should rather take the aid of red lights and very dim white lights in the galley and navigation area. This is because he needs to preserve his night vision so that he can accurately interpret both the buoyage marine navigation lights as well as the boat navigation lights of other vessels.
The nautical almanacs contain the details of each and every visible maritime light signal coming from navigational markers that are both inside and outside the channel.
All the details about any particular light can be found in a published list or on a marine navigational lights chart: its color, period, and in some cases even the elevation and range of the beacon. Use the chart to keep a tag on the lights you are passing by putting a tick mark on the lights that you are about to pass and as the boat sails past, the tick is checked.
You will get two visual clues to figure out how far you are away from a buoy. The light will elevate from the horizon at 0.5 nm and at about 200m, the light will reflect on the surface.
Position of Boat Navigation Lights
Most of the variations that can be found in the different vessels can be read about in most almanacs. At the very basic level, a vessel needs to show a red light to port and green light to starboard. Depending on the size of the vessel, one or more colored or white lights are used as well.
For vessels that are 12 ft in length or shorter, the navigation lights must be visible from a range of one nautical mile and for the ones that are longer than 12 meters the required visibility range is 2 nautical miles. From 5 degrees above to 5 degrees below the horizontal happens to be the required minimum intensity in a vertical sector.

International Navigation Rules state that the boat navigation lights should be placed above the uppermost continuous deck. In case separate fixtures are used for the red and green sidelights, the masthead or all-round white light is placed as close as possible to the vessel’s fore and aft centerline. The masthead or all-around light needs to be positioned at least 1 m or 3.3 ft above the sidelights.
Following are the basic positions of navigational lights. We will discuss the same in greater detail ahead.

Also read: What Is A Marine Sextant?
Boat Navigation Light Regulations
Several rules and specifications are related to the type, size, layout, arc, and distance of visibility of boat navigation lights used by all vessel types which are collectively known as the International Regulations for Preventing Collisions at Sea or COLREGs . The navigational lights used are known as ‘COLREG lights and shapes. A boat might be anchored or underway, under sail or power, or fishing or trawling. These various situations can be communicated through multiple combinations of boat navigational lights.
In addition to the primary navigation lights, vessels may also display one or more steaming lights. These lights are very useful for it gives details about the various aspects of the ship like whether it is in the sail or under power, the direction in which it is going and, in some cases, even the size of the vessel. If a ship is engaged in a specific task that might involve certain restrictions, that too can be indicated with some extra boat lights.
Always maintain the lighting system and display the correct navigation light combination to make other vessels in the vicinity aware of your course and state as to whether your vessel is under power or not. If you follow this a considerable amount lowers the chances of a collision. Here is a list that you might use to familiarise yourself with the basics of the lighting system.
- Basic Navigation Light White Light : Small dinghies that are 7m or less in size are required to carry a torch having a white light that can be flashed when needed.
- All-Round White Light: An all-round white light is expected to be displayed by a small boat, up to 7ft long that is under power and can go beyond 7 knots of speed. This light must be visible at an angle of 360 degrees and from two miles away. An all-around white light is also used when the boat or vessel is at anchor but not at a designated anchoring area. This is to make sure that the ship is visible to all the nearby ships to avoid any accidents.
- Stern and Combined Side Lights : A stern light is a white light that is installed at the end of a boat. A vessel that is over 7 m or 23 ft in length is expected to show red and green sidelights when sailing. Each of these lights needs to cover an arc of 112.5°. The sidelights may be combined in one lantern at the bow when below 25 m or 65 ft. The white stern light can be seen over an arc of 135°. These lights need to be visible from a distance of a mile and need to be placed 39 inches below all white lights for boats of lengths equal to or less than 12 ft.
- Masthead Light : A combination of sidelight and stern light in a tricolor combination may be used sailing yachts of heights 20 m or lower. A masthead light is required by vessels of lengths between 39.4 ft and 65.6 ft. It is placed in the masthead whose height provides excellent visibility. Still, stern lights and sidelights should be fitted separately in case of or use under power along with steaming light. This kind of light needs to be visible across an angle of 225 degrees and from a minimum distance of 2 miles.
- Separate Lights : The displaying of the tricolor masthead light is not allowed in the case of yachts that are longer than 20 m or 65 ft. Instead, they use them separately. Often on large sailing vessels, these all-around, red over green lights are present. These red and green sidelights need to be visible from a distance of one mile and across an angle of 112.5 degrees.
- Steaming Lights Combined Lights : A combination of the masthead and stern light are used in the case of power crafts that are less than 20 m or 65 ft in length. The arrangement is present at the bow.
- Single Steaming Light : Visible over a 225 degrees arc, a masthead steaming light is used by power-driven vessels that are up to 50 m or 160 ft long. Separate stern lights and sidelights are used in case of a length exceeding 20 m or 65 ft.
- Two Steaming Lights: Power-driven vessels that span over 50 m or 160 ft in length display two masthead steaming lights. The forward light placed lower than the aft light with both of them being visible over an arc of 225° with the sidelights and separate stern light.
The area of the nautical lighting system is a precise business and requires some amount of study and a good deal of responsibility. It is because its application forms a core element in safe marine navigation.

Similar Posts

What Is Baltic Mooring?
Baltic mooring is a method of mooring done when there are strong onshore winds in which the vessel is berthed alongside (lengthwise) a quay using the ship’s anchor and onboard cables to secure it safely and reduce the impact. In Ancient times, the size of vessels along with the transportation of goods was limited. The…

Top 12 Most Famous Sunken Ships
Ships have been a part of human history since time immemorial. Over the centuries, humans have managed to design different types of ships for serving different purposes such as transport, rescue, fishing, leisure, etc. Even today, ships are an indispensable part of human life. Thousands of ships set sail every day and several are under…

M/V Blue Marlin: Heavy Lift Vessel
Passenger ships and cargo ships sure help us carry huge loads over wide areas. But what happens when they themselves need to be transported from one area to another? This is when float-on/float-off (Flo-Flo) ships or Heavy Lift Vessels like MV Blue Marlin come in handy. A terrorist attack in the year 2000 destroyed one…

What is Marine Insurance? Types & Policies
What is Marine Insurance? According to Marine Insurance Act, 1906: “An agreement whereby the insurer undertakes to indemnify the assured, in the manner and to the extent thereby agreed, against incidental to marine adventure. It may cover loss or damage to vessels, cargo or freight.” Marine insurance is a type of insurance that provides compensation…

Top 10 Biggest Ports In UAE
Let us first understand what ports are before moving on to the top major ports in UAE. A seaport is a nautical facility with one or more wharves where ships, including freight and passengers, can load and discharge cargo and passengers. It is usually found on the seashore or in an estuary, however, some well-known…

Top Shipbuilding Companies in the World
Before we reveal the list of the top shipbuilding companies in the world, let’s learn how we evaluated the companies. The shipbuilding industry has become an important factor in the global economy and its use in transportation has gained significance in the last decade. The largest shipping market in recent times is the Asia- Pacific…
Leave a Reply Cancel reply
Your email address will not be published. Required fields are marked *
Save my name, email, and website in this browser for the next time I comment.
This website uses cookies to improve your experience. We'll assume you're ok with this, but you can opt-out if you wish. Read More
Lights and shapes

Definitions
- Masthead light means a white light placed over the fore and aft centreline of the vessel showing an unbroken light over an arc of the horizon of 225° and so fixed as to show the light from right ahead to 22.5° abaft the beam on either side of the vessel.
- Sidelight means a green light on the starboard side and a red light on the port side each showing an unbroken light over an arc of the horizon of 112.5° and so fixed as to show the light from right ahead to 22.5° abaft the beam on its respective side. In a vessel of less than 20 metres in length the sidelights may be combined in one lantern carried on the fore and aft centreline of the vessel.
- Sternlight means a white light placed as nearly as practicable at the stern showing an unbroken light over an arc of the horizon of 135° and so fixed as to show the light 67.5° from right aft on each side of the vessel.
- Towing light means a yellow light having the same characteristics as the sternlight.
- All-round light means a light showing an unbroken light over an arc of the horizon of 360°.
- Flashing light means a light flashing at regular intervals at a frequency of 120 flashes or more per minute.
Colour legend
Power-driven vessel underway
A power-driven vessel underway shall exhibit:
- a masthead light forward;
- a second masthead light abaft of and higher than the forward one; except that a vessel of less than 50 metres in length shall not be obliged to exhibit such light but may do so;
- sidelights;
- a sternlight.
|
| ||
|
|
|
|
| Abeam, port side | Ahead | Astern |
|
| ||
|
|
|
|
| Abeam, port side | Ahead | Astern |
Sailing vessels underway and vessels under oars
A sailing vessel underway shall exhibit:
In a sailing vessel of less than 20 metres in length the lights may be combined in one lantern carried at or near the top of the mast where it can best be seen.
A sailing vessel underway may, in addition to the lights, exhibit at or near the top of the mast, where they can best be seen, two all-round lights in a vertical line, the upper being red and the lower green, but these lights shall not be exhibited in conjunction with the combined lantern.
4 lights configurations sailing
|
| ||
|
|
|
|
| Abeam, port side | Ahead | Astern |
|
| ||
|
|
|
|
| Abeam, port side | Ahead | Astern |
|
| ||
|
|
|
|
| Abeam, port side | Ahead | Astern |
|
| ||
|
|
|
|
| Abeam, port side | Ahead | Astern |
A sailing vessel of less than 7 metres in length shall, if practicable, exhibit the lights prescribed above, but if she does not, she shall have ready at hand an electric torch or lighted lantern showing a white light which shall be exhibited in sufficient time to prevent collision.
A vessel under oars may exhibit the lights prescribed in this Rule for sailing vessels, but if she does not, she shall have ready at hand an electric torch or lighted lantern showing a white light which shall be exhibited in sufficient time to prevent collision.
Sailing and Motoring
A vessel proceeding under sail which has her engine running shall exhibit, forward where it can best be seen, a conical shape, apex downwards. She shall exibit lights according to a power-driven vessel.
|
| Day sign | |
|
|
|
|
| Abeam, port side | Ahead | Astern |
A vessel at anchor shall according to Rule 30 (a) (b) exhibit where it can best be seen:
- in the fore part, an all-round white light or one ball;
- at or near the stern and at a lower level than the light prescribed in Rule 30(a)(i), an all-round white light.
|
| Day sign (1 black sphere) | |
|
|
|
|
| Abeam, port side | Ahead | Astern |
|
| Day sign (1 black sphere) | |
|
|
|
|
| Abeam, port side | Ahead | Astern |
|
| Day sign (1 black sphere) | |
|
|
|
|
| Abeam, port side | Ahead | Astern |
A vessel aground shall according to Rule 30 (d) exhibit the lights prescribed in Rule 30(a) or (b) and in addition, if practicable, where they can best be seen;
- two all-round red lights in a vertical line;
- three balls in a vertical line.
|
| Day sign ( black spheres) | |
|
|
|
|
| Abeam, port side | Ahead | Astern |
A power-driven vessel when towing shall exhibit:
- two masthead lights in a vertical line. When the length of the tow, measuring from the stern of the towing vessel to the after end of the tow exceeds 200 metres, three such lights in a vertical line; Rule 24 ;
- a sternlight;
- a towing light in a vertical line above the sternlight;
- when the length of the tow exceeds 200 metres, a diamond shape where it can best be seen.
| ||
| Abeam, port side | ||
|
|
|
| Ahead, Day sign (diamond shapes) | Ahead | Astern |
| ||
| Abeam, port side | ||
|
|
|
| Ahead, Day sign (diamond shapes) | Ahead | Astern |
| Abeam, port side | |
|
|
|
| Ahead, Day sign (no shapes) | Ahead | Astern |
| Abeam, port side | |
|
|
|
| Ahead, Day sign (no shapes) | Ahead | Astern |
Towing an inconspicuous, partly submerged object
An inconspicuous, partly submerged vessel or object, or combination of such vessels or objects being towed; Rule 24 (g) , shall exhibit:
- if it is less than 25 metres in breadth, one all-round white light at or near the forward end and one at or near the after end except that dracones need not exhibit a light at or near the forward end;
- if it is 25 metres or more in breadth, two additional all-round white lights at or near the extremities of its breadth;
- if it exceeds 100 metres in length, additional all-round white lights between these lights so that the distance between the lights shall not exceed 100 metres;
- a diamond shape at or near the aftermost extremity of the last vessel or object being towed and if the length of the tow exceeds 200 metres an additional diamond shape where it can best be seen and located as far forward as is practicable.
| ||
| Abeam, port side | ||
| ||
| Abeam, port side | ||
| ||
| Abeam, port side | ||
| ||
| Abeam, port side (note that often a fifth round white light in the center is added) | ||
|
| |
| Ahead | Astern | |
| ||
| Day sign, Abeam, port side | ||
Pushing from ahead or towing alongside
When a pushing vessel and a vessel being pushed ahead are rigidly connected in a composite unit they shall be regarded as a power-driven vessel and exhibit the normal lights.
A power-driven vessel when pushing ahead or towing alongside, except in the case of a composite unit; Rule 24 (c) , shall exhibit:
- two masthead lights in a vertical line;
A vessel or object being towed shall exhibit:
- Provided that any number of vessels being towed alongside or pushed in a group shall be lighted as one vessel,
- a vessel being pushed ahead, not being part of a composite unit, shall exhibit at the forward end, sidelights;
- a vessel being towed alongside shall exhibit a sternlight and at the forward end, sidelights.
| |
| Abeam, port side | |
|
|
| Ahead | Astern |
| Abeam, port side |
|
|
| Ahead | Astern |
Fishing – Trawling
A vessel engaged in fishing, whether underway or at anchor, shall exhibit only the lights and shapes prescribed below; Rule 26
A vessel when engaged in trawling, by which is meant the dragging through the water of a dredge net or other apparatus used as a fishing appliance, shall exhibit:
- two all-round lights in a vertical line, the upper being green and the lower white, or a shape consisting of two cones with their apexes together in a vertical line one above the other;
- a masthead light abaft of and higher than the all-round green light; a vessel of less than 50 metres in length shall not be obliged to exhibit such a light but may do so;
- when making way through the water, in addition to the lights prescribed hereh, sidelights and a sternlight.
- when shooting nets, white light over white light (Flag Z by day);
- when hauling nets, white light over red light (Flag G by day);
- When nets are caught on the bottom, red light over red light (Flag P by day).
| Day sign | |
|
|
|
| Abeam, port side | Ahead | Astern |
| Day sign • | |
|
|
|
| Abeam, port side | Ahead | Astern |
| Day sign • | |
|
|
|
| Abeam, port side | Ahead | Astern |
| Day sign • | |
|
|
|
| Abeam, port side | Ahead | Astern |
Trawling in span
When pair trawling, each vessel shows searchlights on water aiming forward ( Flag T by day); Rule 26 (f) (b)ǂ(2)
|
|
| Ahead | Astern |
Fishing, other than trawling
A vessel engaged in fishing, other than trawling , according to Rule 26 (c) shall exhibit:
- two all-round lights in a vertical line, the upper being red and the lower white, or a shape consisting of two cones with apexes together in a vertical line one above the other;
- when there is outlying gear extending more than 150 metres horizontally from the vessel, an all-round white light or a cone apex upwards in the direction of the gear;
- when making way through the water, in addition to the lights prescribed here, sidelights and a sternlight.
| Day sign | |
|
|
|
| Abeam, port side | Ahead | Astern |
Purse seining
Purse Seiners will exhibit two all-round yellow lights in a vertical line, flashing alternately; Rule 26 (f) 3ǂ(iii)
|
|
|
| Abeam, port side | Ahead | Astern |
Constrained by draught
A vessel constrained by her draught / draft may, (and not “shall”!) in addition to the lights prescribed for power-driven vessels, exhibit where they can best be seen three all-round red lights in a vertical line, or as day sign a cylinder, Rule 28
| Day sign (black vertical cylinder) | |
|
|
|
| Abeam, port side | Ahead | Astern |
Not under command
A vessel not under command, sometimes knows as a NUC N ot U nder C ommand." aria-label="Illumination" data-bs-original-title="NUC"> vessel, shall according to Rule 27(a) exhibit:
- two all-round red lights in a vertical line where they can best be seen;
- two spherical shapes in a vertical line where they can best be seen; and
- when making way through the water also normal sidelights and a sternlight (not shown in the examples below).
| Day sign (two black spheres) | |
|
|
|
| Abeam, port side | Ahead | Astern |
|
|
|
| Abeam, port side | Ahead | Astern |
Restricted in her ability to manoeuvre
A vessel restricted in her ability to manoeuvre, sometimes knows as a RAM R estricted in her A bility to M anoeuvre." aria-label="Illumination" data-bs-original-title="RAM"> vessel, except a vessel engaged in mine clearance operations , shall according to Rule 27(b) exhibit:
- three all-round lights in a vertical line where they can best be seen. The highest and lowest of these lights shall be red and the middle light shall be white;
- three shapes in a vertical line where they can best be seen. The highest and lowest of these shapes shall be balls and the middle one a diamond;
- when making way through the water, also a masthead light or lights, sidelights and a sternlight
| Day sign: two black spheres and in the middle a black diamond shape | |
|
|
|
| Abeam, port side | Ahead | Astern |
|
|
|
| Abeam, port side | Ahead | Astern |
Dredging or underwater operations
A vessel engaged in dredging or underwater operations, when restricted in her ability to manoeuvre; Rule 27(d) , shall exibit
- two all-round red lights or two balls in a vertical line to indicate the side on which the obstruction exists;
- two all-round green lights or two diamonds in a vertical line to indicate the side on which another vessel may pass; and
- when at anchor (or not making way), the lights or shapes prescribed in this section instead of the lights or shapes prescribed in Rule 30
|
|
|
| Ahead, day signs | Ahead | Astern |
|
|
|
| Ahead, day signs | Ahead | Astern |
|
|
|
| Ahead, day signs | Ahead | Astern |
Small diving vessel
or
| Day signs | |
|
|
|
| Abeam, port side | Ahead | Astern |
A vessel engaged on pilotage, according to Rule 29 , duty shall exhibit:
- at or near the masthead, two all-round lights in a vertical line, the upper being white and the lower red;
- when underway, in addition, sidelights and a sternlight; as shown in the example below.
|
|
|
| Abeam, side | Ahead | Astern |
Hovercraft, hydrofoil ferry
An air-cushion vessel when operating in non-displacement mode shall, besides a masthead light forward, (plus a masthead light abaft if longer than 50 m) sidelights and a sternlight, exhibit an all‑round flashing yellow light (faster than 2 flashes per second). Rule 23(b)
Also a hydrofoil ferry or high speed catamaran when acting as ferry is often allowed under local regulations to exhibit an all-round flashing yellow light.
|
|
|
| Abeam, port side | Ahead | Astern |
Minesweeper
A vessel engaged in mine clearance operations shall in addition to the lights prescribed for a power-driven vessel, or to the lights or shape prescribed for a vessel at anchor, exhibit three all-round green lights or three balls. One of these lights or shapes shall be exhibited near the mast head and one at each end of the fore yard. These lights or shapes indicate that it is dangerous for another vessel to approach within 1000 metres of the mine clearance vessel. Rule 27(f)
|
|
|
| Ahead, day signs (3 black spheres) | Ahead | Astern |
See all chapters
Course overview Chapter 1 – Positions Chapter 2 – Nautical chart Chapter 3 – Compass Chapter 4 – Plotting and piloting Chapter 5 – Plotting and piloting – Advanced Chapter 6 – Tides Chapter 7 – Tide prediction Chapter 8 – Currents Chapter 9 – Navigation aids Chapter 10 – Lights and Shapes
Please verify you are a human
Access to this page has been denied because we believe you are using automation tools to browse the website.
This may happen as a result of the following:
- Javascript is disabled or blocked by an extension (ad blockers for example)
- Your browser does not support cookies
Please make sure that Javascript and cookies are enabled on your browser and that you are not blocking them from loading.
Reference ID: e07f29dc-7642-11ef-baf6-097a072778eb
Powered by PerimeterX , Inc.
Boat Navigation Lights Rules: Illustrated Beginners Guide
When navigating at night, the lights on other boats are your first clue about the moving dangers around you. And your navigation lights are your first line of safety in avoiding collisions in the dark, and they tell others vessels what you are and what you are doing. The rules sound complex, but with a little understanding you can get the basics for any situation.
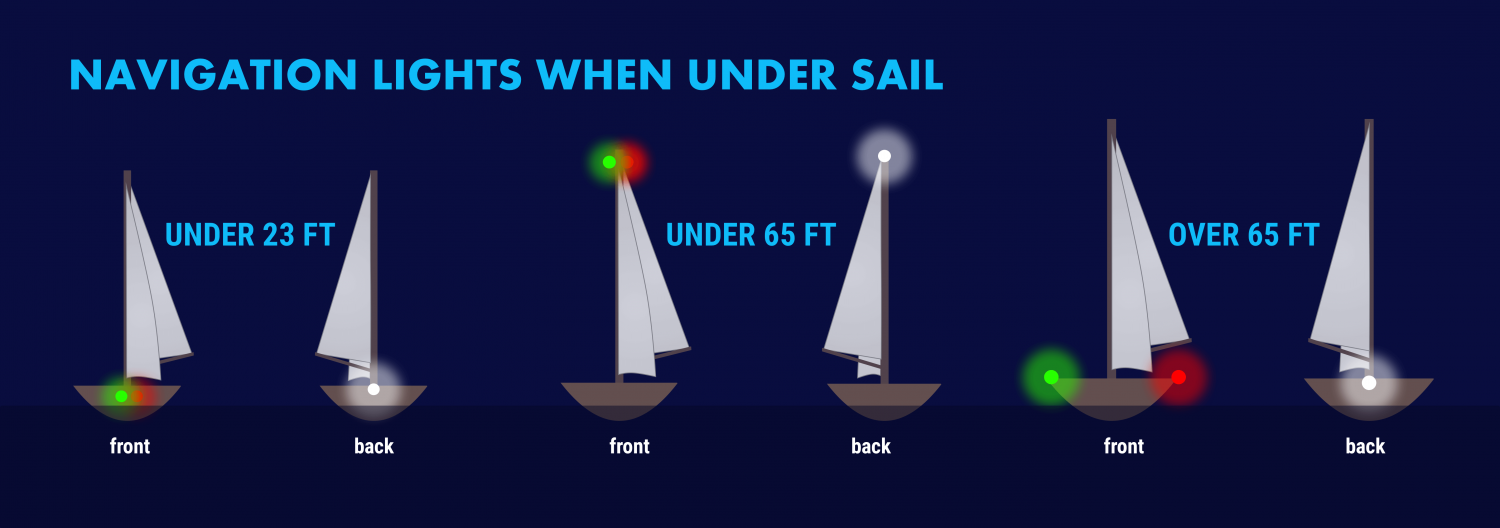
So what are the basic navigation light rules? For most small vessels, motoring requires red and green (port and starboard) lights, and a white light visible in all directions around the boat. This is almost always a stern light and a masthead light on sailboats. Boats under sail require port and starboard lights, and a white stern light. Sailboats below sixty-five feet may show a tricolor light at the masthead instead of side and stern lights when sailing.
That's it, in a nutshell. There's a little more to it, as the rules change with different sizes and there are some specifics about angles of display for the colors. Identifying other ships at sea requires more study, but the basics are the same. And it's not much trouble to make sure you've always got the proper lights on your vessel.

On this page:
What are the official colregs rules for your sailboat, what about the uscg (united states coast guard) rules, lighting at anchor, identifying the boats around you.
The International Regulations for the Prevention of Collision at Sea , abbreviated "COLREGS" is very specific about the lights required, their shapes and sizes, and the distance they must be visible. For the smaller boat, the following definitions apply.
- Masthead Light - a white light placed centerline on the boat showing an arc of 225 degrees with 112.5 degrees either side of the front of the vessel.
- Sidelights - A red light on the port side and a green light on the starboard. They must show an arc of 112.5 degrees from centerline of the bow.
- Stern light - A white light on the stern of the boat showing an unbroken arc of 135 degrees from centerline of the vessel.
- All-round light - A light showing in an unbroken arc of 360 degrees.
The good news is you need not measure these angles. Any properly installed USCG or COLREGS approved light which will cover the correct arcs. If you have to replace the original light from your boat, make sure it's with an approved replacement.
Lights When Sailing
The specific rules for a sailboat under sail are in COLREGS Rule 25 and vary slightly with the size of the boat. A sailboat powering is considered a power boat and falls under in Rule 23.
- Under 23 feet (7 meters) - side lights and a stern light, possible. If these lights can not be displayed a light must be kept at hand to help avoid a collision. This can be a bright flashlight.
- Over 23 feet - Side lights visible to one nautical mile and stern light visible for two.
- Vessels under 65 feet may combine both sidelights into a single lantern on the bow.
- May show a tricolor light on the masthead instead of sidelights and a stern light. It's one or the other though, do not show these lights at the same time .
- Masthead light must be visible for three nautical miles, all other lights must have a two nautical mile visibility.
- Side lights must be separated.
- May not show a masthead tricolor light.
- Masthead light must have five nautical mile visibility, all other lights must be visible for two nautical miles.
- Optional masthead lights - any vessel under sail may display a red light over a green light at the masthead with sidelights and stern light. The red over green may NOT be displayed with a masthead tricolor light. It's one set or the other.
Lights When Motoring
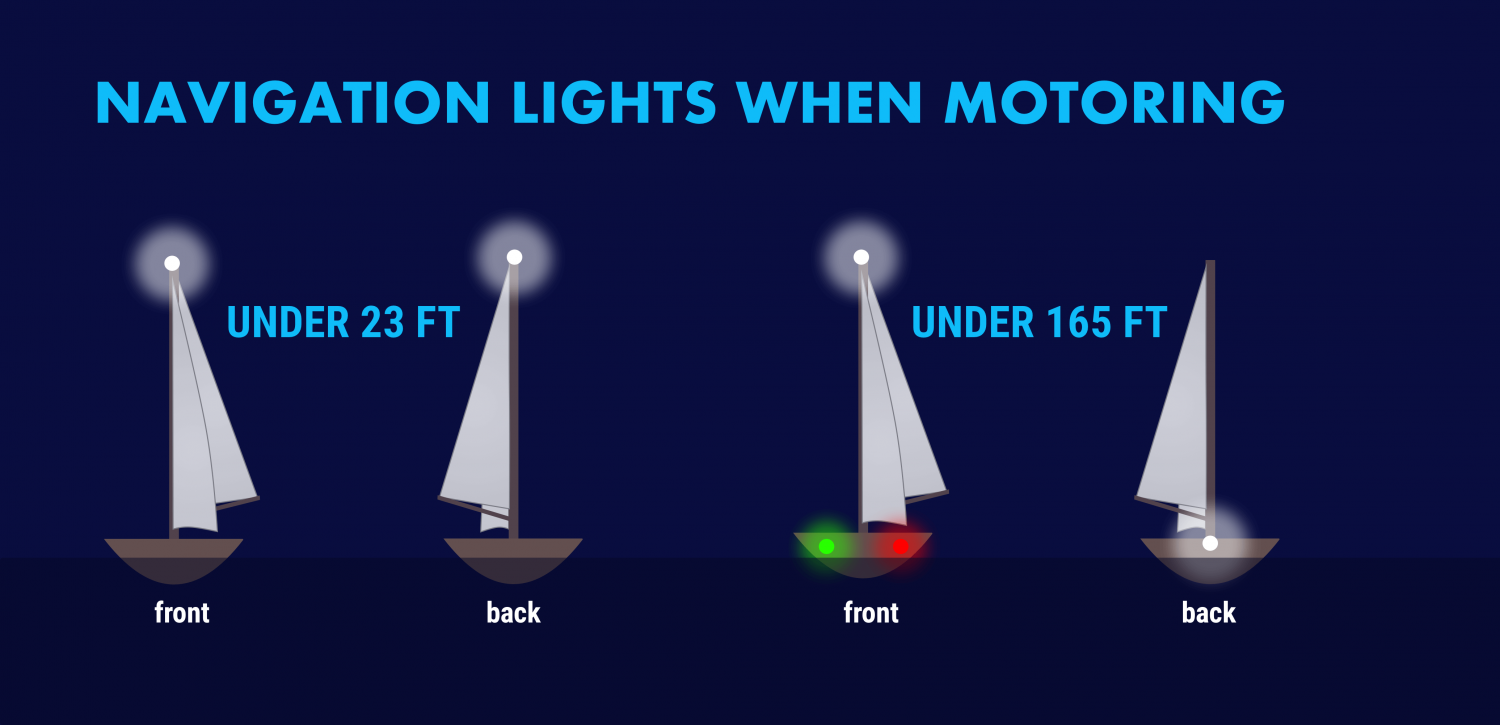
For all navigational purposes a sailboat under power is considered a power boat. This includes motor sailing - if the engine is on and providing propulsion you are on a power boat, even if the sails are up . This applies to navigation lighting, sound signals in fog and limited visibility, and rights of way.
Sailboats under 50 meters under power need to show:
- A masthead light
- Stern light
A power-driven vessel under 23 feet (7 meters) that does not exceed seven knots of speed may display an all around white light, though sidelights should be used if available.

The USCG has published its own "Rules of the Road" that are based on the COLREGS. In addition, it has rules for the "Inland Waterways" for rivers, inland lakes and the Great Lakes.
The good news is this has no impact on what you have to do with your own boat.
They mostly relate to lighting changes on towed vessels like barges and tugs. For example, a vessel towing or pushing another vessel in the ocean under COLREGS shows two masthead lights, sidelights and a stern light, whereas in Inland Waterways the towing or pushing vessel displays two yellow towing lights instead of a white stern light.
If you sail on lakes, rivers or the Great Lakes where towed commercial traffic is common you should learn the inland lights, but coastal or ocean sailors will never see these.
When you anchor outside a designated mooring field, you should display an all around white light at the masthead or as high in the boat as practical.
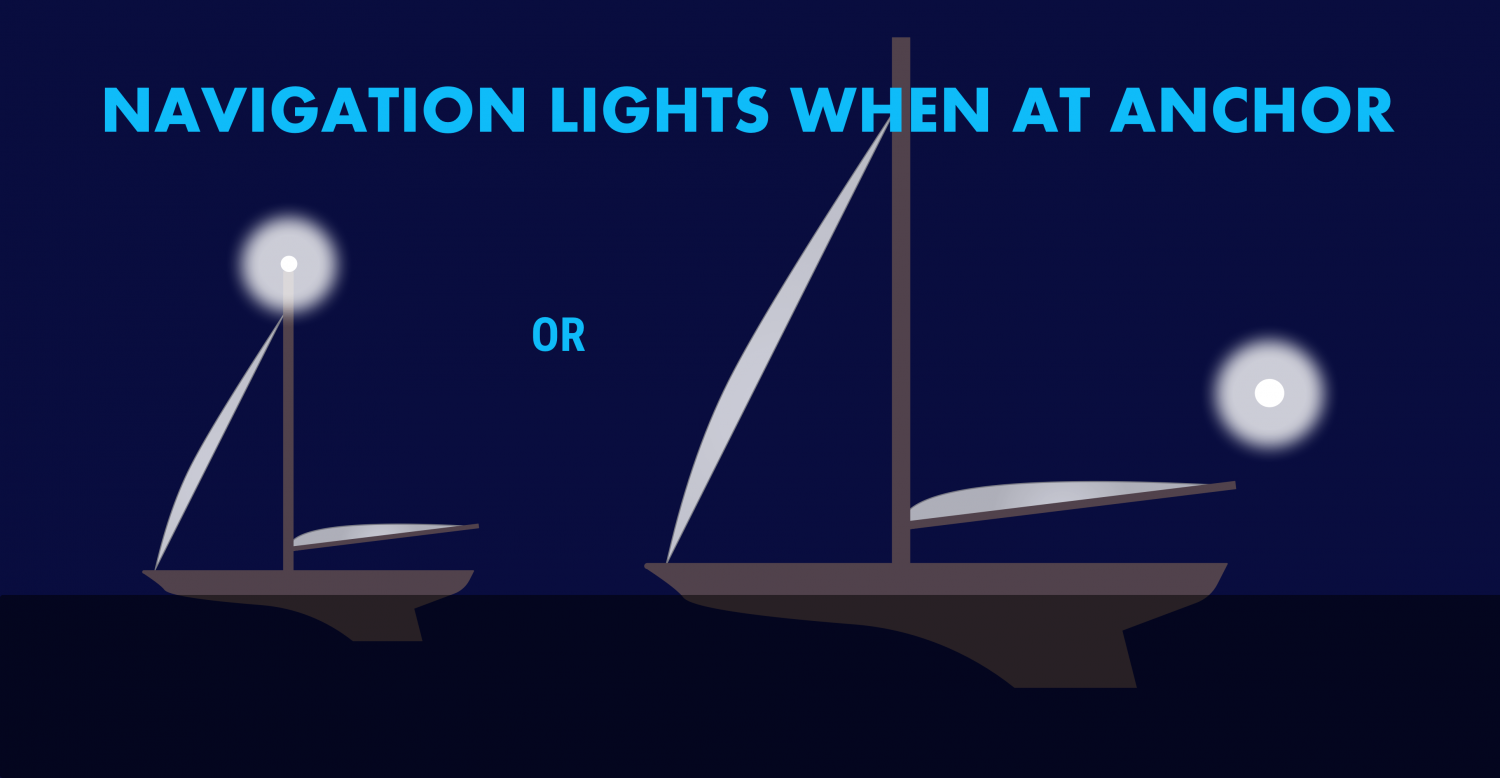
If your boat is large and has a very tall mast, you may wish to display another light closer to the waterline. Boats approaching in the dark may not see a light on a mast sixty or seventy feet in the air when they are close to your boat.
We use a simple garden path light on our stern when we anchor, left in a rod holder or flag socket. It comes on automatically at dusk and is a cheap and easy way to be more visible. There is no specific rule stating you can not display more lights than required, or the nature of any lights beyond the required all around light.
The COLREGS also specify that a round black "daymark" should be displayed in the rigging of any vessel at anchor. Very few small vessels observe this, however it is the correct display for a vessel in an anchorage.
If you tie to a mooring in a marked mooring area you are not required to display anchor lights, but there is no harm in doing so.
The other important reason to know your lights is to figure out what's going on around you at night. The water may be ablaze with white, red, green and other lights at night and they are your first key to avoiding collisions and problems.
All combinations of lights for fishing boats, commercial vessels, and so on are outside this post‘s scope. The odds are small you will encounter a submarine, seaplane or hovercraft at night, but there are regulations regarding specific lighting for each of those vessels!
There are a few fundamentals to help you figure out what that is you see on the horizon, which way it is going, and whether it is a danger to you.
Port Wine is Red
The fundamental rule is that red sidelights will ALWAYS be on the port side of a vessel, and green lights will always be on starboard. However, some vessels can use all around red and green lights for other purposes, though those will be higher than sidelights.

The light‘s on a ship is not important, some large tankers and freighters will have their sidelights far aft and put them on the superstructure for better visibility. It is not safe to assume that sidelights you can see are on the bow of large vessels .
When you can see the color, you know which way the bow is pointing. If it's red, it's pointing more or less to the left and will travel in that direction. A green light shows it is heading more or less to your right.
If you can see the red and green lights at the same time, you are looking directly at the bow of the vessel. When you are far away, this isn‘t as alarming as if you are close crossing. Seeing red and green lights together on a vessel is something you never want to see for long.
Be aware of red and green lights used in combination with other red, green and white lights. These may not be running lights and could have other significance.
Tankers, Freighters and Large Ships
Tankers, freighters and large ships will have side lights, a stern light and a masthead light. In addition, on vessels over 50 meters there will be a second masthead light further aft and higher than the forward light. The masthead light positions are a better tipoff to the bow direction and how far from the bow the sidelights might be. Remember - on a large vessel the sidelights may not be at the bow or even close to it.
USCG Inland Rules allow for a second all-around white light on large vessels on the Great Lakes instead of a second masthead light.
Fishing Boats
Fishing boats engaged in fishing will have more complex light displays. When they aren't fishing, they will show lights like any power vessel, but Rule 26 spells out light combinations that vary by the fishing activity being done. In general:
- Boats which are Trawling but not making headway will display a green all-around light over a white all-around light , and a masthead light aft of these lights. Boats making headway while trawling will show these lights, plus sidelights and a stern light.
- A vessel fishing other than trawling will show a red all-around light over a white all-around light . When making way they will also show sidelights and a stern light.
- If a vessel has gear more than 150 meters away from the boat, it will show a second all around light in the direction of the gear. The best rule is to give fishing boats as wide a berth as you can at night. They're easy to pick out if you check the top light configurations but their course may be difficult to predict.
Towing and Pushing
Towed vessels can be the most dangerous to cross, but they have the most lights to tell you what is happening. Refer to COLREGS or the USCG Rules of the Road Rule 24 for all combinations You can pick a tow/push vessel out with the following lights:
- Two or three masthead lights in a vertical line. Three masthead lights shows a tow over 200 meters. Additional masthead lights may show for larger tow vessels.
- A towing light (yellow light with the same characteristics as a stern light) directly above the stern light.
- The will also have side lights and a stern light.
- The towed vessel will show sidelights and a stern light. Lighting may vary under USCG inland rules, where towing lights may replace stern lights. Learn these differences if this is your regular cruising ground. If you think there is a tow ahead of you, always go well behind the aft most set of lights. Never go between a tow and avoid crossing ahead if possible as it may restrict their maneuverability.
Special Situations
There are several rare situations you may encounter. As a general rule, if there are a lot of lights and you don't understand them look for the sidelights on a moving vessel. If you can find them and figure out the direction it is moving, it makes the vessel easier to avoid. Stay well clear of lights you do not understand if you can avoid them without risk.
Most of these signals are used by larger, commercial vessels and you will not need them.
They use these light combinations with other light combinations. For example a towing vessel may also be restricted in maneuverability, and a vessel constrained by draft will show running lights if moving.
- Not Under Command - two all around red lights in a single line
- Restricted in Ability to Maneuver - red, white then red in a single line
- Constrained by draft - three all around red lights

Leave a comment
You may also like, 17 sailboat types explained: how to recognize them.
Ever wondered what type of sailboat you're looking at? Identifying sailboats isn't hard, you just have to know what to look for. In this article, I'll help you.

The Ultimate Guide to Sail Types and Rigs (with Pictures)
Boat Lighting – Complete Guide to Navigation Lights
I was sitting in the garage the other day admiring my boat when I noticed the green navigation light on the side of the hull, and it dawned on me that I haven’t had the boat out after sunset yet. It also got me wondering about the different places I’d like to travel this summer and what it would be like to navigate in the dark if I had to.
In addition to the legally required lights, I highly recommend having a marine waterproof spotlight in your boat at all times ( this is the one I prefer, which you can buy on Amazon with tons of good reviews ). The little headlight on a boat is nowhere near bright enough to safely navigate if you get caught on the water at night. Trust me, it can save you thousands in boat repairs and a dangerous situation.
I wanted to make sure that I fully understood everything there was to know about navigation lights, so I did some online research. I’ve put together a complete guide of the information I found online talking about the different navigation lights and what I needed to know about them.
What Are Navigation Lights On a Boat?
Boats require specific lighting configuration when operating between sunset and sunrise, or at times when visibility is restricted such as when it’s raining or foggy. Navigation lights are used to help other boaters see you when visibility is reduced, and it allows you also to see the other boaters to avoid collisions.
Navigation lights are also used to communicate with the other boats sharing the water. For example, the navigation lights can tell another boater, what size your vessel is, and in which direction you are heading. This information can be used by the boat caption to determine what the appropriate course of action would be as you approach each other.
By law, the navigation lights come in specific colors; white, red, and green. Even the arc of the illuminated light, the range of visibility, and the location is all specific to what type of vessel you are operating.
Do not assume that your boat came with the appropriate lighting or equipment from the factory or showroom. It is your responsibility to make sure that your boat has the proper navigation lighting configuration before you head out on the water.
What Type Of Boats Requires Navigation Lights?
Basically, in a nutshell, all boats require navigation lights if you’ll be operating them between sunset and sunrise, or whenever visibility is reduced.
This goes for the following types of vessels:
- Motorized vessels
- Non-motorized vessels
- Sailing vessels (Operating under sails)
- Sailing vessels (Operating under motor power)
- Vessels engaged in fishing
- Vessels engaged in trawling
- Towing vessels
- Anchored vessels
- Human-powered vessels such as Rowboats (Kayaks and canoes)
What Lights Are Required On a Boat?
Boats are required to have navigation lights. Navigation lights are required whenever you are operating your vessel between sunset and sunrise, or during any other times when your visibility is restricted from elements such as fog or rain.
The type of lights required depends on the length of your vessel as well as if it’s a powered or non-powered vessel. But in general, all navigation lighting systems will consist of red and green sidelights, as well as one or more white lights. A red sidelight indicates the port side of the vessel, while a green light shows the starboard side of the vessel. The white light in most cases is called an all-around light, which means it can be seen from any angle by other boaters.
Another type of navigation light is a yellow light. A yellow light is not very common to see, but if you do happen to see one, it would mean that a lead boat is towing another boat.
It is your responsibility to make sure you have the proper navigation lighting. It is also recommended that you take spare bulbs with you. The USCG doesn’t care if the lights were working when you left, they only care that the lights are not working when they are required.
Lights Required For Power Vessels Underway:
A powered vessel includes all motorized boats, including sailboats that use a motor.
Vessel length: Under 12 meters (39.4 FT.) Lighting requirement:
- One all-around white light that is visible at 360 degrees, and can be seen from two miles away. The all-around white light must be mounted at least 39 inches above the side lights.
- A pair of red and green sidelights that are visible 112.5 degrees and can be seen at least one mile away.
Vessel length: 12 meters to 20 meters (39.4 FT. to 65.6 FT.) Lighting requirement:
- A white masthead light located at the front of the boat, pointing in the direction you are traveling. This must be visible at 225 degrees and from two miles away. The masthead light must be positioned at least 8 feet above the gunnel.
- A white stern light located at the rear of the boat that is visible at 135 degrees and can be seen from 2 miles away.
Lights Required For Non-powered Vessels Underway:
A non-powered vessel includes sailing vessels and all other types of vessels that don’t have motors such as paddled, poled, or rowed.
Vessel length: Under 7 meters (23 FT.) Lighting requirement:
- You are required to display a white light that can be seen by other boats. White light could consist of a flashlight, torchlight, or lantern.
- If you can, it is recommended that you have an onboard 360-degree white light all-around set on the horizon, with a distance of at least two miles.
Vessel length: Over 7 meters (23 FT.) – NEED 3 IMAGES Lighting requirement:
- A pair of red and green sidelights, that are visible 112.5 degrees and can be seen at least one mile away.
- Alternatively, for sailboats of that are over 7 meters in length, they can display what is called a tricolor light A tricolor light can only be used while the vessel is underway using sails alone and never while underway by power. This light should also never be used at the same time that the regular sidelights are on. Either the tricolor light or sidelights can be displayed, but never both.
Lights Required For Vessels At Anchor (Less Than 50 Meters):
This rule applies if you are anchored away from a designated area such as a marina.
Vessel length: 12 meters to 20 meters (39.4 FT. to 65.6 FT.) Lighting requirement:
- White all-around light is required to be used so you are visible to other ships that could be in the area.
Due to variances in state boating laws/regulations, NASBLA does not provide state-specific information. You may contact your state boating office for the most accurate information. Contact information can be found here: https://www.nasbla.org/about-nasbla/boating-contacts .
Understanding The Difference Between Port And Starboard Lights
While standing on the deck and facing the front of the ship, the left side is called the Port and the right side is called the Starboard. The port is always red , while the starboard is always green .
This information is crucial to understand if you ever find yourself trying to navigate the waters at night or while your visibility is limited. For example, if you are sailing towards another vessel, you will be able to tell if that vessel is heading towards you, or if it is heading away from you based on which side the green and red lights appear to you.
If you see a red light coming towards you, that would mean the other boat is on your right, which means that boat would have the right of way. If you see a green light from an oncoming vessel than you would know that it’s on your left, which means you have the right of way.
When Should Navigation Lights Be Displayed On a Boat?
Navigation lights are required to be displayed in between sunset and sunrise, and anytime that visibility is restricted. For example, due to fog or rain.
Where Can You Buy Navigation Lights?
As discussed earlier, not all boats automatically come with the proper display of navigation lights. It is your responsibility to ensure that your boat has all of the proper equipment for your safety and the safety of others.
The prices for navigation lights will vary anywhere between $9.00 to $100.00 depending on what style and manufacturer you buy. You could even spend as much as $500.00 on some of the higher-end navigation lightings. Be sure to shop around and take a look at what is available, to ensure that you are finding the best lights, at the best prices.
Definitions
All-Round Light: White (32pt/ 360°) Masthead Light: White (20pt/ 225°) Sidelights: Red (10pt/ 112.5°) & Green (10pt/ 112.5°) Stern Light: White (12pt/ 135°)
Similar Posts

What Is a Boat Rooster Tail and How You Can Make One
The term rooster tail is used in fluid dynamics, meteorology, and automotive gear shifting. But in this article, we are going to talk about rooster tail related to fluid dynamics. In fluid dynamics, a rooster tail lies directly in the wake of an object such as a boat traveling within the water and is accompanied…

Can a Boat Battery Freeze – Winterizing Marine Batteries
With winter now upon us, one of the questions you might all be asking yourself is whether or not a boat battery can freeze, and what should you be doing about it? The answer is: Boat batteries can freeze. In fact, any battery can freeze if it gets cold enough. If a boat is being…

How to Get Internet on a Boat – While Docked or At Sea
In the 21st century, you can hardly stay away from the internet without losing your relevance to the world. You need to check your emails and stay up to date on global news on the internet. As a matter of fact, it is important that you stay online, on social networks to connect with your…

Where To Mount The Boat Compass
The boat compass is imperative for proper navigation, but if you want to read it properly, you have to know where to put it. A lot of people are confused, and they end up placing the boat compass in the wrong place. The compass should be mounted on the ship in front of the helmsman….

What You Should Know to Make Your Boat Go Faster
Deep down I think we all have a love for going fast, and for some people that love for speed shouldn’t be limited to the speed the manufacturer bestows upon you when you purchase your boat. Making your boat go faster is more than just an engine overhaul or buying the most powerful asset on…

Which Boat Seat is Right For You
When it comes to boat seats there’s more to them then you think. There are many different styles and levels of comfort to choose from, similar to how there are many different styles of couches or recliners you can buy for your living room at home. Picking the right seat for you depends on you…
Your browser is out-of-date! You must upgrade to a different browser to experience this site.
All Chapters
- Boating Terminology
- Boat Hull Types & Designs
- Boat Engine Types Explained
- Boat Size Classifications
- Boat Capacity
- Hull Identification Numbers
- Boat Registration & Titling
- Life Jacket Types & Designs
- Children's Life Jacket Recommendations & Requirements
- PFD Rules & Requirements
- Life Jacket Fitting & Care Guidelines
- Inflatable PFD Types & Tip
- Boat Fire Extinguishers
- Boat Backfire Flame Arrestor
Boat Ventilation Systems
Boat Navigation Light Types & Requirements
Unpowered Boat Navigation Lights
- Visual Distress Signals
- Marine Distress Signals
- Weather Conditions
- Small Craft Advisory
- Boat Maintenance Tips
- Towing & Trailering
- Launching & Retrieving
- Pre-departure Checklist
- Rendering Assistance
- Capsizing/Falls Overboard
- Cold Water Immersion
- Fire Prevention
- Running Aground Prevention
- Accident Reports
This site requires JavaScript. Your browser either doesn’t support JavaScript or you have it turned off.
For this page to function correctly, please enable JavaScript and then refresh the page.
Boat Navigation Lights
One of the most important safety systems on your boat is your set of navigation lights.
Whenever you are operating between sunset and sunrise, or in other times of restricted visibility, such as in fog or rain, you need to display the appropriate navigation lights so that other boats can see you and take the appropriate action to avoid a collision.
In general, all navigation light systems include red and green sidelights, which indicate the port and starboard side of your boat, as well as one or more white lights.
It's also important that you have a flashlight on board, as you never know when a navigation light might burn out. The rules for what navigation lights to display depend on a number of factors including:
- The length of your boat: e.g. under or over 12 meters;
- Whether your boat is being powered by an engine;
- Where you're boating, e.g. inland or international waters; and
- Whether you at anchor.
For now, remember that it's your responsibility to have the proper navigation lighting. Even if you just purchased a new boat, you should check to ensure that you've got the right lights for safe, and legal, boating.
Powered Boat Navigation Lights
When operating between sunset and sunrise, or in periods of restricted visibility, powered recreational boats require the following set of navigation lights. Remember, these power boat light requirements also apply to sailboats when using a motor.
For powered boats less than 39.4 feet, or 12 meters, you need to have the following set of navigation lights.
- One all-around white light that you can see from 360 degrees and from two miles away;
- And one pair of red and green sidelights that are visible at 112.5 degrees and from one mile away.
For boats of this size, the all-around white light needs to be positioned at a height of at least 39 inches above the sidelights.
Figure A shows a boat with this setup.
- All-around white light - 360 degrees visable from two miles.
- Sidelights — 112.5 degrees visible from one mile
If your boat is greater than 39.4 feet but less than 65.6 feet, or 20 meters, you need the following set of navigation lights:
- A masthead light is a white light at the front of the boat. The masthead light needs to be visible across 225 degrees and from two miles away.
- A stern light, which is a white light at the rear of the boat. The stern light needs to be visible across 135 degrees and from two miles away. When the masthead light and the stern light are combined, that makes up 360 degrees.
- Finally, you need one pair red and green sidelights that are visible across 112.5 degrees and from a distance of one mile.
For boats of this size, the masthead light must be positioned at a height of at least 8 feet above the gunnel.
Figure B shows this configuration.
- Masthead light (foward) - 225 degrees visible from two miles.
- Sternlight (aft) - 135 degrees visible from two miles.
- Sidelights - 112.5 degrees visible from one mile.
Boat Navigation Lights at Anchor
We've covered what navigation lights you need to have when you are underway, but what about when you're at anchor?
When your boat is at anchor, but you are not in a designated anchoring area, like at a marina, you need to make sure that you are visible to other boats that may be operating nearby.
When anchoring in these areas, you are required to display an all-around white light where it will be best seen by any other boats in the area.
Navigation Light Requirements for Anchored Vessels

- Pontoon Boats
- Personal Watercraft
- nauticalknowhow
- Nautical Knots
- Tools and Calculators
Understanding Boat Navigation Lights

Boat navigation lights are essential when you’re out on the water. They’re essential, but it’s easy to misunderstand their uses and correct placements.
If you don’t know the correct placement for your stern lights or know what type of navigation light you need on your mast, don’t worry: we’re here to help. Below, we’ve got an overview of everything you need to know about boat navigation lights: what type of navigation lights you need, where to put them, and why you need to use them.
So without further ado, let’s learn more about boat navigation lights.
What navigation lights are required on a boat?
The U.S. Coast Guard Navigation Rules, International-Inland encompasses lighting requirements for every description of watercraft. The information provided there is intended for powerboats and sailing vessels less than 20 meters. The various options are illustrated.
The U.S. Inland Rules apply inside the demarcation lines at the entrances to inlets, bays, rivers, etc. The demarcation lines are shown on coastal charts as magenta dashed lines. Once outside of the demarcation lines, International Rules apply.
Powered Vessels
Power boats less than 20 meters shall exhibit navigation lights as shown in Figure 1. (Note: 2 masthead lights are optional for vessels under 50 meters. Vessels over 50 meters will display two masthead lights.)
Vessels of less than 12 meters in length, may show the lights in either Figure 1 or Figure 2.
Powerboats less than 7 meters whose maximum speed cannot exceed 7 knots may exhibit an all-round white light, and if practicable sidelights instead of the lights prescribed above, in international waters only.
Sailing Vessels and Vessels Under Oars
Sailing vessels less than 20 meters may exhibit the navigation lights shown in Figures 3 or 4.
Another option for sailboats is to use a single combination lamp at the top of the mast as shown in Figure 5.
Sailing vessels less than 7 meters may carry an electric torch or lit lantern showing a white light to be displayed in time to prevent collision (see Figure 6 – left picture).
If possible, the lights prescribed for sailing vessels less than 20 meters should be displayed.
Vessels under oars may display the lights prescribed for sailing vessels, but if not, must have ready at hand an electric torch or lighted lantern showing a white light to be displayed in time to prevent collision (see Figure 6 – right picture).
Small boats can benefit from using a temporary LED light with a suction cup attachment if permanent fixings aren’t possible.
Shapes and Lights
To alert other vessels of conditions that may be hazardous, there are requirements to display lights at night and shapes during the day.
Anchored Vessels
Powered vessels and sailing vessels at anchor must display anchor lights. An anchor light for a boat less than 50 meters in length is an all-around white light visible for 2 miles exhibited where it can best be seen (see Figure 7).
Vessels at anchor shall exhibit forward where best seen, a ball shape (see Figure 8).
Vessels less than 7 meters are not required to display anchor lights or day shapes unless anchored in or near a narrow channel, fairway or anchorage, or where other vessels normally navigate.
Anchor lights are not required on vessels less than 20 meters, anchored in special anchorages in inland waters designated by the Secretary of Transportation.
Sailing Vessels Under Power
Vessels under sail also being propelled by machinery, must exhibit forward where best seen, a conical shape with the apex pointing down (see Figure 9).
Vessels less than 12 meters are not required to exhibit the dayshape in inland waters.
Sailing vessels operating under machinery, or under sail and machinery are considered as powered boats and must display the lights prescribed for a power-driven vessel.
Restricted Maneuverability
The Navigation Rules require vessels restricted in their ability to maneuver to display appropriate day shapes or lights. To meet this requirement, recreational vessels engaged in diving activities may exhibit a rigid replica of the international code flag “A” not less than one meter in height or at night display the navigation lights shown in Figure 10.
This requirement does not affect the use of a red and white divers flag which may be required by state or local law to mark a diver’s location. The “A” flag is a navigation signal indicating the vessel’s restricted maneuverability and does not pertain to the diver.
Navigation lights should be checked prior to departing the dock and you should always carry spare bulbs. The USCG doesn’t care if they were working when you left, only that they are working when required.
Where do navigation lights go on a boat?
The current navigation light requirements are found in the Navigation Rules, International-Inland, and in Parts 81, 84, and 89 of Title 33, Code of Federal Regulations . They’re easy to find, but many sailors and boat manufacturers do not have a good understanding of the rules governing the proper installation of navigation lights. To help clear up any misunderstandings here’s all you need to know:
Sidelights that are installed in the contour of the bow without providing a mounting surface tooled to be parallel with the fore and aft centreline of the boat are not in compliance with the Inland or International Navigation Rules. Depending on the breadth of the boat near the bow and how far aft from the vessel’s stem the lights are mounted, this shift can be more than 20 degrees in some cases. Installing the fixtures too far aft of the vessel’s stem may result in the sidelights not being visible from a position dead ahead.
Another factor in the proper installation of sidelights is that they must maintain their required minimum intensity in a vertical sector from 5 degrees above to 5 degrees below the horizontal. They must also maintain at least 60 percent of their minimum required intensity from 7.5 degrees above to 7.5 degrees below the horizontal. Installing flush-mounted sidelights, designed to be mounted to a vertical surface in the hull contour, without providing a mounting surface tooled to be vertical, shifts the vertical coverage sector. This also results in non-compliance with the Inland or International Navigation Rules.
Additionally, most of these flush-mounted sidelights are installed below the vessel’s rub rail. International Navigation Rules require that sidelights be installed above the uppermost continuous deck. Therefore, this configuration would not be in compliance with International Navigation Rules.
When separate red and green sidelight fixtures are used, the masthead light or all-round white light, whichever configuration is installed, must be located as close as practical to the vessel’s fore and aft centerline. For vessels less than 12 meters in length, the masthead light or round lights may be displaced from the fore and aft centerline providing that the sidelights are contained within a common fixture and mounted on the vessel’s fore and aft centerline. The masthead or round lights must be installed at least one meter (3.3 ft.) above the sidelights.
Which navigation lights are you required to display when anchoring your boat for the night?
Boating at night (or in reduced visibility) can present some special challenges. Not only is your depth perception lessened, but bright lights on the shore can also cast misleading reflections on the water and if you wear glasses, or worse yet bifocals, you simply don’t see as well at night as you do during the day.
It is not only important that you be able to identify other vessels operating in your proximity, it is equally important that other vessels see you. Most recreational vessels are less than 30 feet in length and, according to the Rules of the Road, shall be equipped with navigation lights.
These lights not only have a certain arc through which they can be seen but must be seen from a minimum distance. The following lighting requirements are for recreational vessels less than 12 meters in length. (approximately 39.4′)
| | ||||
| Masthead Light | 225º | White | 2 | |
| Starboard Side Light | 112.5º | Green | 1 | |
| Port Side Light | 112.5º | Red | 1 | |
| Stern Light | 135º | White | 2 |
The arc of the lights and color allows you to determine the direction a boat is moving. How good are your boat’s lights? You should test them to check your nighttime visibility, or you might land yourself in hot water with the Coast Guard.
Whether on a trailer or at the marina, switch on your lights and see how well they can be seen. Walk away from the boat or row away, if you are at anchor or at a mooring, and see how visible the lights are as you move further away. How easy are they to see against the background of lights onshore?
Does your stern light shine dead astern over the required 135º arc or does it shine to one side or up or down? Can it be seen from the required 2 miles and why is that important? As an example, let’s say that your stern lights can only be seen for 1/2 mile. You are underway at 8 knots and a large ship is approaching at 15 knots. The ship is only 4 minutes away from a collision with you. By the time the ship “might” see you, identify the light, and decide on how to move, it is too late. A ship traveling at 15 knots may take miles to stop.
Look at the stern lights again, as you move from the stern toward the bow, does the stern light “disappear” as the sidelight “appears”? The stern light should disappear and sidelight appear at 22.5º abaft the beam. If you don’t see the green starboard sidelight or the red port side light when the stern light disappears there is a problem with the arc of one or all these lights. This means that if another boat were approaching you at the angle where no lights are seen there is an increased risk of collision.
If both the stern lights and side lights are seen brightly at the same time you still have a problem. A boat approaching won’t know whether they are overtaking or crossing and whether they should give-way or stand-on.
You should also check to make sure that your masthead light disappears at the same time each side lights disappear and they both disappear when the stern light appears.
Check your sidelights from dead ahead. You should see both red and green. However, by moving toward one side just 1-3º you should then see only one light. If you still see two lights, an approaching boat won’t be able to tell which direction you’re are going.
It is very important to be seen from a distance but also for an approaching boat to be able to determine your direction of travel.
When boating at night remember the following: “When two lights you see ahead, turn your helm and show your red”.
About Chris
Outdoors, I’m in my element, especially in the water. I know the importance of being geared up for anything. I do the deep digital dive, researching gear, boats and knowhow and love keeping my readership at the helm of their passions.
Categories : nauticalknowhow

Robert Hogward on September 12, 2021
Thanks for writing this post. I can either place them on the exterior or interior for decorations. Placing them on the exterior side is helpful when I go fishing and indulging in other night activities in the water.

Dalton Bourne on July 26, 2022
We love the lights! We put lights from Seaponer on my Jon boat right above the water line and use them for night fishing! The amount of brightness it offers is an assurance of my boat’s being seen clearly during the night. At the same time, the LED lights don’t consume too much energy, leading to a life span of up to 50,000 hours.
Leave a Reply Cancel reply
Your email address will not be published. Required fields are marked *
Save my name, email, and website in this browser for the next time I comment.
More in nauticalknowhow
How to Tie a Boat to a Dock
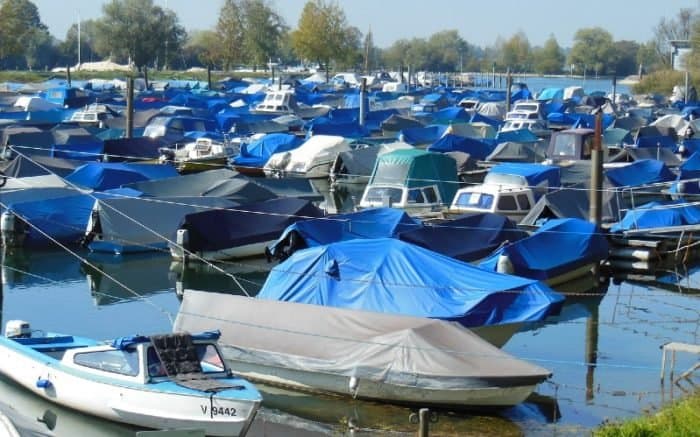
How to Clean a Boat Cover
Everything You Need to Know About Your Boat’s Bilge Pump

4 Ways to Tie Your Boat Shoes

The People’s Poncho Review and Ratings

Oru Lake Kayak Review

What Is A Gunwale?

131 of the Best Hawaiian Boat Names

167 Patriotic Boat Names
About boatsafe.
Established in 1998, BoatSafe is your independent guide into the world of boating, fishing, and watersports. We provide expert insights and detailed guides to help you find products tailored to your needs and budget.
Contact Boatsafe
- Address: 4021 West Walnut Street. Rogers, AR 72756
- Phone: (479)339-4795
- Email: [email protected]
Site Navigation
- How We Test
- Corrections Policy
- Privacy Policy
- Terms & Conditions
- Editorial Policy
- Affiliate Disclosure
Our Reviews

All content is © Copyright 2024. All rights reserved.
Navigation Light Switching for Vessels Under 20 Meters
Related products.
The possible switch configurations for navigation lights vary greatly depending on the vessel size, type, and purpose. This article addresses the most common configurations for smaller vessels.
ABYC standards state that one switch, or position of a switch, will turn on all of the navigation lights required for the vessel while underway. Another switch, or position of a switch, will turn on the anchor light. This allows the use of either 2 switches or a 3 position switch with one off position.
The most common configurations of lights are:
these can be broken down into 3 combinations:
| Combination | Navigation Lights | Anchor Light | Steaming Light | Figure # |
|---|---|---|---|---|
| A | DPST | SPST | * | 1 |
| A | DPDT | * | * | 2 |
| B (Power Boat) | SPST | SPST | * | 3 |
| B (Power Boat) | SPDT | * | * | 4 |
| B (Sailboat) | SPST | SPST | SPST | 5 |
| B (Sailboat) | DPDT | SPST | * | 6 |
| C | SPST | SPST | SPST | 7 |
| C | SPDT | SPST | * | 8 |
*included in navigation lights switch **includes navigation lights excluding masthead tri-color
| SPST – Single Pole Single Throw | |
| SPDT – Single Pole Double Throw (Center Off) | |
| DPST – Double Pole Single Throw | |
| DPDT – Double Pole Double Throw (Center Off) |
The following illustrations use a bicolor, but two sidelights can be substituted for it in the diagram. All of the double throw switches are "Center Off".


| Everything Boat Building Don't tell me that I can't. Tell me how I can. | ||
|
| ||
| I am not a spokesperson for the US Coast Guard or ABYC. For an official interpretation of regulations or standards you must contact the US Coast Guard or other organization referenced.. | ||
| or; Contact and the to get the latest standards for Electrical systems. Info about ; Or go to the Basic Electricity Pages below. | ||
14 Steps To Wiring Your Boat
What you need to know to install or re-wire the electrical system on your boat. a step-by-step practical guide. covers planning, diagrams, wiring, batteries, over current protection and more..
I want to thank Ed Sherman for reviewing this page for accuracy.
A question often asked on boating and boat building forums, and by visitors to my web site, is: “I need a simple wiring diagram for a small outboard boat to wire up the lights and few other things, but no one seems to have one. Is there one, and where can I find it? Are there a set of step-by-step instructions?”
There are wiring diagrams, websites and forums that tell you how to wire an electrical system for large boats and bigger sailboats. But when it comes to small boats there is a distinct lack of information and diagrams for how to install a simple, safe, and reliable electrical system.
The following is meant to apply only to small outboard boats under 16 feet with 50 or 60 horsepower or less. It can be applied to slightly larger boats that have a simple 12V DC system using one or two 12V batteries.
Note 1 : I will not deal with the wiring specifically for the outboard motor and controls. Here is a web site where you can obtain wiring diagrams for most outboard motors. Most new outboards come with a wiring harness and a manual that has wiring diagrams. See Master Tech Marine Outboard Wiring Diagrams .
Note 2: If you are re-wiring a boat with an electrical system installed: Don't rip out that old system yet ! Use the old system to help make a plan in steps 1 through 7. Trace out each wire and put that on your diagram. This will make it far easier to locate wires and equipment. Wait until you actually start installing wiring in step 12. Then replace each set of wires with new. This may take a little more time, but will result in far fewer mistakes and less troubleshooting.
Note 3: Throughout this I will give references to the US Code of Federal Regulations (CFR) requirements that apply to boat manufacturers, and to the American Boat and Yacht Council industry standards. Examples: 33 CFR 183.401, or ABYC E-11. The US Coast Guard Regulations (the CFR) and the ABYC standards are good guidelines to follow for a safe and reliable electrical system. They are used by marine electricians, professional boatbuilders, designers, marine surveyors, and marine repairers. If that’s how the pros do it, so should you.
Step 1. Make a Plan. Decide what you want to install, and where it will go. See Electrical Planning
Step 2. Draw a simple electrical schematic (diagram) that shows each piece of equipment, the fuses, switches, and how all of this will be connected. This is not a diagram of where the equipment is located on the boat. That will come in Step 8. It is simply a diagram of the electrical circuits. Here are two alternative examples. (Click on the diagram to expand.) The first diagram uses a positive buss bar. The second omits the positive buss bar. For clarity I did not use color codes except red (positive) and black (negative).
Do not be concerned if you don’t know electrical symbols. Just make a box or circle and write in what it is, or you can use a picture of the item. As long as you understand what goes where, and how they are connected, it’s Ok. Remember, any 12V DC device must have at least a positive and negative wire connected to it. Put a plus or minus next to the wire or use red for positive and black for negative. On metal boats do not use the hull as a return (negative) path. Connecting your electrical system to a metal hull can result in stray current corrosion.
See also BoatUS diagram:
There are several ways to draw wiring diagrams. The most important thing is that you understand what you are diagraming. It needs to be simple enough and clear enough for you to be able to refer to it in the future and still understand what each item is, what the wiring is and how each item of equipment is connected to the electrical system. That way, in the future if you want to add or subtract equipment you can do so by referring to your diagram and determining where and how the new item fits into the system.
Step 3. Batteries: Decide where you will put the battery. Later we will decide the capacity and type of battery but for now we only need to decide where to put it.
The battery is the source of power for starting, instrumentation, and lighting. There may be a second battery on some boats for running a trolling motor or other equipment.
Batteries should not be too close to anything that can cause an accidental short. There should be 12 inches of space all around them. Batteries must not be directly under or over fuel lines or under other electrical equipment such as a charger or inverter. If they are, there must be a floor or panel separating them. ABYC E-10.7.5 and 10.7.6 Storage Batteries
Batteries need to be in a space that is ventilated to the atmosphere. 33 CFR 183.420(e) This applies to all batteries, not just lead/acid batteries.
Batteries must not move, so they have to be fastened down. 33 CFR 183.420(a)
There should be a tray under a battery for spilled electrolyte, or it should be in a battery box, and fastened down so it won’t move under any conditions. (ABYC E-10.7.2) The Coast Guard does not require a tray or a battery box but ABYC does require some means to contain spills. If it is strapped down in a tray, spilled acid won’t damage the boat and the battery won’t move. The terminals need to be covered with a boot or some other device that protects them from accidental contact with metal tools. But, if the battery is in a box the terminals are protected against accidental contact with tools, spills are contained, and it won’t move.
| | |
The battery should be close to the engine. Since starting current is so high, and the wires to the starter are not fused, you want to keep the wires as short as is practical.
The battery should be a combo starting/deep cycle battery, usually sold as a marine battery. An auto battery would do for starting and lights. But, for running a radio, and other electronics while anchored or fishing, a battery with a little deep cycle capacity is needed so the battery doesn’t go flat and leave you stranded when you try to restart the engine.
How big a battery (capacity, not physical size) do you need? That depends on the amount of load on the battery. I will show how to determine that in Step 12.
There is one non-electrical consideration; weight. Lead acid batteries can weigh up to 50 lb. Think about how the weight of the battery will affect weight distribution on your boat, especially if it is on the same side as the helm and controls. You may have to move it to balance the boat side to side. If you have a very low transom, how will the weight of the battery affect the water line at the transom?
Step 4. Battery Switch: Some people think that a battery switch is not necessary on a small boat. I think a battery switch is necessary to turn everything off when you are not using the boat.
Where the battery is located determines where the battery switch goes. It should be close to the battery but easily accessible to be switched off in an emergency. ABYC E-11.6.2.
A good brand is Perko but there are others. Avoid any battery switch that is not UL Marine Listed. There are cheap ones on the market that are not UL listed and can get hot and melt.
A battery switch must be ignition protected. (33 CFR 183.410)
Ignition protection means that it will not ignite gas fumes if they are present. This is extremely important if you have a gasoline fuel tank in the same compartment as the battery.
Use only ignition protected electrical components. You don't want anything in there that will set fuel vapors off. Batteries are not considered a source of ignition because there are no moving parts, but if you make accidental contact with metal tools it can create an arc. So, the terminals must be protected, and battery switches and other electrical equipment in this compartment must be ignition protected.
Buy a switch that has a provision for two batteries because you may want to add a battery in the future. The switch will have three positions. OFF, 1, 2, and BOTH. The 1 position connects the one battery and allows charging of that battery when the engine is running (if your outboard is large enough to have an alternator). The 2 position connects and charges the second battery, if there is one, and the BOTH position puts the two batteries in parallel doubling the battery capacity and charging both at the same time. You won’t need the BOTH and 2 positions now, but this gives you the option to add a second battery.
Step 5. Fuses: Next, install a fuse block close to the battery switch. Fuses must be within seven inches of the source of power (33 CFR 183.455) but you can go up to forty inches if the wire is sheathed. Standard wire loom is fine as a sheath. Be aware, the fuse is there to protect the wire, not the equipment. If you overload wiring it gets hot, melts and starts a fire. We will determine the size of the fuse later. See Step 12. Buy a fuse block with two fuse holders. That way you have a spare if the fuse blows. This is generally a good idea. When installing fuse blocks get ones with more fuse holders than you think you need. You will need them eventually. One or two extra fuse holders is good.
Step 6. Equipment Location: Determine where each piece of equipment will be.
Think about where you want things to go. Depth finders need to be where they are easy to see, but not blocking your vision when operating the boat. Radios should be where they can be easily reached, and for VHF, reach the mike. The back of the console or surface you are mounting them on needs to be easily accessible for access to the wiring.
Step 7 . Locate the fuses, buss bars and switch panels.
Decide where to put fuse boxes, buss bars, switch panels, etc. Each of these must be close to the equipment they power, and easily accessible to be worked on. They cannot be hidden behind equipment or inaccessible panels. This may sound obvious, but I have seen some very bad installations. Also, they should be protected from spray or rain.
Most electrical and electronic equipment comes with pigtails. Pigtails are wires coming out of the equipment and may only be a few inches to several feet long. Sometimes they have a connector attached to the ends of the wire. When determining where stuff goes consider the length of the pigtails, because you don’t want a rat’s nest of wires hanging loose.
Switch boxes: A box or panel where switches can be mounted to control stuff. On a small outboard boat this is usually the dash or the console.
Fuse block: A panel with fuse sockets on it. It can be open or covered.
Buss bar: A block with studs for connecting wires.
| A Battery Switch | FuseBlock | Buss Bar |
Typical Buss Bar: This buss bar is for the negative wires. The large wire on the left is the battery negative.
There are some devices that are connected directly to the source of power and do not go through fuse blocks and switches. They need to always have power. One is the bilge pump. Bilge pumps may have a float switch that automatically turns the pump on when water in the bilge gets to a preset height. This won’t work if the pump is not wired directly to the battery. It is not good practice to wire it directly to the battery though. Wire it to the power input side of the battery switch. It is good to install a switch at the helm that turns the pump on manually.
If your boat has an anchor light, you may also want to wire the switch for the light directly to the power input side of the battery switch. That way you can turn on the anchor light when the battery switch is off.
Step 8. Make a diagram of the boat showing where the wiring, equipment and fuse blocks will be located.
Make a rough drawing of the boat looking down from the top. This is called a general arrangement and shows how the boat is laid out. Using your electrical schematic, put in where the equipment, fuse boxes, buss bars, switch boxes and wiring are going to go. Check this against the actual boat to make sure you aren’t missing something.
Wiring cannot go through pieces of equipment, pipes, tubes, and other solid objects. They can go through walls and bulkheads and panels. Wiring must be easily accessible for installation, trouble shooting and replacement. It must be fastened down at least every 18 inches (ABYC 11.15.4.1.9) so it isn’t rubbing or chafing on something. Where wiring goes through a bulkhead, wall or panel, it must have a grommet or padding to protect the wire. 33 CFR 183.445(a)
Your diagram may look something like this; (Click on image to expand)

Step 9. Wiring: Figure out how much wire you need, what size wire you need, and what color it should be. Wire standards.
What about the wires from the battery switch to the starter? The wire needs to be a very heavy gauge, at least a 4 AWG on small outboard boats, because starters draw a lot of current. Both the positive and negative wires should be the same size. If the outboard has the wires for the starter already installed, the wires from the battery to the switch should be the same size as those wires. The engine manufacturer has determined the amount of amperage the starter draws and correctly sized the wires for the load.
The positive wire (red) goes from the battery to the input side of the battery switch. The negative (black) wire goes to a buss bar. One post on the buss is for the wire from battery to the engine block (ground). Another wire goes from the buss up forward to the dash. The others are for other equipment. There should be as many terminal posts as you need plus a few extra.
Color Codes: The positive wire should be red. Negative can be black, or yellow, or black with a yellow stripe. Throughout the boat negative wires should be black or yellow or a combination. AT the dash or console, all positive wires from the fuse block to the instruments and the equipment, should be color coded using the standard color codes for marine wiring. Direct Current Color Codes: From ABYC E-11.15.2.3 Table 11 and Table 12.
Direct Current Color Codes: From ABYC E-11.15.2.3 Table 11 and Table 12.
| Green | DC Grounding Conductor | Bonding Wires (insulated) |
| Yellow or Black | DC Negative Conductor | Negative Mains |
| Red | DC Positive | Positive Mains |
| Yellow/Red | Starting Circuit | Starting Switch to Solenoid |
| Brown/Yellow | Bilge Blowers | Fuse or Switch to Blower |
| Dark Gray | Navigation Lights | Circuit Breakers or Switch To Lights |
| Dark Gray | Tachometer | Tachometer Gauges and Senders |
| Brown | Generator Armature | Generator Armature to Regulator |
| Brown | Alternator Charge Light | Generator Terminal or Alternator Aux Terminal to Regulator |
| Brown | Pumps | Circuit Breakers or Switch to Pumps |
| Orange | Accessory Feed | Amp Mtr to Alt or Gen Output Acc Circuit Breaker Switches |
| Orange | Common Feed | Distribution Panels To Accessory Switches |
| Purple | Ignition | Ignition Switch to Coil Electrical Instrument |
| Purple | Instrument Feed | Distribution Panel To Electrical Instruments |
| Purple | Main Power Feed | Positive Mains (particularly un-fused) |
| Dark Blue | Cabin and Instruments | Circuit Breakers or Switch to Lights |
| Light Blue | Oil Pressure | Oil Pressure Gauges & Senders |
| Tan | Water Temp | Water Temp To Sender To Gauge |
| Pink | Fuel Gauge | Fuel Gauge Sender to Gauge |
| Green/stripe | Tilt Down/Trim in | Tilt and Trim Circuits |
| Blue/Stripe | Tilt Up/Trim Out | Tilt and Trim Circuits |
Color codes tell you what the wire is for. But label the wire on both ends. A simple piece of tape with a name written on it will do. They do not need to be fancy labels, but if you prefer, you can buy labels at electrical suppliers or hardware stores.
Wire must be marine wire. (33 CFR Sec. 183.435) Do not use auto wire. It is not made to the same standards as marine. Most marine wire is labeled UL 1426. It must be copper stranded wire. It does not have to be tinned, although tinned wire will last longer. On a small boat it is not necessary. Do not scrimp on wire though! Cheap wire could mean the difference between a reliable system and one that you constantly have trouble with. Buy good quality wire. I have seen 100 ft spools of Ancor 16 AWG Tinned Marine Wire for sale on-line for as little as $24.00 USD.
What size wire? American Wire Gauge (AWG) is in reverse order. The larger the number, the thinner the wire. The thickest wires are 00 or 0 AWG. The smallest gauge allowed on boats for a single wire is 16 AWG, or 18 AWG if it’s in a bundle or sheath (33CFR 183.425), but this may be way too thin for the equipment or the length of the wire run. The only exception to this is wire inside electronic devices or part of the electronic controls on the engine. 33 CFR 183.425(g)
The thicker a wire is, the less resistance it has. The longer a wire, the more resistance it has, and so there is a larger voltage drop. You want to minimize the resistance and the voltage drop. So you first need to figure out the wire size based on how many amps are being used, and then by how long the wire is. Use the tables in Appendix A, at the end of this page, to determine the correct size. Don't just guess at wire size and buy larger diameter wire such as 14 or 12 AWG. See Wire Size:
For the purpose of determining wire size, the fuse block the wire is coming from is considered the source of power. For the wires running from the battery to the starter, or to the under-dash fuse block, the battery is the source of power. In the two examples below the fuse block under the dash or console is the source of power.
Here is an example:
A Hummingbird Model 345C depth sounder draws 380ma (milliamps from the specifications). The installation includes a 6 foot power cable of 18 AWG wire. This may be fine for connecting it to a fuse block near the dash. But we need to size the cable running from the battery to the dash. It is going to be at least 10-12 feet long on a 16 foot boat. Double that length for the negative return wire.
Use table 3 in The Appendix for voltage drop. Most boat manufactures use wire rated for 105C (degrees Celsius - the temperature rating of the insulation on the wire). Looking at the table under the column for 105C we see amperages starting at 20 amps, 25 amps, 30 amps, and so on. Following the row for 20 amps to the left column we find 18 AWG.
From the table on voltage drop an 18 AWG wire 20-24 feet long (30 feet in the table) with a 15-ampere load will have less than a 10% voltage drop. But it can only be 18 if it’s in a sheath or bundle. So go up one size to 16 AWG.
Another Example:
Suppose I have three electronics running off a fuse block in the dash or console. Each piece of equipment requires 1 amp at 12 volts to run. The total amperage for the three items is 3 amps. From the fuse block in the dash or console to each item of equipment, there is a positive wire from the fuse to the equipment, and a negative wire running back to the buss. Using 1 ampere, we determine the size the wire should be, by using table 1 and 3 in Appendix A. For instance, if the positive wire is two feet long then the total length of positive and negative wires is 4 feet. Looking at the Table 1, the line for 18 AWG wire at 105C allows up to 20 amps.
So, we could use 18 AWG. Look at Table 3. We see that an 18 AWG wire, 10 feet long, will have less than a 10% voltage drop for up to 5 amperes. Again, we could use 18 AWG but since 18 AWG wire has to be in a bundle or a sheath we add a level of safety by using 16 AWG.
This is done using the tables developed by the US Coast Guard and ABYC. You don’t have to know any formulas to figure it out. The first table determines the wire size based on the load in amps and the second table the size depending on length and voltage drop. You use the larger wire if there is a difference.
See the table in Appendix A at the bottom of this page. or ELECTRICAL TABLE: 33 CFR 183.42: ALLOWABLE AMPERAGE OF CONDUCTORS FOR UNDER 50 VOLTS or: ELECTRICAL SYSTEMS VOLTAGE DROP
Step 10. Wiring tools. Wire connections (terminals). See Connectors :
Tools: Use good quality tools, especially good quality crimpers and wire strippers. Cheap crimpers make bad crimps. Bad crimps make bad connections. Poor wire strippers nick the metal conductor which may cause the wire to break or have a high resistance. See My Page on Practical:
Wire terminals must be used . Connections should never be a bare wire wrapped around a stud or post. This is bad practice, and can easily come loose or result in a high resistance connection. High resistance equals heat, which results in fire. Never use wire nuts to connect wires on a boat! They are prone to vibration and corrosion. ABYC E-11.15.3.7 Twist-on connectors (i.e., wire nuts) shall not be used.
Use crimp type ring or captive spade terminals. Captive spade terminals have a tang on the ends. This prevents them from being pulled off or slipping off the stud or post. Connections must resist being pulled off. In the ABYC wire standard there is a table listing how much of a pull they must withstand depending on the size of the wire. A 16 AWG wire must withstand a ten lb. pull. A 4 AWG wire must withstand a 70lb pull.
You can solder connections if you like but crimp them first . ABYC standards do not prohibit soldering, but they do not allow soldering to be the sole source of support for the connection. (ABYC E-11.5.3.8) This is because solder creates a hard spot in the wire which is not as flexible as the wire itself and not as resistant to flexing and vibration. So, if you solder you must also crimp. Crimp first, then solder.
Seal wire connections with a good waterproof sealant , usually marketed as dielectric grease. There is no requirement to do this, but it prevents water from getting in the connection and wicking up the inside of the wire insulation or corroding the connector.
My method. I do not solder. First I slide a short length of heat shrink tubing onto the wire. https://en.wikipedia.org/wiki/Heat-shrink_tubing How long it is depends on the wire and connector size. Usually if the tubing extends about 1/2 inch (1 centimeter) beyond the end of the connector, that is enough. Then I use dielectric grease. See Wikipedia on Dielectric grease . Dielectric grease is non-conductive grease, usually silicone that is also waterproof and can be used to seal connectors. Before crimping the wire in the connector, I squirt a little dielectric grease into the connector where the wire goes. I then insert the wire and crimp it. Then I slide the tubing down over the connector and shrink it with a heat gun or hair drier so it seals itself around the wire and connector. The combination of grease and heat shrink tubing should keep the water out.
Heat Shrink Tubing And Connectors, AAA protection, How to install and repair. http://youtu.be/jCRsx38WRw8
How to get a good crimp: Marine How to: Wire terminations: https://marinehowto.com/marine-wire-termination/
Step 11. Fuses . How big should your fuses be?
Fuses are rated by amperage and protect the wire from overheating and fire. Fuses must be rated at the same or less rating of the wire. If you have a wire that is rated at 15 amps you need a 15 amp fuse. Each circuit is rated for a certain amperage, such as 15 amps or 20 amps, and more equipment is not added to the circuit if it would cause it to draw more current than the fuse is rated for.
This can become an issue on little boats too if you have more equipment, or something like a powerful stereo system that draws a lot of amperage. Then it should have its own circuit and its own fuse for the circuit.
The question is how many fuses in the block? That depends on how much stuff you are running. I would have a fuse for the lights, one for the instrumentation, and one for any electronic devices, plus a spare. That is four. But for expansion maybe a six or 8 fuse block would be better. Again, in the future you won’t have to buy a new block. See Overcurrent Protection:
Step 12. Installing equipment .
Start with the battery, the battery switch, and the main fuse block.
Selecting a Battery: Batteries are rated by voltage and capacity. We are using a 12V battery. There are two ratings, CCA and MCA See Batteries at:
CCA Means Cold Cranking Amps. MCA means Marine Cranking Amps. These are measures of how many amps the battery can deliver for 30 seconds and maintain the voltage at 12V. Basically the higher the CCA rating the longer the battery will maintain its voltage. Batteries are also rated by amp-hours. 1 amp for 1 hour is 1 amp-hr. Generally the rating is based on how many amps the battery will discharge for 20 hours until the charge drops to 10.5 volts. The higher the amp hour rating, the longer the battery will power your equipment. Also, batteries are rated for Reserve Capacity which is how many minutes it will deliver the same voltage at 80 degrees. An average marine battery should have a Reserve Capacity of 60 to 90 minutes. Anything less is not adequate.
There are four types of batteries commonly used on boats, Wet Cell (also called lead acid, flooded, or flooded lead acid, and sometimes abbreviated FLA), AGM (Absorbed Glass Mat), Gel, and Lithium, but for now I’ll stick with the standard wet-cell battery. They are relatively inexpensive, can be purchased anywhere, and for a small boat, more than adequate. A battery with a CCA or MCA rating of 200-300 should do but we’ll determine that when we calculate the loads. See table below on how to calculate loads. Battery Capacity should be at least twice the load.
To calculate loads, list the equipment you are planning on installing. In the chart below the following items are listed. Navigation lights Bilge Pump Radio (Only when receiving) Depth Sounder engine electrical Instruments GPS Bait well pump Horn Radio TX. (VHF Marine radio. It draws more when transmitting)
Determine from the specifications for each item what the current load is in amps. Separate them into continuous loads (on all the time) and intermittent loads (only on when used). Determine how many hours they will be used. Multiply the amps times the hours to get amp hours. Add up the amp hours.
See Also Electrical Planning
| Continuous Loads | Intermittent loads | Total | ||||||
| Item | amps | hours | Amp Hours | item | amps | hours | Amp Hours | |
| Nav Lts | 1 | 8 | 8 | Horn | 1 | 0.25 | 0.25 | |
| Bilge Pump | 2 | 8 | 16 | |||||
| Radio | 1 | 8 | 8 | Radio Tx | 6 | 0.5 | 3 | |
| Depth Sndr | 0.5 | 8 | 4 | |||||
| Engine | 2 | 16 | 32 | |||||
| Instruments | 1 | 8 | 8 | |||||
| GPS | 1 | 8 | 8 | |||||
| Bait Well | 2 | 8 | 16 | |||||
| Totals | 10.5 | 100 | 7 | 3.25 | 100.3 | |||
Double the result to determine what the rating of the battery should be. For this case, 200.
Another consideration is the battery group size. Batteries come in different physical sizes. A Group 24 battery is 10 ¼ inches by 6 13/16 inches by 8 7/8 inches. A Group 27 battery is 12 1/6 inches by 6 13/16 by 8 7/8 inches. The physical size is determined mainly by how much space you have for the battery and its weight. A bigger battery weighs more. A large group size does not necessarily mean it will last longer. That is determined by the battery ratings for amp hours and reserve capacity. The most commonly used size on small boats is Group 27.
Install the battery box if you are using one, or a tray, then the battery. Now that you have installed a battery you can begin installing equipment. Install lights and electronic equipment. You want everything in place before you begin wiring. Put in switch panels and fuse blocks.
From Step 5, we need to determine the size of the main fuse at the battery. The continuous loads add up to 10.5 amps. The fuse in a DC circuit should be about 150% of the load so a 15 amp would be appropriate. (ABYC E-11.10.1.5.)
The fuses for each circuit of our example should be at least 3 amps except for the VHF radio because on transmit it draws 6 amps. So, use a 10 amp fuse for the radio circuit. Check the manufacturer's installation instructions for recommended fuse sizes for each piece of equipment. Remember, this fuse is to protect the wire to the equipment, not the equipment. Some equipment may have built in or in-line fuses for that purpose.
Step 13. Installing Wire:
Begin installing wire, starting at the battery and working outward to each fuse block and buss bar, and then on to each piece of equipment. Remember to follow the color codes and label the wires on both ends. If you decide to make any variations from your diagrams make sure you change the diagram for future reference.
Step 14. Turn on the power. Test by turning on each item, one at a time, to see if it works. Troubleshoot as you go. If there is a problem, fix it before you proceed. Once everything has been tested individually, turn on everything, one at a time, until everything is on. If a fuse blows or something doesn’t work the last item you turned on is where the problem lies. Turn everything off, fix it and then try again from the beginning.
An Excellent Article: Avoiding Boat Electrical Mistakes by Ed Sherman; Boat US Magazine https://www.boatus.com/expert-advice/expert-advice-archive/2016/august/avoiding-boat-electrical-mistakes
An excellent article by Owen Youngblood on Wiring Your Boat , from the Metal Boat Quarterly
How to Wire A Boat from New Wire Marine https://newwiremarine.com/how-to/wiring-a-boat/
The USCG Boat Builders Handbook for Electrical Systems is available on-line at https://safeafloat.com/wp-content/uploads/2021/04/I-Electrical-Systems-Final-4-14.pdf
Contact ABYC for a copy of E-11, AC and DC Electrical Systems on Boats. There is a fee. See: https://abycinc.org
Appendix A: Allowable Amperage and Voltage Drop Tables
Note: This is the table that is in the Federal Regulations. The Federal Regulation now uses the ABYC table. It is published in 33 CFR Subpart I sec 183.425. ABYC Standard E-11 has five separate tables based on how many conductors are in a wire bundle.
| Temperature Rating of Conductor Insulation | |||||||||||||
| Conductor Size English (metric) | 60 C (149 F) | 75 C (167 F) | 80 C (176 F) | 90 C (194 F) | 105 C (221 F) | 125 C (257 F) | 200 C (392 F) | ||||||
| Outside Engine space | Inside Engine Space | Outside Engine space | Inside Engine Space | Outside Engine space | Inside Engine Space | Outside Engine space | Inside Engine Space | Outside Engine space | Inside Engine Space | Outside Engine space | Inside Engine Space | Outside or Inside Engine Space | |
| 18 (0.8) | 10 | 5.8 | 10 | 7.5 | 15 | 11.7 | 20 | 16.4 | 20 | 17.0 | 25 | 22.3 | 25 |
| 16 (1) | 15 | 8.7 | 15 | 11.3 | 20 | 15.6 | 25 | 20.5 | 25 | 21.3 | 30 | 25.7 | 35 |
| 14 (2) | 20 | 11.6 | 20 | 15.0 | 25 | 19.5 | 30 | 24.6 | 35 | 29.8 | 40 | 35.6 | 45 |
| 12 (3) | 25 | 14.5 | 25 | 18.8 | 35 | 27.3 | 40 | 32.8 | 45 | 38.3 | 50 | 44.5 | 55 |
| 10 (5) | 40 | 23.2 | 40 | 30.0 | 50 | 39.0 | 55 | 45.1 | 60 | 51.0 | 70 | 62.3 | 70 |
| 8 (8) | 55 | 31.9 | 65 | 48.8 | 70 | 54.6 | 70 | 57.4 | 80 | 68.0 | 90 | 80.1 | 100 |
| 6 (13) | 80 | 46.4 | 95 | 71.3 | 100 | 78.0 | 100 | 82.0 | 120 | 102 | 125 | 111 | 135 |
| 4 (19) | 105 | 60.9 | 125 | 93.8 | 130 | 101 | 135 | 110 | 160 | 136 | 170 | 151 | 180 |
| 2 (32) | 140 | 81.2 | 170 | 127 | 175 | 138 | 180 | 147 | 210 | 178 | 225 | 200 | 240 |
| 1 (40) | 165 | 95.7 | 195 | 146 | 210 | 163 | 210 | 172 | 245 | 208 | 265 | 235 | 280 |
| 0 (50) | 195 | 113 | 230 | 172 | 245 | 191 | 245 | 200 | 285 | 242 | 305 | 271 | 325 |
| 00 (62) | 225 | 130 | 265 | 198 | 285 | 222 | 285 | 233 | 330 | 280 | 355 | 316 | 370 |
| 000 (81) | 260 | 150 | 310 | 232 | 330 | 257 | 330 | 270 | 385 | 327 | 410 | 384 | 430 |
| 0000 (103) | 300 | 174 | 380 | 270 | 385 | 300 | 385 | 315 | 445 | 378 | 475 | 422 | 510 |
Notes for the above table | |||||||
Temperature Rating of Conductor Insulation | |||||||
60oC (140oF) | 75oC (167oF) | 80oC (176oF) | 90oC (194oF) | 105oC (221oF) | 125oC (257oF) | 200oC (392oF) | |
| 1. See the following table: Temperature Rating of conductor | 0.58 | 0.75 | 0.78 | 0.82 | 0.85 | 0.89 | 1.00 |
| 2. See the following Table: Number of current carrying conductors | Correction Factor | ||||||
| 3 | 0.70 | ||||||
| 4 to 6 | 0.60 | ||||||
| 7 to 24 | 0.50 | ||||||
| 25 and above | 0.40 | ||||||
The table for voltage drop is below. This is only for 12V DC. Contact ABYC for a copy of E-11, AC and DC Electrical Systems on Boats. There is a fee. See: https://abycinc.org
This is the table to determine wire size due to voltage drop based on the length of the wire. This table is for 12 volts only. The top row is the length of the wire in feet. The first column below Total Amps, is the amount of maximum amperage. The number in the row to the right of the total Amps column, is the size of the wire for a 10% or less voltage drop. Example: 25 feet of wire (top row) at 15 amps (first column) the wire would be 14 AWG.
| |||||||||||||||||||
| Feet | 10 | 15 | 20 | 25 | 30 | 40 | 50 | 60 | 70 | 80 | 90 | 100 | 110 | 120 | 130 | 140 | 150 | 160 | 170 |
| Total Amps | 12 volt - 10% drop wire sizes gauge | ||||||||||||||||||
| 5 | 18 | 18 | 18 | 18 | 18 | 16 | 16 | 14 | 14 | 14 | 12 | 12 | 12 | 12 | 12 | 10 | 10 | 10 | 10 |
| 10 | 18 | 18 | 16 | 16 | 14 | 14 | 12 | 12 | 10 | 10 | 10 | 10 | 8 | 8 | 8 | 8 | 8 | 8 | 6 |
| 15 | 18 | 16 | 14 | 14 | 12 | 12 | 10 | 10 | 8 | 8 | 8 | 8 | 8 | 6 | 6 | 6 | 6 | 6 | 6 |
| 20 | 16 | 14 | 14 | 12 | 12 | 10 | 10 | 8 | 8 | 8 | 6 | 6 | 6 | 6 | 6 | 4 | 4 | 4 | 4 |
| 25 | 16 | 14 | 12 | 12 | 10 | 10 | 8 | 8 | 8 | 6 | 6 | 6 | 6 | 4 | 4 | 4 | 4 | 4 | 2 |
| 30 | 14 | 12 | 12 | 10 | 10 | 8 | 8 | 6 | 6 | 6 | 6 | 4 | 4 | 4 | 4 | 2 | 2 | 2 | 2 |
| 40 | 14 | 12 | 10 | 10 | 8 | 8 | 6 | 6 | 6 | 4 | 4 | 4 | 2 | 2 | 2 | 2 | 2 | 2 | 2 |
| 50 | 12 | 10 | 10 | 8 | 8 | 6 | 6 | 4 | 4 | 4 | 2 | 2 | 2 | 2 | 2 | 1 | 1 | 1 | 1 |
| 60 | 12 | 10 | 8 | 8 | 6 | 6 | 4 | 4 | 2 | 2 | 2 | 2 | 2 | 1 | 1 | 1 | 0 | 0 | 0 |
| 70 | 10 | 8 | 8 | 6 | 6 | 6 | 4 | 2 | 2 | 2 | 2 | 1 | 1 | 1 | 0 | 0 | 0 | 2/0 | 2/0 |
| 80 | 10 | 8 | 8 | 6 | 6 | 4 | 4 | 2 | 2 | 2 | 1 | 1 | 0 | 0 | 0 | 2/0 | 2/0 | 2/0 | 2/0 |
| 90 | 10 | 8 | 6 | 6 | 6 | 4 | 2 | 2 | 2 | 1 | 1 | 0 | 0 | 0 | 2/0 | 2/0 | 2/0 | 3/0 | 3/0 |
| 100 | 10 | 8 | 6 | 6 | 4 | 4 | 2 | 2 | 1 | 1 | 0 | 0 | 0 | 2/0 | 2/0 | 2/0 | 2/0 | 3/0 | 3/0 |
Navigation Lights: I added this section because many people asked for it.
Wiring Navigation Lights for boats with combination red/green bow lights and an anchor/sternlight on a pole. I have been asked many times if there is a standard wiring diagram for hooking up the lights on a small outboard or inboard boat. There are some variations on this but here is how I did it on my boat.
The below diagram is for small boats with a red/green combo light on the bow, and a single sternlight that can also be used as an anchor light. Usually these have a single switch with 3 positions; Off, 1. anchor light, 2. combo bow light, sternlight/anchor light, and instrument lights. The diagram shows a Cole-Hersee switch that is in common use, but there are other manufacturers that also make switches for this, such as BEM and Blue Seas. They all serve the same function. In this diagram the lights are wired directly to the battery. However, some people prefer to wire it through the battery switch so the battery is not discharged if the lights are accidentally left on. It is just a matter of switching the power wire from B on the lights switch, to the number one position on the battery switch.

© newboatbuilders.com 2007 All rights reserved. revised 03/17/2023
|
|
|
| This Web site may contain copyrighted material the use of which has not always been specifically authorized by the copyright owner. I am making such material available in my efforts to advance understanding of educational, economic, and scientific issues, etc. I believe this constitutes a "fair use" of any such copyrighted material as provided for in section 107 of the US Copyright Law. In accordance with Title 17 U.S.C. Section 107, the material on this Web site is distributed without profit to those who have expressed a prior interest in receiving the included information for nonprofit educational purposes. For more information see: . If you wish to use copyrighted material from this Web site for purposes of your own that go beyond "fair use", you must obtain permission from the copyright owner. |
Created with Dreamweaver 21.2 ©newboatbuilders.com 2022 All Rights Reserved

How to Wire Boat Navigation Lights
Boating is an enjoyable and relaxing way to spend time with family and friends. But it’s important to remember that safety is a top priority when out on the water. One way to ensure safety is to correctly wire your boat’s navigation lights. Properly wiring navigation lights will help you to be seen by other boaters and help you to avoid collisions. This article will explain how to wire navigation lights for a boat.
Table of Contents
W iring boat navigation lights is not a difficult task , but it does require careful attention to detail . M ake sure the navigation lights you have purchased are compatible with the wiring harness you plan to use . Y ou will need to determine the power source for the lights . This can either be a dedicated battery or the boat ’s main battery . Once you have determined the power source , you can begin to make the necessary connections .
- Gather the materials and tools needed, including the navigation lights, wire connectors, electrical tape, a switch panel, a fuse holder, a fuse, and marine-grade electrical wire.
- Determine the location for the navigation lights on your boat. The port (red) light should be mounted on the left side, the starboard (green) light on the right side, and the stern (white) light on the back.
- Run the electrical wire from the navigation lights to the switch panel. Ensure that the wire is securely fastened and protected from any potential damage.
- Connect the electrical wire to the navigation lights. Strip the ends of the wire and connect them to the appropriate terminals on each light fixture. Follow the manufacturer’s instructions for proper wiring.
- Install the switch panel in a convenient location on your boat’s control console. Connect the wires from the navigation lights to the corresponding terminals on the switch panel.
- Install a fuse holder near the switch panel. Connect the positive wire from the switch panel to one terminal of the fuse holder, and connect the other terminal to the positive terminal of the boat’s battery.
- Install a fuse of the appropriate amperage rating into the fuse holder to protect the wiring and lights from overload.
- Secure all wire connections with wire connectors and wrap them with electrical tape for added protection.
- Test the navigation lights by turning on the switch panel. Ensure that each light functions properly and illuminates the correct color.
- Double-check all connections and secure any loose wires or fasteners.
Start by connecting the positive (+ ) lead from the power source to the positive (+ ) side of the navigation light . Then connect the negative (- ) lead from the power source to the negative (- ) side of the navigation light . Finally , use waterproof connectors to secure the connections . After the wiring is complete , you can test the lights to make sure they are working properly . Following these steps should ensure that your navigation lights are properly and safely wired .

Understanding Navigation Lights Wiring
Navigation lights are lights that are used to indicate the direction and speed of a boat. They help other boaters know which direction you are heading and if you are traveling at a slow or fast speed. Navigation lights are important safety devices that must be installed and wired correctly on all boats.
This process requires the use of electrical cables and connectors, as well as tools such as wire strippers and crimpers. It is important to have a thorough understanding of electrical wiring and boat systems before attempting this task, as improper wiring can lead to hazardous situations and costly repairs. Also see our article article about best boat spotlights .The wiring process begins by running the cables from the power source to the lights, making sure to leave enough slack to allow for movement.
Cables should be connected to the lights, using the appropriate connectors and crimps. Power source should be connected to the switch, ensuring that the power flow is correct and that all connections are secure. Following these steps will ensure that the navigation lights are properly wired and will remain in working condition for years to come.
Tools and Materials Needed
Before you start wiring your navigation lights, you will need to make sure you have the right tools and materials. You will need a screwdriver, wire cutters, electrical tape, wire strippers, terminals, and a fuse.
- Wire cutters
- Wire strippers
- Electrician’s pliers
- Soldering iron
- Heat shrink tubing
- Crimping tool
Materials:
- Navigation lights
- Connectors
- Electrical tape
In order to wire navigation lights on a boat, you will need to have a few tools and materials on hand. You will need a set of wire cutters, a set of wire strippers, solder and a soldering iron, electrical tape, and marine-grade electrical connectors. You will need to acquire the appropriate size and type of wiring for your installation, as well as the navigation lights themselves.
You will also need to make sure that you understand all of the safety precautions associated with wiring and that you have the right tools to do the job. It is important to make sure that the connections are secure and that the wiring is well insulated. This will help to ensure that the wiring is safe and secure and that the navigation lights will work properly. It is important to make sure that the wiring is properly connected to the corresponding navigation light, so that the appropriate illumination is achieved. Always be sure to double check all the connections before turning on the power.
Installing the Lights

Once you have all the necessary tools and materials, you can begin to install the navigation lights. Mount the navigation lights on your boat in the correct position. Make sure they are securely fastened and that the wires are long enough to reach the battery or fuse panel.
- Gather the necessary tools and materials: screws, drill, navigation lights, electrical wires, wire cutters, electrical tape, and screwdriver.
- Determine the desired location for the navigation lights on the boat.
- Drill holes in the boat for the lights to be mounted.
- Attach the navigation lights to the boat using the screws provided.
- Connect the electrical wires from the navigation lights to the boat’s electrical system.
- Secure the electrical wires with electrical tape.
- Test the navigation lights to ensure they are working properly.
- Enjoy your newly installed navigation lights!
Installing navigation lights on a boat requires a few simple steps. Make sure the lights are the correct type for your boat, as different types of boats require different types of lights. Prepare the mounting surfaces for the lights, typically by drilling mounting holes. Then, attach the lights to the boat using screws and washers, making sure they are securely mounted. Connect the lights to the boat’s electrical system, following the manufacturer’s instructions. Once the lights are connected and powered, make sure they are working properly.
Connecting the Wires
Once the lights are mounted, it’s time to connect the wires. Start by stripping the insulation off the end of the wires. Then connect the wires to the corresponding color terminals on the navigation lights.
Connecting the wiring for navigation lights requires careful consideration of the electrical system, the type of lights used, and the necessary current draw. Identify the electrical source and ensure it is capable of supplying the necessary current. Connect the power wires to the appropriate terminals on the navigation lights, typically either a positive and negative terminal or a hot and ground terminal. Make sure the wiring is secured and insulated to prevent any short circuiting or other electrical hazards. Test the lights to ensure they are functioning properly.
Connecting to the Battery
Once the lights are connected to the wires, you can connect them to the battery. Start by connecting the positive wire to the positive terminal on the battery. Then connect the negative wire to the negative terminal. Make sure the connections are tight and secure.
Connecting to the Fuse Panel
If your boat has a fuse panel, you will need to connect the navigation lights to it. Start by connecting the positive wire to the positive terminal on the fuse panel. Then connect the negative wire to the negative terminal. Make sure the connections are tight and secure.
Testing the Lights
Once the navigation lights are connected to the battery or fuse panel, you can test them to make sure they are working properly. Turn on the switch and check to see if the lights come on. If they do, then you have successfully wired your navigation lights.
Maintenance
Even after the navigation lights are installed, maintenance is still necessary. Regularly check the wires and connections for any signs of corrosion or wear. If you notice any problems, make sure to fix them immediately. It’s important to make sure the lights are clean and free of dirt or debris. This will help ensure that the navigation lights are working properly and are visible to other boaters.
Safety Considerations

When wiring navigation lights, it is important to follow safety guidelines. Make sure to turn off the power before making any connections and use appropriate tools. When connecting the wires to the battery or fuse panel, make sure the connections are secure and there is no chance of a short circuit.
- Ensure the navigation lights meet the requirements of the applicable governing body.
- Test the navigation lights regularly to ensure they are working properly.
- Replace any broken or malfunctioning navigation lights immediately.
- Ensure the navigation lights are securely fastened to the vessel.
- Check the navigation lights for obstructions such as dirt, debris, or marine growth that can reduce visibility.
- Make sure the navigation lights are visible from all directions.
- Use navigational chart symbols to identify the type of navigation lights in use.
- Ensure the navigation lights comply with the applicable international navigation regulations.
- Be aware of the time of day when operating the navigation lights.
- When in doubt, contact the local harbormaster for advice.
They are important safety features , as they allow other boats to identify the boat ’s position , course , and speed . To ensure safety on the water , it is important to make sure that navigation lights are properly installed and maintained . This includes ensuring that the lights are in good working condition and that the watt age of the bulbs is appropriate for the size of the boat .
Troubleshooting
If your navigation lights are not working properly, there are a few things you can check. Make sure the lights are turned on and the connections are tight. If everything appears to be connected properly, then you may need to replace the fuse or check the wires for any signs of damage.
What size wire for boat navigation lights?
The size of wire required for boat navigation lights will depend on the total wattage of the lights being used. Generally, a minimum of 16 AWG (American Wire Gauge) wire should be used for lights with a wattage of up to 20 watts. For higher wattage lights, a larger AWG wire should be used.
How many amps do boat navigation lights draw?
The amount of amps that boat navigation lights draw depends on the wattage of the bulbs and the voltage of the system. A standard navigation light bulb may draw between 0.1 and 0.3 amps.
How to wire multiple boat lights to one switch
Wiring multiple boat lights to one switch is fairly straightforward and requires a few basic tools. Identify the type of switch you are using and the type of light you are wiring. Once you know the type of lighting and switch, you will need to determine the gauge of the wire needed. If you have the wire and the switch, you will need to strip the ends of the wires and attach them to the switch, ensuring to note the correct polarity.
Wiring navigation lights for a boat can seem like a daunting task, but with the right tools and materials it can be done quickly and easily. Understanding how navigation lights work and making sure they are connected correctly is important for the safety of you and other boaters. By following the steps outlined in this article, you can be sure your navigation lights are wired correctly.
Related posts:

Leave a Reply Cancel reply
Your email address will not be published. Required fields are marked *
Save my name, email, and website in this browser for the next time I comment.
- Forums New posts Unanswered threads Register Top Posts Email
- What's new New posts New Posts (legacy) Latest activity New media
- Media New media New comments
- Boat Info Downloads Weekly Quiz Topic FAQ 10000boatnames.com
- Classifieds Sell Your Boat Used Gear for Sale
- Parts General Marine Parts Hunter Beneteau Catalina MacGregor Oday
- Help Terms of Use Monday Mail Subscribe Monday Mail Unsubscribe
wiring diagram for mast lights and bow lights
- Thread starter dknape
- Start date May 2, 2012
- Hunter Owner Forums
- Ask A Hunter Owner
My current problem is that when my mast was put back up, my mast lights and bow light no longer function on my 1987 Hunter 26.5 sailboat. The wiring is likely all original and and thus not tinned. The wiring also has a lot of black electrical tape above the deck. The stern light does function. The forward cabin light also does not function. Tried moving the light bulbs around, the same light continued to not function. I am looking for a wiring diagram to assist me in fixing my wiring problem. Thank you in advance for any help and or suggestions you can provide me.

it should be a fairly simple task..... without a schematic, if you know what a continuity tester is and how to use it. but you also need a regular test light also. if it happened when the mast was either taken down or put back up, it could be a pinched wire or a broken ground. I dont know if the masthead light and bow lights have independent grounds or if they have a shared ground wire. you need to find out if the ground wire at the light has continuity to the negative post on the battery, and the positive wire at the light needs continuity to the positive post on the battery. find out which one has failed you and 2/3 of your work is done..... then you only need to find out where the failure is in that one particular wire. is there any thing common between the two lights other than the battery?.... do they share the same switch?.... the same ground wire? the same hot wire? with these ideas you should be able to locate the problem fairly quickly.....

ChiTownSail
I am having the same issue. My issue is where / how the wires run. How do you feed them through the ceiling / where do they go?? I've got a 78' H25.
navigator97
The Red & Grn Bow lights and Stern light should all be on the same switch at the panel. Marked either "Running Lights" or "Nav Lights", or similar. The Steaming Light and the Anchor light should each have separate switches at the DC distributional panel. To do the continuity tests that Centerline talked about above, make sure all of the Nave lights, Steaming lights, and Anchor light are in the on position. Check them out one leg at a time. On my H-33.5 (1990) the Bow lights wires run along the Port side behind the settee. Im not sure where the Stern light wires run - probably start out on the Port side (that is the side that my DC distribution panel is), but cross over somewhere to the Starboard side where the Stern light is. The Steaming light and Anchoe light wires start out on the Port side and go to the top of the compression post and thru the deck to the base of the mast. There there are connections to the wires in the mast to the Steaming and Anchor , and Spreader lights. I hope some of this makes sense and is somewhat useful to you for your H-26.5. Good luck.
Another thought. There should be basic rudimentary schematics in the boats manual from Hunter. They should also be available on line from Hunter. Give that a try.
There are the basic drawings of the wiring, I'm wondering if anyone has fed new wire through the ceiling and how it was done.

As I've been working piece by piece on rebuiliding my salvage H22 for the past 4 years, I did not try to feed the wires through the salon ceiling, but just replace the wiring that I could access (splicing, taping over / heat shrink tubing at the connection points) and would make my own runs of wiring via accessible paths, and hiding / reinforcing with spiral wound cable protector as needed.
I am embarrased to admit it, but the issue with the bow nav light had nothing to do with the electrical. It was a bad bulb. Evidently, the bulb just simply went bad during transport from the Chesapeake down to South Carolina. I replaced the bulb and the front lens and all is now good with that light. Now it is time for me to find my harness and send my wife up the mast to replace the bulbs on the mast and see if that might fix those lights too. I guess it is always possible that they were simply damaged during transport. I have traced the red/blue wires coming down the mast to the thru-deck connector where they splice into a set of red/green wires below deck and back to the electrical panel under the companion way.
- This site uses cookies to help personalise content, tailor your experience and to keep you logged in if you register. By continuing to use this site, you are consenting to our use of cookies. Accept Learn more…
- CREATE AN ACCOUNT
- Boat Cover Finder
- Bimini Top Finder
- Boat Propeller Finder
- Engine Parts Finder
- Anchor & Dock
- Watersports
- Clothing and Footwear
- Engine Parts
- Cabin and Galley
- Covers and Biminis
- Electronics
- Paint and Maintenance
- Pumps and Plumbing
- Anchor Chains & Ropes
- Boat Fenders
- Boat Mooring
- Boat Protection
- Dock Storage & Protection
- Ladders, Steps, & Platforms
- Top Sellers

- Fishing Rods
- Fishing Reels
- Fishing Rod & Reel Combos
- Fishing Tools & Tackle Boxes
- Fishing Line
- Fly Fishing
- Fishing Bait & Fishing Lures
- Fishing Rod Holders & Storage Racks
- Fish Finders, Sounders & Sonar
- Trolling Motors
- Fishing Nets
- Fishing Downriggers & Acessories
- Fishing Outriggers & Acessories
- Fishing Kayaks
- Fish Cleaning Tables

- Inflatable Rafts
- Paddle Boarding
- Paddles & Oars
- Wakeboard, Wakesurf & Ski
- Wakeboard Towers
- Tow Ropes & Handles
- Life Jackets & PFDs
- Snow Sports
- Roof Racks, Carriers, Dollies

Men's Clothing
- Accessories
Men's Footwear
- Atheltic Shoes
- Water Shoes
Women's Clothing
- Dresses & Skirts
Women's Footwear
- Fuel Systems
- Sacrificial Anodes & Zincs
- Generator Parts
- Inflatable Boats
- Propeller Parts & Accessories
- Boat Manuals
- PWC Parts & Accessories

- Fishing Boat Seats
- Offshore Boat Seats
- Ski Boat Seats
- Pontoon Boat Seats & Furniture
- Boat Seat Pedestals & Hardware
- Boat Seats by Manufacturer
- Boat Tables & Hardware
- Boat Seat Covers
- Boat Seat Vinyl
- Floating Boat Cushions

- Barbeque Grills
- Boat Drink Holders
- Cabin Accessories & Hardware
- Boat Ventilation
- Interior & Cabin Lighting
- Marine Teak Products
- Carbon Monoxide & Smoke Detectors
- Binoculars & Telescopes

Boat Bimini Tops
- Bimini Top Accessories
- Pontoon Bimini Tops
- Other Biminis
- RV & Trailer Covers
- Boat Shrink Wrap & Accessories
- Boat Shelters
Boat Covers
- Boat Cover Accessories
- Boat Lift Canopy Covers
- Other Covers
- Boat Wiring & Cable
- Marine Batteries & Accessories
- Marine DC Power Plugs & Sockets
- Marine Electrical Meters
- Boat Lights
- Marine Electrical Panels & Circuit Breakers
- Power Packs & Jump Starters
- Marine Solar Power Accessories
- Marine Electrical Terminals
- Marine Fuse Blocks & Terminal Blocks
- Marine Switches
- Shore Power & AC Distribution

- Marine Audio & Video
- GPS Chartplotters & Accessories
- Electronic Navigation Charts & Software
- Digital Instruments
- Display Mounts
- VHF Radios & Communication
- Marine Radar
- Auto Pilot Systems
- Action Cameras

- Fiberglass & Epoxy Boat Repair
- Boat Paint & Varnish
- Marine Adhesives, Sealant, & Caulking
- Marine Engine Maintenance
- Boat Cleaners & Waxes
- Boat Cleaning Supplies

- Fresh Water Boat Systems
- Bilge Pumps
- Marine Plumbing Parts
- Wash Down Pumps
- Livewell Aerator Pumps & Live Bait Wells
- Toilet & Waste Pumps
- Marine Pump Replacement Parts

- Tires, Rims, & Hub Kits
- Boat Trailer Winches
- Boat Motor Supports & Transom Savers
- Boat Trailer Guides & Rollers
- Boat Trailer Fenders
- Boat Trailer Lights
- Boat Trailer Hardware
- Boat Trailer Jacks
- Boat Trailer Brakes & Axles
- Boat Trailer Tie Downs
- Couplers, Mounts, Hitches, & Locks

- Boat Deck Harware
- Marine Nuts, Bolts, & Screws
- Boat Handles, Pulls, & Rings
- Prop Nut Kits & Hardware
- Boat Cabin Hardware
- Marine Fasteners
- Boat Windshield Parts
- Boat Tubing & Rails
- Boat Mirrors
- Marine Tools & Tool Kits
- Boat Lettering

- Women's Clothing Deals
- Men's Clothing Deals
- Fishing Deals
- Anchor & Dock Deals
- Electrical Deals
- Electronics Deals
- Paint & Maintenance Deals
- Pumps & Plumbing Deals
- Boat Seats Deals
- Trailering Deals
- Camping & RV Deals
- Dealer Login

- Forums Login

- Search forums
- The iboats forum moderators are excited to announce that at this time it appears the iboats forums posting pictures function is working once again. Though we cannot promise for how long, we're hoping for indefinitely.
- Boat Repair and Restoration
- Electrical, Electronics, Audio and Trolling Motors
Need a very simple wiring diagram for navagation lights.
- Thread starter Baytown.boy
- Start date Mar 27, 2011

Baytown.boy
- Mar 27, 2011
I Need a very very simple wiring diagram for navagation lights. Mounting the red and green on seperate sides of a center console and the anchor light in the back, thanx.

Honorary Moderator Emeritus
Re: Need a very simple wiring diagram for navagation lights. http://forums.iboats.com/showthread.php?t=225399&p=2745677&viewfull=1#post2745677

Lieutenant Commander
Re: Need a very simple wiring diagram for navagation lights. Hmm, may want to make sure that red and green mounted on your center console meets all the visibility requirements: http://www.boatsafe.com/nauticalknowhow/sidelights.htm Especially the part where they are visible x degrees above and below horizontal.
Re: Need a very simple wiring diagram for navagation lights. These are the navagation lights I will be using. I had used these same on another boat I had built about 4 years ago I had bought off Ebay. The navagation lights diagram drawing I found in my files, I had used on same boat, just could not remember where it was until now. I used a pull pull switch. Thanx for yalls help again, good fishin.
Attachments

Baytown.boy said: ...The navagation lights diagram drawing I found in my files.... Click to expand...
jhebert said: That is a nice drawing of rectangles and lines with random colors used, but it is not an electrical drawing that makes any sense. Click to expand...

Re: Need a very simple wiring diagram for navagation lights. You run the negative leads from all the lights to the battery negative (or the negative buss under the console); the positive side for all lights goes through the switch. Same concept as in the top diagram in the thread that was linked By Don.

Supreme Mariner
Re: Need a very simple wiring diagram for navagation lights. There are four problems with the diagram. 1) A switch should not have a negative liine connected to it. Negative lines go to ground (wherever you find it -- that's not on the switch) 2) the diagram does not show "where" on the switch each wire goes. Push-pull nav light switches, just like the three, six, and seven terminal toggle or rocker switches, must be wired correctly. Your diagram does not show that. 3) Your use of red and black wires is incorrect. Red is the positive feed. Only one red wire should exit the battery (or preferably the fuse panel) INTO the switch. The red wires TO the lights runs FROM the switch TO the lights. Grounds (black wires) FROM the lights connects to a ground buss or the negative terminal of the battery. 4) You show a red line going from the battery directly to the stern light and also to the switch. Wrong! The positive line for any light comes from the switch, not directly from the battery (unless you happen to want the light on all the time).
Re: Need a very simple wiring diagram for navagation lights. Ok, yes I know yall think I'm a big dummy, but I think with yalls help, I got it figured out in my mind and on paper, see diagram below, thanx again for all yalls help. Let me know if I'm wrong. The last diagram was the one I had that was wrong 4 years ago and had to change it up also.

- Mar 28, 2011

Re: Need a very simple wiring diagram for navagation lights. http://continuouswave.com/whaler/reference/navLightSwitch.html
Re: Need a very simple wiring diagram for navagation lights. Don S. I already have the switch, just got my wires were crossed!! I was looking at an old diagram that was wrong. 4 years ago, and is still wrong. LOL All is working right now. I had a tiller motor, and now have installed a center console and steering and the boat mechanic drilled a 2" hole from the back and into the front of the rear seat filled with foam for a wiring tunnel and put in a piece of PVC pipe, and run all the cables thru to the console. Now running the bilge pump and white anchor light wires into the tunnel so I can hook them up. That is all the wires in the tunnel now. All lights, GPS, dept finder, bilge pump will go thru a fuse panel under the console and switches will be on it also. All wires will be hooked onto the troll motor battery that is under the console now. Now just have to hook up the start/choke key switch and I'm fishing. Thanx for all yalls help, Doyle
Re: Need a very simple wiring diagram for navagation lights. Just to clarify --- Nobody said or even insinuated that you were a dummy. You asked for help and it was given.
Re: Need a very simple wiring diagram for navagation lights. I was laughing at myself for some dumb mistakes I make. I think the older I get, the less I know. I know I have C.R.S. disease now, LOL. I used a wiring diagram that was given to me approx 4 years ago and it was wrong then and is still wrong now. Had in an old file , the only one and just printed it, tried it and it would not work, so I asked for yalls help. I do appreciate it very much. That file has been replaced by the right version. thanx, Doyle.
Seaman Apprentice
Re: Need a very simple wiring diagram for navagation lights. Where is the fuse??

Rear Admiral

- Mar 31, 2011
Re: Need a very simple wiring diagram for navagation lights. I don't have a $6.00 proper switch, mine is a non proper $15.00 switch by Cole Hersee, You get what you pay for. I already had the switch, so that is what I used. Thanx for yalls help, good fishin. Found this quote in another forum. Quote: I've yet to find a switch that lasts forever in the salt environment, only ones that last longer than others. The old standard pull switches do a fine job and are simple and easy to replace. As with anything, you get what you pay for and the cheaper ones don't last a year or two before they start getting "sweet spots" where you have to jiggle them to keep the lights on. It's all because of the nature of ANY mechanical switch, there is a shaft that has a seal that will eventually let water in and wipe it out. Pull's or toggles, they all have the same issue. Toggles are gaining popularity because they can be part of the boats switch panel instead of having a lot of pull buttons all over the place. Makes a neater, cleaner installation and is easier to wire up. Sticking with the more expensive brands (Cole Hersee, Carlingswitch, Blue Seas) should give you twice the lifetime over the cheaper knock offs that don't use quality components.
- May 3, 2012
Re: Need a very simple wiring diagram for navagation lights. i have a nitro bass boat and am having a problem with my nav/anc lights. front red/green light has three wires to it. white, gray, and black. the pole itself only has two pins. the switch has three terminals on it. 12V in, one for anc, and one for nav. my problem is that the front light is not grounded to battery ground. the two wires that plug into pole light both run back up to the switch. can anyone help? light used to work but now doesn't work properly. not sure what happened. does this sound even remotely right to anyone?
Re: Need a very simple wiring diagram for navagation lights. Welcome to iboats henkemm You need to start a new thread with YOUR problem, not hijack someone elses thread. You need troubleshooting help not how to wire in new lights.
- May 4, 2012
Re: Need a very simple wiring diagram for navagation lights. Don, not sure how to start a new thread. Looked in FAQ and didn't see anything in there about how to do this. Kinda new to the whole forum thing. Sorry. Thanks, Matt
IMAGES
VIDEO
COMMENTS
On any vessel, navigation lights have a specific color, (white, red, green, yellow, blue), arc of illumination, range of visibility, and location, as required by law and regulations. For the purposes of this course, we will concentrate on pleasure boats under 65 feet in length. Knowledge of navigation lights is important to a small-boat skipper ...
As such a power boat, and by extension all sailboats, MUST, without question show one green light on the starboard bow and one red light on the port bow and one all around white light or lights while operating in reduced visibility. These lights should shine at all 360 degrees of visibility with the bow lights shining at an angle of dead ahead ...
A vessel that is over 7 m or 23 ft in length is expected to show red and green sidelights when sailing. Each of these lights needs to cover an arc of 112.5°. The sidelights may be combined in one lantern at the bow when below 25 m or 65 ft. The white stern light can be seen over an arc of 135°.
Rule 29, duty shall exhibit: at or near the masthead, two all-round lights in a vertical line, the upper being white and the lower red; when underway, in addition, sidelights and a sternlight; as shown in the example below. Pilot boat, shorter than 50 m. Abeam, starboard side.
In this video, we'll be covering the basics of boat wiring. We'll be installing navigation lights, the anchor light, courtesy lights, bilge pump, livewell pu...
The basic rule is that sidelights and a stern light are required. Permissible variations to this rule appear below. Sailboats less than 20m (65.7') can substitute a tricolor light for separate sidelights and stern light—or a bi-color light and a stern light may be substituted. Sailboats less than 7m (23') shall, if practicable, exhibit lights ...
For most small vessels, motoring requires red and green (port and starboard) lights, and a white light visible in all directions around the boat. This is almost always a stern light and a masthead light on sailboats. Boats under sail require port and starboard lights, and a white stern light. Sailboats below sixty-five feet may show a tricolor ...
Vessel length: 12 meters to 20 meters (39.4 FT. to 65.6 FT.) Lighting requirement: A white masthead light located at the front of the boat, pointing in the direction you are traveling. This must be visible at 225 degrees and from two miles away. The masthead light must be positioned at least 8 feet above the gunnel.
As the name indicates, a stern light is a white light intended for your boat to be visible from behind, so it faces backwards with 135° of visibility, 67.5° on each side. 5. All-Around Light. An all-around light is white and has 360° of visibility. It is typically the light at the highest point on the boat compared to all other navigation ...
All-around white light - 360 degrees visable from two miles. Sidelights — 112.5 degrees visible from one mile. If your boat is greater than 39.4 feet but less than 65.6 feet, or 20 meters, you need the following set of navigation lights: A masthead light is a white light at the front of the boat. The masthead light needs to be visible across ...
Power boats less than 20 meters shall exhibit navigation lights as shown in Figure 1. (Note: 2 masthead lights are optional for vessels under 50 meters. Vessels over 50 meters will display two masthead lights.) Figure 2. Vessels of less than 12 meters in length, may show the lights in either Figure 1 or Figure 2.
Step 1: Begin by identifying the stern light fixture. It is typically located on the back of the boat, near the transom. Step 2: The stern light will have two wires extending from its base - one is the positive wire, usually color-coded as red, and the other is the negative wire, usually color-coded as black.
Connect the positive (+) wire to the positive terminal on the navigation light and the negative (-) wire to the negative terminal. Secure the connection by crimping it with a crimping tool. 6. Use a soldering iron to melt solder onto the crimped connections. This will create a more durable and reliable connection.
Attwood 3-mile (4.8 km) Anchor/Masthead Lights consist of anodized aluminum poles with lightweight heads. Horizontal and vertical bases allow light pole to be adjusted and locked within a 180° arc. Lights provide a 3-mile, 225 forward running light and 2-mile all-round ° anchor light. For power-driven boats boats up to 65.6 feet (20 meters).
This allows the use of either 2 switches or a 3 position switch with one off position. The most common configurations of lights are: A bicolor light with an all-round (360°) white light. A bicolor light with a 135° stern light and a 225° masthead light and a 360° anchor light. Two sidelights with an all-round (360°) white light.
where both lights are required to be on at night, when the boat is moving but only the anchor light is required when the boat is at anchor. For the purposes of this guide, both your red and green lights will be considered "Nav" lights, and the white stern or hardtop light will be considered the "Anc" light. Rev- 16 APR 2016 VJD2-U66B ...
Beginners guide: The basics of boat wiring. Wiring schematics, pictures, best practices and tips to get your boat's electrical systems in shape.
Step 2. Draw a simple electrical schematic (diagram) that shows each piece of equipment, the fuses, switches, and how all of this will be connected. This is not a diagram of where the equipment is located on the boat. That will come in Step 8. It is simply a diagram of the electrical circuits.
Joe. Feb 25, 2007. #6. Mast Wiring. Coax cable has no electric field outside of its shield. The field is between he conductors only - even if the antenna is not tuned properly. As far as the gauge of the wire used - 14 AGW is plenty for the grounds of all of your lights even if all of them are on at the same time.
We've got videos that show using a full harness for wiring in navigation lights on a boat, but this video shows how to do so in the simplest form for those j...
Drill holes in the boat for the lights to be mounted. Attach the navigation lights to the boat using the screws provided. Connect the electrical wires from the navigation lights to the boat's electrical system. Secure the electrical wires with electrical tape.
The Steaming light and Anchoe light wires start out on the Port side and go to the top of the compression post and thru the deck to the base of the mast. There there are connections to the wires in the mast to the Steaming and Anchor , and Spreader lights. I hope some of this makes sense and is somewhat useful to you for your H-26.5.
Re: Need a very simple wiring diagram for navagation lights. To use a push/pull switch, you are going to need the right kind of switch, several look the same on the outside, but work differently inside. You need an Off- On circuit 1 - On circuit 1 and 2. Circuit 1 will be your anchor light, and circuit 2 will be your bow/side lights.