ACTIVE STORM TRACKER Hurricane and Tropical Storm Information Learn more
Service Locator
- Angler Endorsement
- Boat Towing Coverage
- Mechanical Breakdown
- Insurance Requirements in Mexico
- Agreed Hull Value
- Actual Cash Value
- Liability Only
- Insurance Payment Options
- Claims Information
- Towing Service Agreement
- Membership Plans
- Boat Show Tickets
- BoatUS Boats For Sale
- Membership Payment Options
- Consumer Affairs
- Boat Documentation Requirements
- Installation Instructions
- Shipping & Handling Information
- Contact Boat Lettering
- End User Agreement
- Frequently Asked Questions
- Vessel Documentation
- BoatUS Foundation
- Government Affairs
- Powercruisers
- Buying & Selling Advice
- Maintenance
- Tow Vehicles
- Make & Create
- Makeovers & Refitting
- Accessories
- Electronics
- Skills, Tips, Tools
- Spring Preparation
- Winterization
- Boaters’ Rights
- Environment & Clean Water
- Boat Safety
- Navigational Hazards
- Personal Safety
- Batteries & Onboard Power
- Motors, Engines, Propulsion
- Books & Movies
- Cockpit Confessions
- Communication & Etiquette
- Contests & Sweepstakes
- Colleges & Tech Schools
- Food, Drink, Entertainment
- New To Boating
- Travel & Destinations
- Watersports
- Anchors & Anchoring
- Boat Handling

Selecting a Transducer
Advertisement

As the technology of sonar (an acronym for Sound Navigation and Ranging) has developed, prices have dropped dramatically at the same time that choices have widened. What once was a simple electronic device meant to determine the water's depth now has numerous capabilities to find fish, scan the bottom for obstructions, or create underwater maps.
Whether it's a simple portable fishfinder or a commercial mapping system weighing several tons, all sonar devices operate on the same principles using two parts: a transducer and a processor/display. The transducer is both a sender and receiver. It is placed in the water, or in a medium adjacent to the water, and emits an acoustic signal with a characteristic waveform. This signal passes through the water at a known rate of speed and is reflected off any object with a density different than water. When part of the acoustic signal strikes an object, it is reflected back to the transducer, which receives it and sends it to the processor.
The processor/display is a group of electronic circuits that interprets the signals received by the transducer. It will have some mechanism to display the results, ranging from a flashing light to color LCD graphic maps. Dedicated units often have some controls for signal gain or for other features. Some scanning models may even use a laptop computer as the processor and display.
Finding the proper depth sounder or fish finder to meet your needs requires a choice between numerous brands and models. Many of us have a tendency to solely concentrate on the features or appearance of the processor/display unit, neglecting the transducer altogether. This mistake can lead you to the wrong choice.
Transducer Frequency

Transducers for recreational and light commercial boats usually operate on frequencies between about 25 and 400 KHz, with 50 and 200 KHz being the two most common. As with most radio or radar transmissions, lower frequencies generally have greater penetrating power while higher frequencies offer higher resolution or detail. A low frequency around 50 KHz is excellent for displaying a wide area of the bottom, especially if the water is deep, while a higher frequency shows more bottom detail in shallow water, a very useful trait for fishfinders and recorders. A depth sounder signal that reads up to 400' in fresh water may lose as much as half of its penetrating power in saltwater, so lower frequencies may be favored for saltwater use.
Many fishfinders have dual-frequency transducers, with 50/200 KHz combinations being the most common. Since the body of a fish is mostly water, the depth finder signals don't bounce directly off their bodies — it is the air in fishes' gills and air bladder that create the target. With dual frequencies, the low frequency can search a wide area of deep water for targets, showing schools of fish as wide patches on the screen. The higher frequency offers more detail of objects directly below the boat, showing better bottom formations, bottom-feeding fish, and schools of baitfish, especially in shallower waters.
There is wide variety in dual-frequency and multiple frequency models. Some have the ability to switch back and forth between two frequencies, while others offer two screens to view simultaneously. A few even have the ability to detect their own acoustic signals when a large number of boats fishing nearby with similar units create "crosstalk and other interference". The transducers of some high-end scanning sonars have multiple elements within their housings, allowing them to "see" in front of the boat or out to the sides.
Transducer Beam Width
A second important feature when selecting a depth finder transducer is the width of the beam (also known as cone angle) it was designed to emit. Transducers with a wide beam width of up to 50° will "see" around their location at a wide section of the bottom. As the amount of area is increased, the bottom resolution is decreased, so a wide beam is fine for searching for fish in the water column but not detecting bottom details like breaks, shallow holes or small contours.
A narrow beam of 10-15°, on the other hand, concentrates its energy on a section right below the boat. When looking for individual fish or bottom structure in shallow water (say under 100-200'), a narrow-beamed transducer should be the first choice. Note that there is a certain amount of correlation between a transducer's frequency and its beam width. As a general rule, lower frequency and a wider beam angle tend to go together while higher frequency and narrower beam width are usually companions. This makes sense, as the latter makes a great depth sounder while the former is an obvious choice as a fishfinder.
Output Power
Output power is quoted in watts just as any transmitter or audio receiver. Here, however, the ratings have little meaning and more power is not always better. Too much power in shallow water is as ineffective as too little power in deep water. Generally speaking, units in the 100-200 watt range are sufficient for shallow water use and units up to 1,000 watts and more may be necessary to probe deep canyons and drop-offs. Using a transducer from a 100-watt unit on a 1,000-watt unit is also not a good idea as the excessive energy from the more powerful fishfinder will soon destroy the crystals within the small transducer.
Transducer Materials
In the distant past, the working portion of all transducers was captured in a traditional bronze housing with a long, narrow stem and a curious aerodynamic shape. Today, many transducers are contained in space age strong plastic housings. These tough new materials have great advantages over bronze in reducing corrosion and electrolysis, and are designed to stand up to the abuse of long-term immersion in seawater.
Transducer Mounting and Style

Transducers may be installed through the hull, in water- or oil-filled boxes inside certain hulls, attached to the inside of some fiberglass boats, or mounted on the transom. The only requirement is that no air space or high-density material blocks the transducer's stream of acoustic pulses. Because of this flexibility in mounting, several styles of transducers are manufactured, assuring easy installation on all types of boats.
Long-stemmed bronze transducers are still best when mounting through the hull on a boat with a very deep "V" or high deadrise angle where fairing blocks must be used to keep the transducer close to vertical.
Low-profile plastic transducers with a mushroom head are easiest to mount through the hull on a boat with a flat surface and little "V" shape.
A few low-profile through-hull models have a hollow plastic housing and a removable inner transducer. These are ideal for trailerable boats where the transducer might be damaged in the launching process.
Flush-mount transducers are ideal for depth sounders on racing sailboats and other applications where a fair hull is important. These sometimes require a special countersinking tool for proper installation.
Transom-mount transducers are usually flat on their leading edge, with an adjustable bracket or pivoting hardware to attach to the boat's stern below the waterline. When installing a transom-mount transducer, make certain it is mounted in an area of the transom with the least amount of disturbed water. It is not uncommon to find the ability of your transom mount transducer to show clear images is drastically reduced as the speed of the boat increases. Most often a small "adjustment" of the tilt or depth of the transducer can greatly improve its performance at high speed. On some vessels however, you may need to experiment by placing the transducer at different spots on the transom to obtain the optimum results.
Some transducers are specifically made to shoot through the hull. These are generally more accurate than standard transducers used in that manner.
Related Articles
The truth about ceramic coatings for boats.
Our editor investigates the marketing claims of consumer-grade ceramic coatings.
Fine-Tune Your Side Scan Fishfinder
Take your side-scanning fishfinder off auto mode, and you’ll be spotting your prey from afar in no time
DIY Boat Foam Decking
Closed-cell foam flooring helps make boating more comfortable. Here’s how to install it on your vessel
Click to explore related articles
BoatUS Editors
Contributor, BoatUS Magazine
Award-winning BoatUS Magazine is the official publication of Boat Owners Association of The United States. The magazine provides boating skills, DIY maintenance, safety, news and more from top experts.
BoatUS Magazine Is A Benefit Of BoatUS Membership
Membership Benefits Include:
Subscription to the print version of BoatUS Magazine
4% back on purchases from West Marine stores or online at WestMarine.com
Discounts on fuel, transient slips, repairs and more at over 1,200 businesses
Deals on cruises, charters, car rentals, hotel stays and more…
All for only $25/year!
We use cookies to enhance your visit to our website and to improve your experience. By continuing to use our website, you’re agreeing to our cookie policy.
- 2024 BOAT BUYERS GUIDE
- SWS ADVENTURES
- Email Newsletters
- Fishing Boat Reviews
- Fly Fishing
- Marine Electronics
- Fishing Tackle
- Fishing Destinations
- The Bahamas Fishing Guide
- Boating Safety
- Ultimate Boating Giveaway
Choosing a Transducer
- By Glenn Law
- Updated: September 21, 2007

| To find fish wherever they lurk, anglers must have the right ‘ducer for the job. |
The most critical and overlooked part of a fishfinder is the transducer. It’s not especially sexy, as it doesn’t have all the bells and whistles and customizable features associated with the modern echosounder. It’s a part of the fishfinding system you rarely see once it’s installed, and you probably won’t give it a second thought unless it quits working. But it merits some serious attention if you want to get the best performance from that fancy equipment on your console.
A couple of considerations – mounting location and specific qualities of the transducer – determine how effectively your sounder does its job. Let’s look at placement first. There are three ways to mount a transducer in your boat, and the one you choose depends most on the your hull.
The most complicated is through-hull mounting, where a hole is cut in the bottom of the boat and the transducer is mounted flush with the bottom, so the transducer face is in direct contact with the water. Through-hull mounting is the most efficient way to get the best performance out of a transducer, according to the experts at Simrad, a major manufacturer of top-end transducers for recreational and commercial fishing and research boats. Patrick Belen, Regional Manager, Fisheries Acoustic Equipment, explains:
“Direct contact with the water is the most efficient transducer mount. That way every single ounce of power that you put in the transducer goes into the water. There are some considerations, though. You have to make a hole in the hull, which some people don’t want to do, though there are seldom problems with this. If the instructions are followed, you have assurance of 100-percent safety.”
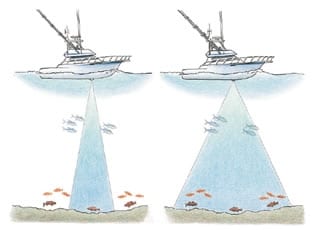
The beam of a transducer set to 200 kHz, left, covers less area but shows much more detail. This is the frequency that’s most useful for shallow-water applications. The 50 kHz transducer beam, right, sacrifices some detail for a broader beam, useful for searching deep water.|
Belen explained that not all hulls are suited for this treatment. Placement of tanks, assorted rigging or structural members can create problems when it comes time to cut through the hull – especially if you are installing a transducer on a boat you already own, as opposed to installing it during construction. There may be other objections, as well.
In-Hull Mounting
If you are uncomfortable with cutting a hole in the hull, another option is to mount the transducer inside the hull, flush against the bottom of the boat, and shoot the signal through the hull. The disadvantage here is the power loss that occurs when the signal must pass through the hull during transmission and reception. In the past, this was much more of a problem than it is today. Even with the power loss, an in-hull mount has some advantages. One other consideration is that an in-hull transducer won’t work if your hull is cored, such as with end-grain balsa or foam. In this case you’ll need to go with a through-hull or transom mount.
“In-hull is a much faster and less-expensive way to mount the transducer,” says Belen. “You don’t have to pull the boat out of the water, and installation is much easier. It is not as efficient as a through-hull mount, but it is workable, especially with today’s transducers. Things have changed. In the last five years there have been substantial efficiency gains in transducer designs, so they work much better though the hull. Modern transducers – all of them, not only Simrad – have become very efficient. I was looking at Airmar’s new models that are designed specifically for in-hull installation and the numbers are extremely good, very efficient. Our transducers too are very high-end and our sport fishing models have 65- to 70-percent efficiency.”
Transom Mount
The third type of placement, on the transom, is usually reserved for smaller boats or when there is no access inside the hull for a through-hull or in-hull transducer. Transom mounting is the quickest and simplest way to mount a transducer, but it must be done properly.
“You have to be very careful where you mount the transducer in proximity to the propeller. Try to mount it as far outboard as possible, and separate it from the source of noise. Turbulence, bubbles, motor noise, all of these will interfere with signal transmission and reception. However, if properly mounted as far as possible from the source of noise, they work fine,” says Belen. “It will be as effective as the other mount locations, but it’s much more difficult to make it 100 percent.”
Transom mounting has some genuine advantages. First of all, this the most accessible place to mount a transducer. You don’t have to make large holes in your boat, and the transducer can be mounted above the waterline, so it’s easy to replace or repair if you have a problem. Nor-mally, hull-mount transducers are plastic, which makes them less expensive, says Belen.
Bubbles and turbulence can be a problem with other mounting positions, too. Both through-hull and in-hull mounts have to deal with this kind of interference.
“The farther aft the transducer is mounted, the more noise you will have in the system,” Belen explained. “But the bow wave creates a cone of noise, too. It’s a balancing act between getting the transducer forward of the engine noise, but keeping it far enough astern to keep it in clean water.”
Bill Knowles of Knowles Boat Company in Stuart, Florida, deals with transducer placement routinely. “Air is the enemy,” he says, explaining that where the hull meets the water, there is a thin curtain of air that can interfere with transducer performance. “What we do is put the transducer in the keel. On a center console, go through the keel. There is no white water along the keel.
“If the transducer is wider than the keel, we put a fairing block around it and that way it will work at any speed. If you can’t put it through the keel – I have a 43-foot Hatteras and I can’t get to the keel because of the fuel tanks – I mount the transducer on a fairing block on the hull. It looks like a submarine cut in half, and it works even in the wake of another boat. Try to keep the block as small as possible, but also try to get the transducer away from the bottom where the disturbed water is.”
Choose the Right Frequency
Once you’ve determined where the transducer will go, it’s important to buy quality. Jeff Condiotty, Fisheries Research Manager for Simrad, deals with high-end gear for commercial fishing and fisheries research. The choice available, he explained, is either split-beam or single-beam technology. Split-beam is used by commercial and research vessels. It’s pricey, but it’s the best system going.
“The split-beam transducer receives in four quadrants, so we know where in the beam the target is and we can place it in relation to the boat. With a single beam, everything appears directly beneath the boat. Get a split-beam if you have the money – they run $20,000 and up – otherwise, single-beam, with dual frequency, is the way to go,” says Condiotty.
Which is what most of us will settle for. Dual frequency is the order of the day for most sport fishing applications – unless you just happen to have that extra $20 grand laying around waiting to be spent on a fishfinder. Dual-frequency transducers transmit both 50 and 200 kHz. Because 200 is a multiple of 50, the same transducer will ring on both frequencies. It transmits and receives on both at the same time, and you decide which one you want to look at by selecting the display at the screen on the console.
Basically, the lower the frequency, the better the penetration, so 50 kHz handles the deep-water chores, though target identification can get sketchy. At 200 kHz, targets are well defined but the beam is narrow, and this frequency is best used for shallower applications, say down to 200 feet or so.
“Think of a flashlight beam, like that on a Mag-Lite,” says Condiotty. “Narrow the beam and it becomes more intense and shows more detail. Think of this as the 200 kHz frequency. At 50 kHz, it’s like a wider beam on the flashlight – you get wider coverage, but less definition. A wide-beam 200 kHz transducer would be ideal, but the transducer would have to be so small it wouldn’t handle enough power to be of much use.”
So the obvious compromise is the dual-frequency configuration. At up to 1,500 feet of depth, you can use both frequencies and learn to interpret the picture displayed on the screen. And, you can set up with a top-notch, single-beam, dual-frequency system for under $5,000, according to Condiotty.
Mike Hillers, Fisheries Products Manager for Simrad, offered some suggestions for making practical decisions on a transducer purchase. “The place to start is size,” he says. ” The basic rule of thumb is the bigger the transducer, the narrower the beam and the more power it can handle. The bigger ones cost more, but you’re getting something for that.
“Some of the bluefin tuna guys, when they chum, they want a wide beam to see their chum line and see the fish coming in. You couldn’t see this with a narrow beam, but with a 50 kHz, which produces a wide cone angle, you could. Therefore, a 50/200 dual-frequency transducer is a nice, inexpensive way to get it all.”
There are other options, too, if you want to get really serious about using your depthsounder. “If a guy really wants to win tournaments, he will buy three individual transducers,” Hillers explained. “He tunes one for low frequency, say 38 kHz, to look in the canyons. Then he has a 50 kHz transducer, and another tuned to 200 kHz. This way he can look at all three frequencies at the same time. Ideally, he would have three separate machines, one for each transducer, but you can also hook up multiple transducers to one display screen. That’s a less expensive way to do it.”
A common mistake, Hillers explained, is to buy a transducer by price, or to fit the boat, instead of one to meet your needs. “I hate to see a guy who is going to go fish the canyons walk off with a transducer that’s too small. He is going to be unhappy with the results. What you want to do is back into the decision. Determine what you need for the fishing you do, then buy a transducer based on what is going to best suit your specific purposes.”
It may take some inquiry, beyond the markings on the box, but it is well worth your while to get the most efficient transducer you can, in order to take advantage of the power your depthsounder is putting out. What you should look for, according to the experts at Simrad, is an efficiency rating of greater than 50 percent. This allows you to maximize the power output of your sounder, which translates directly into seeing fish and the bottom. “There can be a lot of wasted energy with an inefficient transducer, and you want to eliminate it,” says Hillers.
The money you spend on the transducer is the best you can spend on a fishfinder, according to Hillers. “If I buy a $3,000 echo-sounder and a $70 ‘ducer, I’ve wasted my money. I’d rather have a $1,000 transducer with a $2,000 sounder and get a much better system.”
Think of your transducer like you do your propeller – just because you don’t see it working doesn’t mean it isn’t critical to your success.
- More: Electronics , Gear , Transducers

Best Boat Trolling Motor Features for Saltwater Fishing

Spotlight on Quantum

What to Look for in a Live Bait Tank for Saltwater Fishing

Salt Water Sportsman’s Deals of the Week

Birds Lead the Way to Trout and Reds

Fishing for Lingcod with Large Saltwater Swimbaits
- Digital Edition
- Customer Service
- Privacy Policy
- Terms of Use
- Cruising World
- Sailing World
- Salt Water Sportsman
- Sport Fishing
- Wakeboarding

New Visitor?

Browse the Furuno product catalog for current and previous products.
Complete Angler's Guide to Marine Transducers
There are transducers available for virtually every type and size of boat. There are also sensors you can install that will accurately read your boat speed and the surface water temperature. Because there are a number of variables in transducer types that can dramatically affect your fish finder's performance, understanding these variables is the key to selecting the right transducer. This book will help you learn about what makes a transducer 'tick.'

Angler's Guide to Marine Transducers
Because there are a number of variables in transducer types that can dramatically affect your Fish Finder's performance, understanding these variables is the key to selecting the right transducer. This guide will help you learn what makes a transducer 'tick.'
Where Is The Best Place To Mount A Transducer? (Top 5 Locations)
UPDATED 03 NOVEMBER 2023
by Robert Ceran
Are you wondering where to mount your fish finder transducer?
As you probably know, it’s essential to install your transducer correctly in order to get good performance from it.
Table of Contents
But choosing the right location to mount a transducer is more complicated than most people anticipate, since each location comes with its own set of challenges and pros and cons.

In this article we’ll go over the 5 best places to mount a transducer on a boat, and what you need to know in order to choose the right location for your transducer.
Where to mount a transducer on a boat
The top five transducer mounting locations on a boat are:
- Transom mount
- Trolling motor mount
- In-hull mount
- Thru hull mount
Out of these five transducer placement options, the most commonly used ones by far are transom and trolling motor mounts, though the other three can also be great options for specific situations and applications.
When choosing the right transducer mounting location, it’s important to keep in mind that all of these options come with their own pros and cons, and you should weigh these carefully before choosing the right one for your purposes.

Screwless transducer mounting kit
Pad for mounting your transducer without screwing into the boat hull.
Where to mount transducer on transom
Now let’s talk about choosing the best transom mount transducer location, since this is one of the most commonly used places to mount a transducer on a boat.
Unfortunately, many anglers choose an incorrect transducer placement on the transom, and as a result they experience problems with their sonar imaging.
That’s why it’s so important to get the transducer placement right in order to achieve the best results.
What is the best transom mount transducer location?
It’s essential to mount your transducer in an area of the transom that doesn’t have any turbulence, since even a little turbulence can negatively impact the quality of your sonar image.

This means you should avoid areas with turbulent water flow aft of rivets, strakes, or ribs in the hull. Choose a transducer placement spot on the transom where the hull in front of this location is flat and smooth.
Also, make sure that the transducer is at least 15 inches away from the propeller of your outboard motor, and check whether the outboard can rotate fully in all directions without bumping into the transducer (which needs to be checked in the fully trimmed position).
What is the best transducer mounting height?
The best transducer mounting height is at the bottom edge of the transom, with the lower surface of the transducer protruding about 1/32 to 1/16 inches below the bottom of the boat.
It’s important to avoid mounting the transducer too high on the transom, since this will cause it to be out of the water at planing speed (keep in mind that the water level of the transom drops when the boat is on plane).
If you mount your transducer too high on the transom, this will still allow it to function at slow speeds under 2 to 3 mph. But as soon as the boat gets faster than that, the transducer will stop working.

Secondly, you also want to avoid the transducer being too low on the transom, as that will trigger turbulence and rooster tail formation, which also negatively affects the quality of sonar imaging.
So the ideal transducer mounting height on the transom is with the bottom surface of the transducer just slightly protruding below the bottom of the boat (see diagram above).
How far should a transducer be in the water?
The transducer placement needs to be deep enough so that its piezoelectric crystals are fully covered by water.
This can be accomplished even if the top of the transducer is flush with the water level, but if its crystals are out of the water, the sonar can’t function, and you won’t get an image.
One thing you need to keep in mind is that the water level of the transom goes down at planing speed, and if your transducer is mounted too high, the crystals will be out of the water when you’re going fast.
Should the transducer be flush with the bottom of the boat?
No, it’s actually better if the bottom edge of the transducer protrudes by about 1/32 to 1/16 inch below the bottom of the boat.
This is just enough to ensure that it is covered by water even at planing speed, but not low enough to trigger turbulence and rooster tail formation.
If the transducer is flush with the bottom of the boat, it will still work at slower speed, but not at high speeds.
Can you mount a transducer too low?
Yes, if you mount a transducer too low, it will trigger turbulence and air bubble formation around the transducer, as well as rooster tail formation behind the transducer.
This turbulence decreases the quality of the sonar imaging, especially when your boat is planing at higher speed.
What side of the boat do you mount a transducer?
A transducer should be mounted on the side of the boat with the downstroke of the outboard propeller, which is usually on the starboard side.
An easy way to check this for your boat is to observe the direction of rotation of your propeller. If it’s clockwise, then your transducer placement should be on the starboard side, but if it’s anti-clockwise, then the transducer should be on the port side.
The side of the transom with the downward stroke of the prop has less turbulence than the side with the upward stroke, which is why it is the best transducer mounting location.
Where to mount a transducer on trolling motor
The best place to mount a transducer on a trolling motor depends on the type of transducer you’re using.
A forward facing transducer (such as LiveScope, Active Target , or MEGA Live) should be mounted on the shaft of the trolling motor, as that gives it an unobstructed view in the forward direction.
The great thing about this type of transducer mount is that it will automatically point your transducer in the same direction as the trolling motor.
However, you can also achieve this with a trolling motor barrel mount if the transducer is placed on the side of the lower compartment.
If you want to mount a 2D or down imaging transducer on your trolling motor, the best way to do this is with a barrel mount, which uses a circular mounting bracket that fits around the lower compartment of the trolling motor.
This mounting location is ideal for pointing the transducer downwards without obstructing its view.
The best locations to mount different types of transducers
Now let’s take a closer look at different types of transducers, and the best mounting locations for each of them.
Where to mount a side imaging transducer
The best location to mount a side imaging transducer is at the transom, since that usually allows its sonar beams to shoot sideways in both directions while you’re driving the boat around, which enables you to scout large areas of water to both sides without having to slow down.
But when mounting a side imaging transducer on the transom, you need to take care that you put it in a spot where it isn’t blocked on one side by the outboard motor when it is fully trimmed down.
Where to mount a down imaging transducer
The best location to mount a down imaging transducer is either the transom, or the trolling motor.
Which transducer placement is best for you depends on whether you plan to use the down imaging while you’re driving around (in which case a transom mount is best), or while you’re fishing (in which case a trolling motor mount is best).
If you mount your transducer on your trolling motor, the best option is a barrel mount, since that allows you to position it at the very bottom and pointing downwards with an unobstructed view.
Finally, Humminbird offers several thru hull down imaging transducers that you can mount inside your boat without drilling a hole.
This option is great if you want to use down imaging to scan the water below while driving around with your boat at planing speed.
Where to mount a LiveScope transducer
The best location to mount a LiveScope transducer is on the shaft of your trolling motor, which is ideal for a forward facing sonar. This also holds true for other brands of live sonar, including Lowrance Active Target or Humminbird MEGA Live .
However, an alternative option is to use a transducer mounting pole , which was specifically designed for live sonars, and can be positioned at the front of your boat similar to a trolling motor.
The nice thing about using a transducer mounting pole is that you can point your transducer in different directions independently of the trolling motor, simply by rotating the handle of the mounting pole.
The same mounting locations that are ideal for live sonar transducers are also a great choice for Humminbird 360 or Mega 360 transducers.
Where to mount an in-hull transducer
The best place to mount an In-hull transducer is as close as possible to the centerline of the hull and towards the aft end, since this part of the hull remains in contact with the water even at high speed.
If mounted correctly, this transducer location will allow you to get high quality sonar readings at high speed with an in-hull transducer.
But keep in mind that in-hull transducers can only be used on fiberglass boats, since fiberglass has sonar characteristics that are similar to water, which enables an in-hull transducer to shoot its sonar beam through the hull.
When choosing the right location to mount an in-hull transducer, choose an area that has no ribs, rivets, or other protrusions on the outside of the hull, in order to avoid water turbulence.
You also need to avoid locations with cables or other sources of interference.
Where to mount a thru hull transducer
The best place for mounting a thru hull transducer is as close as possible to the centerline of the hull and towards the aft of the boat.
Choosing an aft midship transducer placement ensures that the transducer will be in contact with water even when planing at high speed.
Also, if you have an inboard motor, make sure that the thru hull transducer is mounted forward of the propeller.
Where to mount a transducer on a pontoon boat
The best place to mount a transducer is at the bottom edge of the bracket at the back end on one of the pontoon tubes.
Since pontoon boats are built on top of pontoon tubes, they don’t have a transom like other boat types, and so require a different using a different location to mount a transducer.
When mounting the transducer, make sure that it is just under the water line, and parallel to the water surface.
If your cockpit is on the starboard side, it’s a good idea to mount the transducer on the same side, to make it easier to run a cable to the cockpit.
And when you lay down the cable, make sure to keep it away from any other wires or electronic devices that can cause interference.
Leave a Reply
Your email address will not be published. Required fields are marked *
Please verify you are a human
Access to this page has been denied because we believe you are using automation tools to browse the website.
This may happen as a result of the following:
- Javascript is disabled or blocked by an extension (ad blockers for example)
- Your browser does not support cookies
Please make sure that Javascript and cookies are enabled on your browser and that you are not blocking them from loading.
Reference ID: ec7d2ae5-762a-11ef-9f7f-8871db045898
Powered by PerimeterX , Inc.
- 2024 BOAT BUYERS GUIDE
- Email Newsletters
- Boat of the Year
- 2024 Freshwater Boat and Gear Buyers Guide
- 2024 Boat Buyers Guide
- 2024 Water Sports Boat Buyers Guide
- 2024 Pontoon Boat Buyers Guide
- Cruising Boats
- Pontoon Boats
- Fishing Boats
- Personal Watercraft
- Water Sports
- Boat Walkthroughs
- What To Look For
- Watersports Favorites Spring 2022
- Boating Lab
- Boating Safety
- Ultimate Boating Giveaway
Installing a Transom-Mount Transducer on a Boat
- By Jim Hendricks
- Updated: April 6, 2020

It don’t mean a thing if ain’t got that ping. With apologies to the first lady of song, the late great Ella Fitzgerald, that sums up fish-finder performance. The world’s finest sonar is useless without a transducer that pings and receives the echoes in an effective manner. Ultimately, pings paint the picture of the underwater world. To work well, a transducer requires immersion in water that’s free of air bubbles that cause aeration and result in sonar interference.
Read Next: Airmar TM165HW Wide-Beam Chirp-Ready Transducer (Transom-Mount)
Many transducers are mounted with a bracket on the transom — a convenient location that requires no large holes in the bottom of the boat and eliminates interference with trailer bunks. But this zone is also prone to excessive aeration as H₂O streams out from under the hull and props agitate the water. These transducers demand careful installation. Here are tips for mounting one of the most popular transom-mount models, the Airmar P66 dual-frequency ’ducer (available with a speed and temp sensor)on a sterndrive boat with a 12-degree transom angle. Make sure the connector plug on the cable matches the transducer port for your particular brand of fish finder.
Skill Level: 2 of 5
Finish Time: Approx. 3 hours
Tools and Supplies
• Airmar P66 transom-mount Triducer with speed and temp sensors ($159.99, westmarine.com )
• Power drill, drill-bit set and countersink
• Phillips screwdriver
• Straightedge
• 3M 4200 marine sealant
• Electricians snake (for routing cables)
• Masking tape (to secure template)
• Measuring tape
• Stern Saver mounting block, to avoid drilling into the transom ($49.99, tacklewarehouse.com )

On single-drive boats, Airmar recommends locating the P66 on the side where propeller blades are moving downward, which is usually the starboard-side of a single outboard or sterndrive. It should be as close to the centerline as possible but at least 3 inches outside the swing radius of the prop blades. For twin drives, mount the transducer between the drives. Avoid areas abaft through-hull fittings or pickups that create turbulence. If you opted for a speed sensor, connect the cable to the fish finder and spin the paddle wheel to ensure it reads. Make sure there is a relatively accurate (ambient air) temp reading. If not, return it to your place of purchase.
Tip: An alternate to drilling holes in the transom, especially on aluminum boats, is to use a King Starboard (poly) block such as a Stern Saver to accept the retaining hardware. The block gets glued to the hull with a special adhesive, and hardware gets screwed into the block.

Cut out the supplied template and position it so the arrow at the bottom is aligned with the bottom edge of the transom. Be sure the template is parallel with the waterline, then tape it in place. Using a 9/64-inch bit, drill three holes 7/8-inch deep at the marked locations. To prevent from drilling too deeply, wrap masking tape around the bit 7/8-inch from the point. To minimize gelcoat cracking, run the drill in reverse until the gelcoat is penetrated. After drilling, lightly chamfer each hole with a countersink bit to prevent further cracking. Drill holes 90 degrees to the angled transom surface, not horizontally, to ensure that the screw heads sit flush with the bracket.
Tip: Drill the holes at position B on the template for hulls with reverse transom slopes of between 16 and 22 degrees. Use position A to drill holes if the slope is between 2 and 15 degrees.

With the bracket removed, apply marine sealant such as 3M 4200 (suitable for below-the-waterline applications) to the supplied three No. 10-by-13/4-inch self-tapping stainless-steel screws. Also squeeze sealant into each of the three mounting holes that you drilled in the previous step. Use a manual Phillips screwdriver to screw the bracket into the transom, but don’t completely tighten screws at this point. Slide the bracket up or down in the slotted adjustment holes until the distance from the bottom left corner and bottom of the transom is 11/2 inches. Then make sure the bottom of the bracket is parallel with the waterline. At this point, tighten the screws.

Open the retaining cover on the top of the transducer bracket by depressing the latch and rotating the cover downward. Then insert the transducer’s pivot posts into the slots on the top the bracket. With posts in position, push down on the transducer to click the posts in place. Rotate the transducer downward until it snaps into the bracket. Close the retaining cover. Install the paddle-wheel speed sensor, if you have one. Route the transducer cable to the fish finder. If it is necessary to drill through the transom to route the cable, be sure to use the supplied cable cap and sealant to prevent water intrusion. Use cable clamps to secure the cable along the length of its run.
Tip: If you need to release the transducer from the bracket, use a sharp upward blow with your palm on the underside of the ’ducer. This allows access to the mounting screws if you need to adjust the height. If the transducer accidentally gets latched before mounting to the transom, slots on each side of the bracket allow a screwdriver to be inserted, releasing the bracket.
- More: diy projects , How-To , transducer , Weekend Workbook
More How To

Compounding Mistakes Make for a Dangerous Situation

On Board With: Monique Richter

Grady-White Pulls off Its Largest Raft-up Ever in Vieques, Puerto Rico

Installing Retractable Transom Straps

Boat Test: 2024 Grady-White 231 Coastal Explorer

Boat Test: 2024 Hurricane SunDeck 2600 OB

Boat Test: 2024 Brabus Shadow 1200 Sun-Top

Inflatable Water Mats for Boaters
- Digital Edition
- Customer Service
- Privacy Policy
- Terms of Use
- Cruising World
- Sailing World
- Salt Water Sportsman
- Sport Fishing
- Wakeboarding
Many products featured on this site were editorially chosen. Boating may receive financial compensation for products purchased through this site.
Copyright © 2024 Boating Firecrown . All rights reserved. Reproduction in whole or in part without permission is prohibited.
IMAGES
VIDEO
COMMENTS
Multibeam thru-hull transducer with premium FrontVü™ forward-looking sonar helps you avoid running aground¹ by displaying the bottom ahead of your boat in real time on your chartplotter. It also includes LiveVü Forward sonar so you can see fish — even divers — swimming in real time under and ahead of your boat with a 300' forward range.
Most challenging to install, but likely to provide best signal quality. Displacement, power and sailboats generally use thru-hulls. If you are considering installing a thru-hull on your boat, check out our West Advisor article on Installing a Thru-hull Transducer. Tilted Element Transducers. A type of semi-flush thru-hull transducer.
Proper transducer placement depends on the type of hull and the style of transducer you choose to install. Consistent high-quality sonar signal demands the transducer rides in clean, unaerated water beneath the boat. (1) A transom-mount transducer sits on a bracket behind the boat to ease installation. (2) Position the transducer aft near the ...
Transducer Frequency. The accuracy with which your fishfinder detects bottom and other objects is also determined by the frequency selected for the depth you are viewing. Raymarine depth transducers can be tuned to two different frequencies: 200 kHz (high) or 50kHz (low). 200 kHz works best in water under 200 feet/60 meters and when you need to ...
A narrow beam of 10-15°, on the other hand, concentrates its energy on a section right below the boat. When looking for individual fish or bottom structure in shallow water (say under 100-200'), a narrow-beamed transducer should be the first choice. Note that there is a certain amount of correlation between a transducer's frequency and its ...
Garmin ClearVü and SideVü sonars deliver an amazingly clear picture of what's under and to the side of your boat. You're a boater who needs a thru-hull transducer that delivers maximum depth performance with clearly defined fish arches and structure. Go with the 350-watt GT12M-THF, 600-watt GT15M-THF or 1-kilowatt GT17M-THF.
Through-hull transducers are mounted through a hole drilled in the bottom of the boat and protrude directly into the water. This type of transducer generally provides the best all-around performance. Through-hulls are recommended for displacement hulls and boats with straight-shaft inboard engines. You'll also need a fairing block that allows ...
Here's a video on how to install a transducer mounting plate. 2. Through-hull transducers - Through-hull transducers are known for providing the best performance possible. However, since putting one into your boat means cutting a hole in the hull, it's best to have a skilled professional handle the installation.
The beam of a transducer set to 200 kHz, left, covers less area but shows much more detail. This is the frequency that's most useful for shallow-water applications. The 50 kHz transducer beam, right, sacrifices some detail for a broader beam, useful for searching deep water.|. Belen explained that not all hulls are suited for this treatment.
The transducer is a central part of your sportfishing arsenal - but it isn't everything. Combining your transducer with the right gear across your boat is key to unlocking your full potential out on the water. For testing the waters of fishing with sonar, our GO series combines brilliantly with 300W or 600W transducers.
Transmitting at 455kHz or 800kHz frequencies, scanning sonar provides high-resolution views to the sides (SideScan) and beneath (DownScan Imaging) the boat. 800kHz provides the sharpest resolution at shallower depths, while 455kHz delviers the best overall image quality and depth penetration. HDI. HDI is a transducer that combines a round ...
Where is the Best Place to Put a Transducer on a Boat? Transducer placement is crucial to performance. You must drill through the hull for thru-hull transducers, so you'll want to be sure to get this right the first time. Unfortunately, there isn't a singular placement spot that works great for every boat or transducer type.
These transducers are often installed in pairs, with separate units for the high and low frequencies. When choosing any through-hull transducer, consider the hull material. Transducers with bronze or stainless housings are commonly used in fiberglass or wooden boats. Plastic through-hulls are offered for aluminum fishing boats.
A 50 kHz Transducer may have a 35° Beam angle, whereas dual- frequency or dual search transducers come with both narrow (eg. 12°, 200 kHz) and wide (eg. 35°, 50 kHz) Beam angles. Typically a lower Frequency will give you a wider Beam angle. While a wider angle may give you a wider view of what's beneath your Boat, the Resolution won't be as ...
Angler's Guide to Marine Transducers. Because there are a number of variables in transducer types that can dramatically affect your Fish Finder's performance, understanding these variables is the key to selecting the right transducer. This guide will help you learn what makes a transducer 'tick.'. Download the Angler's Guide to Marine Transducers.
One of the latest in-hull models is the M285HW chirp-ready transducer from Airmar. It operates at 1,000 watts on a — high-frequency band of 150 to 250 kHz with a fixed beam angle of 25 degrees for maximum coverage under the boat out to depths of 500 feet.
Recently, I worked with a client who was upgrading to a new system on a 1980's era Catalina sailboat and was replacing a transducer with a 2" (5.08 cm) diameter through-hull to a 3" (7.62 cm) diameter through-hull. To compound the problem, the transducer had been leaking lightly throughout the 2020 season. ... Access to the transducer ...
Where to mount a transducer on a boat. The top five transducer mounting locations on a boat are: Transom mount. Trolling motor mount. In-hull mount. Pole mount. Thru hull mount. Out of these five transducer placement options, the most commonly used ones by far are transom and trolling motor mounts, though the other three can also be great ...
For boats capable of speeds above 25 knots, review transducer location and operating results of similar boats before proceeding. For fin keel sailboats, mount it to the side of the centerline and forward of the fin keel 1' to 2'. For full keel sailboats, locate the transducer amidships and away from the keel at the point of minimum deadrise angle.
Slide the bracket up or down in the slotted adjustment holes until the distance from the bottom left corner and bottom of the transom is 11/2 inches. Then make sure the bottom of the bracket is parallel with the waterline. At this point, tighten the screws. Attach the Transducer Tim Barker.
What to Know About a Transducer. 1.1 Use a Mounting Plate. 1.2 Tape Your Drill Bit. 1.3 No Electric Drivers! 1.4 Chamfer and Seal Your Holes. 1.5 Level Your Transducer with the Transom Waterline. 1.6 If You Lose Bottom at Speed, Go Lower. 1.7 Lower the Tail a Few Degrees is Necessary. 2.
Navico Group is a division of Brunswick Corporation. We'll help you find the right transducer for your display and style of fishing. If you want more accurate and higher-definition underwater views, getting a Lowrance transducer is the place to start.
Transom-mount transducers - Transom-mount transducers are the most common type, especially on smaller boats that are about 25 feet long and shorter. They offer good detail, but installing one can be a bit tricky because a transom-mount transducer needs a solid flow of water with as little turbulence as possible.