Sailboat Parts Explained: Illustrated Guide (with Diagrams)
When you first get into sailing, there are a lot of sailboat parts to learn. Scouting for a good guide to all the parts, I couldn't find any, so I wrote one myself.
Below, I'll go over each different sailboat part. And I mean each and every one of them. I'll walk you through them one by one, and explain each part's function. I've also made sure to add good illustrations and clear diagrams.
This article is a great reference for beginners and experienced sailors alike. It's a great starting point, but also a great reference manual. Let's kick off with a quick general overview of the different sailboat parts.

General Overview
The different segments
You can divide up a sailboat in four general segments. These segments are arbitrary (I made them up) but it will help us to understand the parts more quickly. Some are super straightforward and some have a bit more ninja names.
Something like that. You can see the different segments highlighted in this diagram below:

The hull is what most people would consider 'the boat'. It's the part that provides buoyancy and carries everything else: sails, masts, rigging, and so on. Without the hull, there would be no boat. The hull can be divided into different parts: deck, keel, cabin, waterline, bilge, bow, stern, rudder, and many more.
I'll show you those specific parts later on. First, let's move on to the mast.

Sailboats Explained
The mast is the long, standing pole holding the sails. It is typically placed just off-center of a sailboat (a little bit to the front) and gives the sailboat its characteristic shape. The mast is crucial for any sailboat: without a mast, any sailboat would become just a regular boat.
I think this segment speaks mostly for itself. Most modern sailboats you see will have two sails up, but they can carry a variety of other specialty sails. And there are all kinds of sail plans out there, which determine the amount and shape of sails that are used.
The Rigging
This is probably the most complex category of all of them.
Rigging is the means with which the sails are attached to the mast. The rigging consists of all kinds of lines, cables, spars, and hardware. It's the segment with the most different parts.
The most important parts
If you learn anything from this article, here are the most important parts of any sailboat. You will find all of these parts in some shape or form on almost any sailboat.

Okay, we now have a good starting point and a good basic understanding of the different sailboat parts. It's time for the good stuff. We're going to dive into each segment in detail.
Below, I'll go over them one by one, pointing out its different parts on a diagram, listing them with a brief explanation, and showing you examples as well.
After reading this article, you'll recognize every single sailboat part and know them by name. And if you forget one, you're free to look it up in this guide.

On this page:
The hull is the heart of the boat. It's what carries everything: the mast, the sails, the rigging, the passengers. The hull is what provides the sailboat with its buoyancy, allowing it to stay afloat.
Sailboats mostly use displacement hulls, which is a shape that displaces water when moving through it. They are generally very round and use buoyancy to support its own weight. These two characteristics make sure it is a smooth ride.
There are different hull shapes that work and handle differently. If you want to learn more about them, here's the Illustrated Guide to Boat Hull Types (with 11 Examples ). But for now, all we need to know is that the hull is the rounded, floating part of any sailboat.
Instead of simply calling the different sides of a hull front, back, left and right , we use different names in sailing. Let's take a look at them.

The bow is the front part of the hull. It's simply the nautical word for 'front'. It's the pointy bit that cuts through the water. The shape of the bow determines partially how the boat handles.
The stern is the back part of the hull. It's simply the nautical word for 'back'. The shape of the stern partially determines the stability and speed of the boat. With motorboats, the stern lies deep inside the water, and the hull is flatter aft. Aft also means back. This allows it to plane, increasing the hull speed. For sailboats, stability is much more important, so the hull is rounded throughout, increasing its buoyancy and hydrodynamic properties.
The transom is the backplate of the boat's hull. It's the most aft (rear) part of the boat.
Port is the left side of a sailboat.
Starboard is the right side of a sailboat
The bilges are the part where the bottom and the sides of the hull meet. On sailboats, these are typically very round, which helps with hydrodynamics. On powerboats, they tend to have an angle.
The waterline is the point where the boat's hull meets the water. Generally, boat owners paint the waterline and use antifouling paint below it, to protect it from marine growth.
The deck is the top part of the boat's hull. In a way, it's the cap of the boat, and it holds the deck hardware and rigging.
Displacement hulls are very round and smooth, which makes them very efficient and comfortable. But it also makes them very easy to capsize: think of a canoe, for example.
The keel is a large fin that offsets the tendency to capsize by providing counterbalance. Typically, the keel carries ballast in the tip, creating a counterweight to the wind's force on the sails.
The rudder is the horizontal plate at the back of the boat that is used to steer by setting a course and maintaining it. It is connected to the helm or tiller.
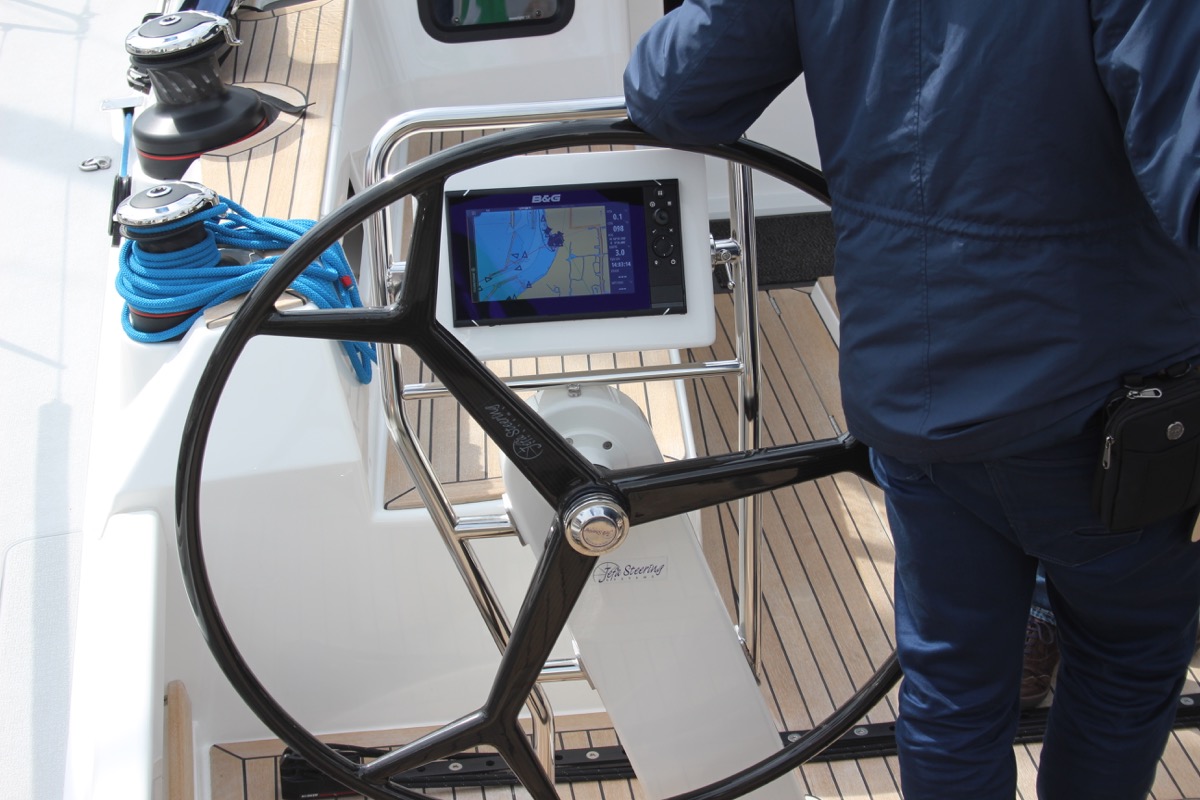
Tiller or Helm
- The helm is simply the nautical term for the wheel.
- The tiller is simply the nautical term for the steering stick.
The tiller or helm is attached to the rudder and is used to steer the boat. Most smaller sailboats (below 30') have a tiller, most larger sailboats use a helm. Large ocean-going vessels tend to have two helms.
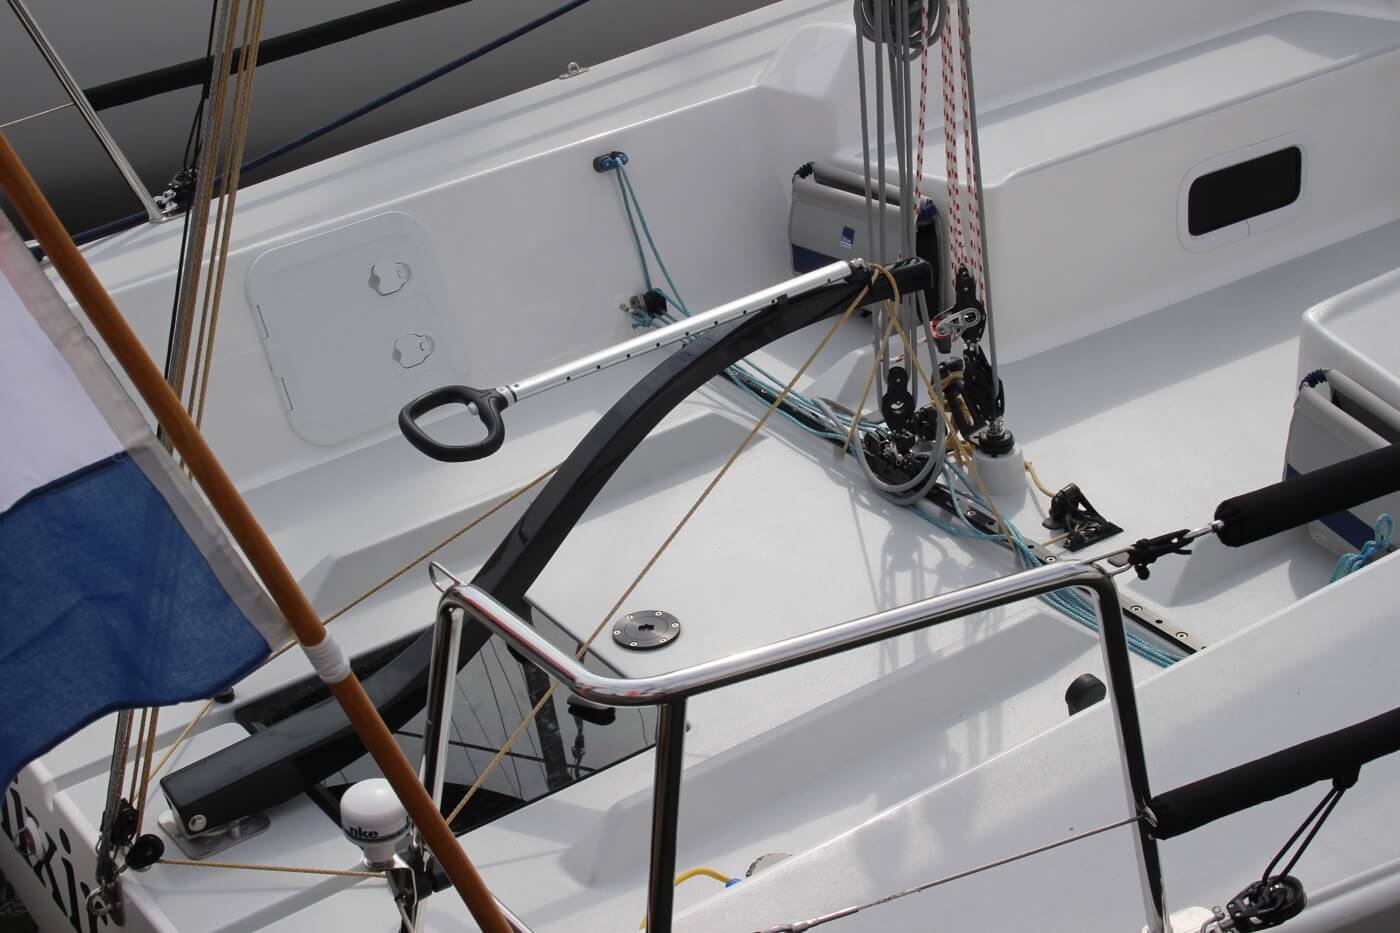
The cockpit is the recessed part in the deck where the helmsman sits or stands. It tends to have some benches. It houses the outside navigation and systems interfaces, like the compass, chartplotter, and so on. It also houses the mainsheet traveler and winches for the jib. Most boats are set up so that the entire vessel can be operated from the cockpit (hence the name). More on those different parts later.
Most larger boats have some sort of roofed part, which is called the cabin. The cabin is used as a shelter, and on cruising sailboats you'll find the galley for cooking, a bed, bath room, and so on.
The mast is the pole on a sailboat that holds the sails. Sailboats can have one or multiple masts, depending on the mast configuration. Most sailboats have only one or two masts. Three masts or more is less common.
The boom is the horizontal pole on the mast, that holds the mainsail in place.
The sails seem simple, but actually consist of many moving parts. The parts I list below work for most modern sailboats - I mean 90% of them. However, there are all sorts of specialty sails that are not included here, to keep things concise.

The mainsail is the largest sail on the largest mast. Most sailboats use a sloop rigging (just one mast with one bermuda mainsail). In that case, the main is easy to recognize. With other rig types, it gets more difficult, since there can be multiple tall masts and large sails.
If you want to take a look at the different sail plans and rig types that are out there, I suggest reading my previous guide on how to recognize any sailboat here (opens in new tab).
Sail sides:
- Leech - Leech is the name for the back side of the sail, running from the top to the bottom.
- Luff - Luff is the name for the front side of the sail, running from the top to the bottom.
- Foot - Foot is the name for the lower side of the sail, where it meets the boom.
Sail corners:
- Clew - The clew is the lower aft (back) corner of the mainsail, where the leech is connected to the foot. The clew is attached to the boom.
- Tack - The tack is the lower front corner of the mainsail
- Head - The head is the top corner of the mainsail
Battens are horizontal sail reinforcers that flatten and stiffen the sail.
Telltales are small strings that show you whether your sail trim is correct. You'll find telltales on both your jib and mainsail.
The jib is the standard sized headsail on a Bermuda Sloop rig (which is the sail plan most modern sailboats use).
As I mentioned: there are all kinds, types, and shapes of sails. For an overview of the most common sail types, check out my Guide on Sail Types here (with photos).
The rigging is what is used to attach your sails and mast to your boat. Rigging, in other words, mostly consists of all kinds of lines. Lines are just another word for ropes. Come to think of it, sailors really find all kinds of ways to complicate the word rope ...
Two types of rigging
There are two types of rigging: running and standing rigging. The difference between the two is very simple.
- The running rigging is the rigging on a sailboat that's used to operate the sails. For example, the halyard, which is used to lower and heave the mainsail.
- The standing rigging is the rigging that is used to support the mast and sail plan.
Standing Rigging

Here are the different parts that belong to the standing rigging:
- Forestay or Headstay - Line or cable that supports the mast and is attached to the bow of the boat. This is often a steel cable.
- Backstay - Line or cable that supports the mast and is attached to the stern of the boat. This is often a steel cable.
- Sidestay or Shroud - Line or cable that supports the mast from the sides of the boat. Most sailboats use at least two sidestays (one on each side).
- Spreader - The sidestays are spaced to steer clear from the mast using spreaders.
Running Rigging: different words for rope
Ropes play a big part in sailing, and especially in control over the sails. In sailboat jargon, we call ropes 'lines'. But there are some lines with a specific function that have a different name. I think this makes it easier to communicate with your crew: you don't have to define which line you mean. Instead, you simply shout 'mainsheet!'. Yeah, that works.
Running rigging consists of the lines, sheets, and hardware that are used to control, raise, lower, shape and manipulate the sails on a sailboat. Rigging varies for different rig types, but since most sailboats are use a sloop rig, nearly all sailboats use the following running rigging:

- Halyards -'Halyard' is simply the nautical name for lines or ropes that are used to raise and lower the mainsail. The halyard is attached to the top of the mainsail sheet, or the gaffer, which is a top spar that attaches to the mainsail. You'll find halyards on both the mainsail and jib.
- Sheets - 'Sheet' is simply the nautical term for lines or ropes that are used to set the angle of the sail.
- Mainsheet - The line, or sheet, that is used to set the angle of the mainsail. The mainsheet is attached to the Mainsheet traveler. More on that under hardware.
- Jib Sheet - The jib mostly comes with two sheets: one on each side of the mast. This prevents you from having to loosen your sheet, throwing it around the other side of the mast, and tightening it. The jib sheets are often controlled using winches (more on that under hardware).
- Cleats are small on-deck hooks that can be used to tie down sheets and lines after trimming them.
- Reefing lines - Lines that run through the mainsail, used to put a reef in the main.
- The Boom Topping Lift is a line that is attached to the aft (back) end of the boom and runs to the top of the mast. It supports the boom whenever you take down the mainsail.
- The Boom Vang is a line that places downward tension on the boom.
There are some more tensioning lines, but I'll leave them for now. I could probably do an entire guide on the different sheets on a sailboat. Who knows, perhaps I'll write it.
This is a new segment, that I didn't mention before. It's a bit of an odd duck, so I threw all sorts of stuff into this category. But they are just as important as all the other parts. Your hardware consists of cleats, winches, traveler and so on. If you don't know what all of this means, no worries: neither did I. Below, you'll find a complete overview of the different parts.
Deck Hardware

Just a brief mention of the different deck hardware parts:
- Pulpits are fenced platforms on the sailboat's stern and bow, which is why they are called the bow pulpit and stern pulpit here. They typically have a solid steel framing for safety.
- Stanchons are the standing poles supporting the lifeline , which combined for a sort of fencing around the sailboat's deck. On most sailboats, steel and steel cables are used for the stanchons and lifelines.
Mainsheet Traveler
The mainsheet traveler is a rail in the cockpit that is used to control the mainsheet. It helps to lock the mainsheet in place, fixing the mainsails angle to the wind.
If you're interested in learning more about how to use the mainsheet traveler, Matej has written a great list of tips for using your mainsheet traveler the right way . It's a good starting point for beginners.
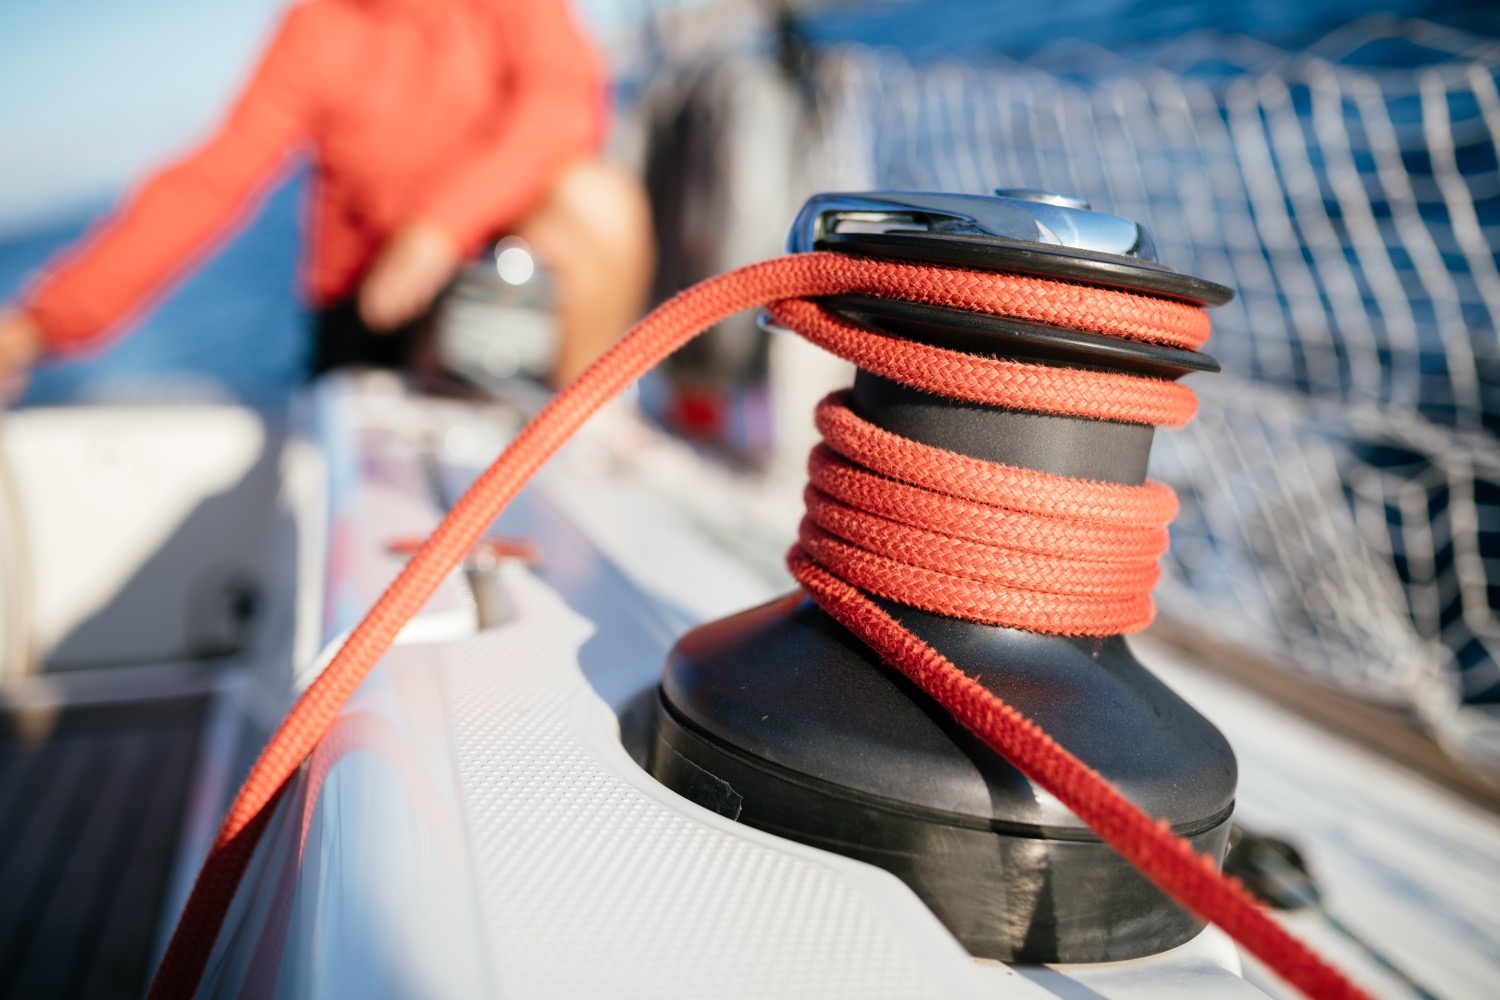
Winches are mechanical or electronic spools that are used to easily trim lines and sheets. Most sailboats use winches to control the jib sheets. Modern large sailing yachts use electronic winches for nearly all lines. This makes it incredibly easy to trim your lines.
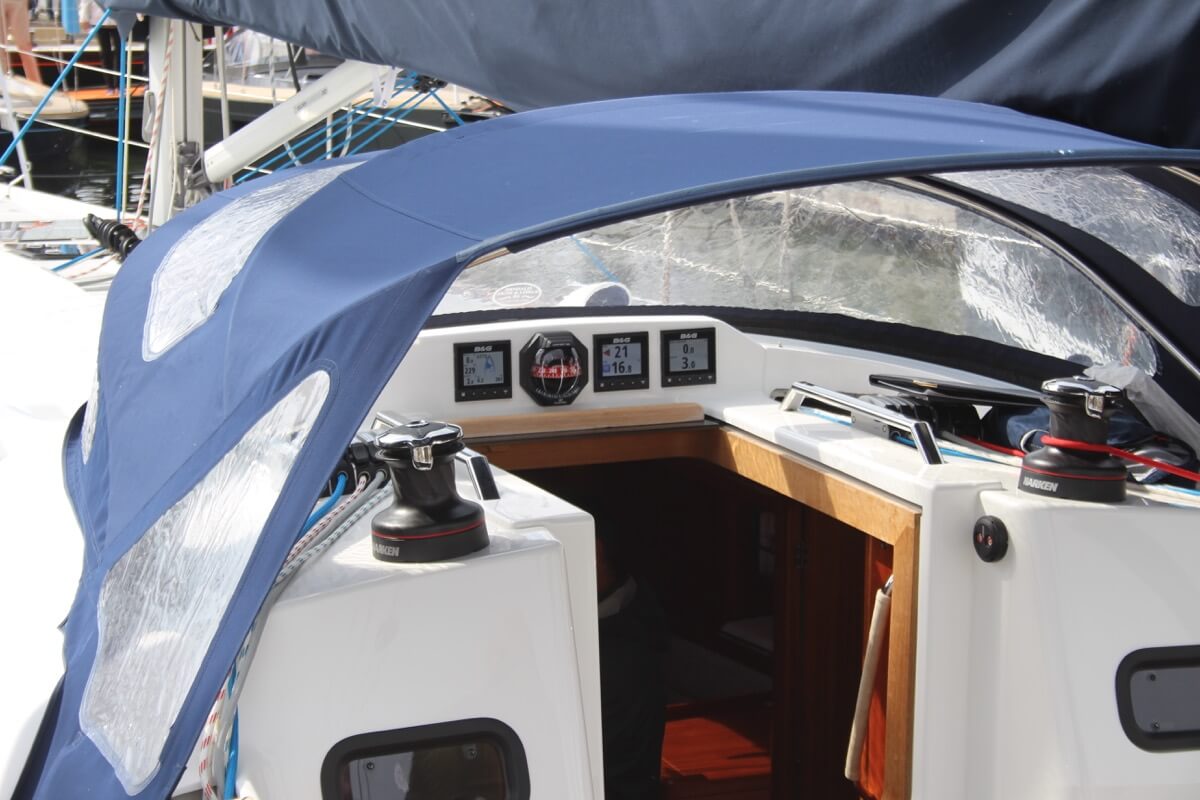
You'll find the compass typically in the cockpit. It's the most old-skool navigation tool out there, but I'm convinced it's also one of the most reliable. In any way, it definitely is the most solid backup navigator you can get for the money.
Want to learn how to use a compass quickly and reliably? It's easy. Just read my step-by-step beginner guide on How To Use a Compass (opens in new tab .
Chartplotter
Most sailboats nowadays use, besides a compass and a map, a chartplotter. Chartplotters are GPS devices that show a map and a course. It's very similar to your normal car navigation.
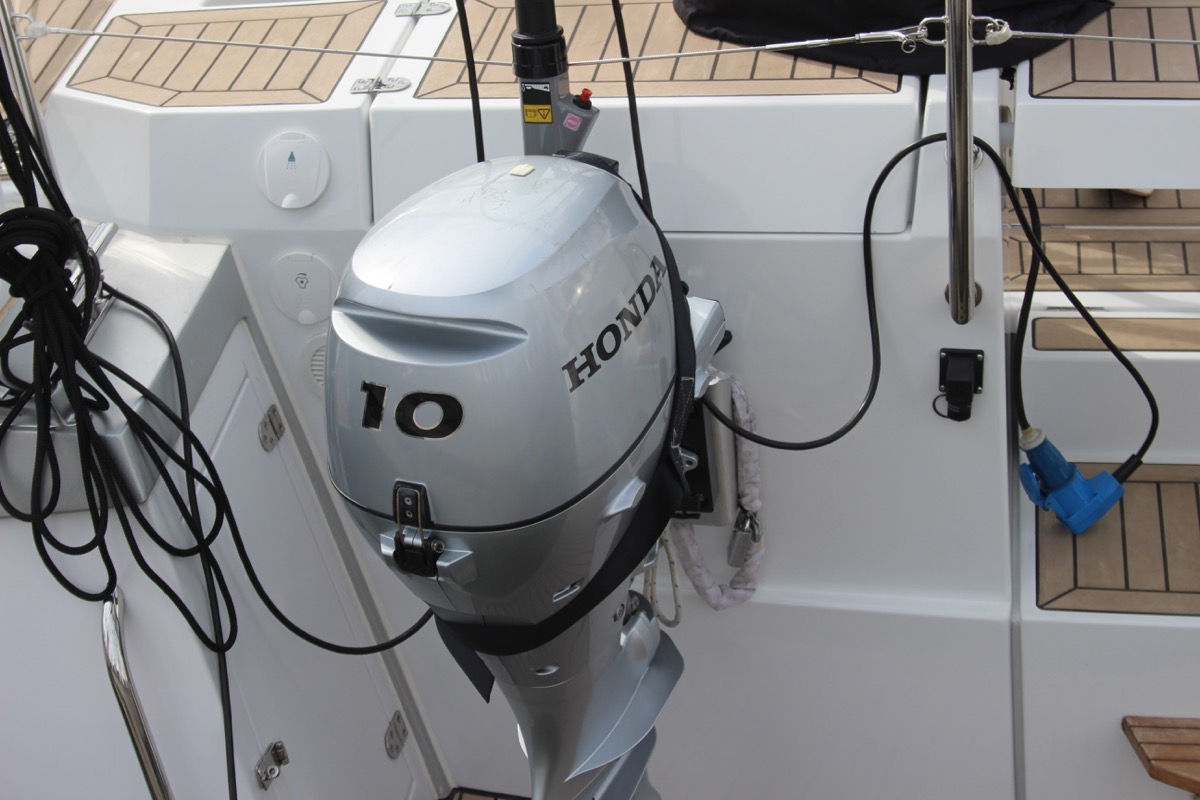
Outboard motor
Most sailboats have some sort of motor to help out when there's just the slightest breeze. These engines aren't very big or powerful, and most sailboats up to 32' use an outboard motor. You'll find these at the back of the boat.
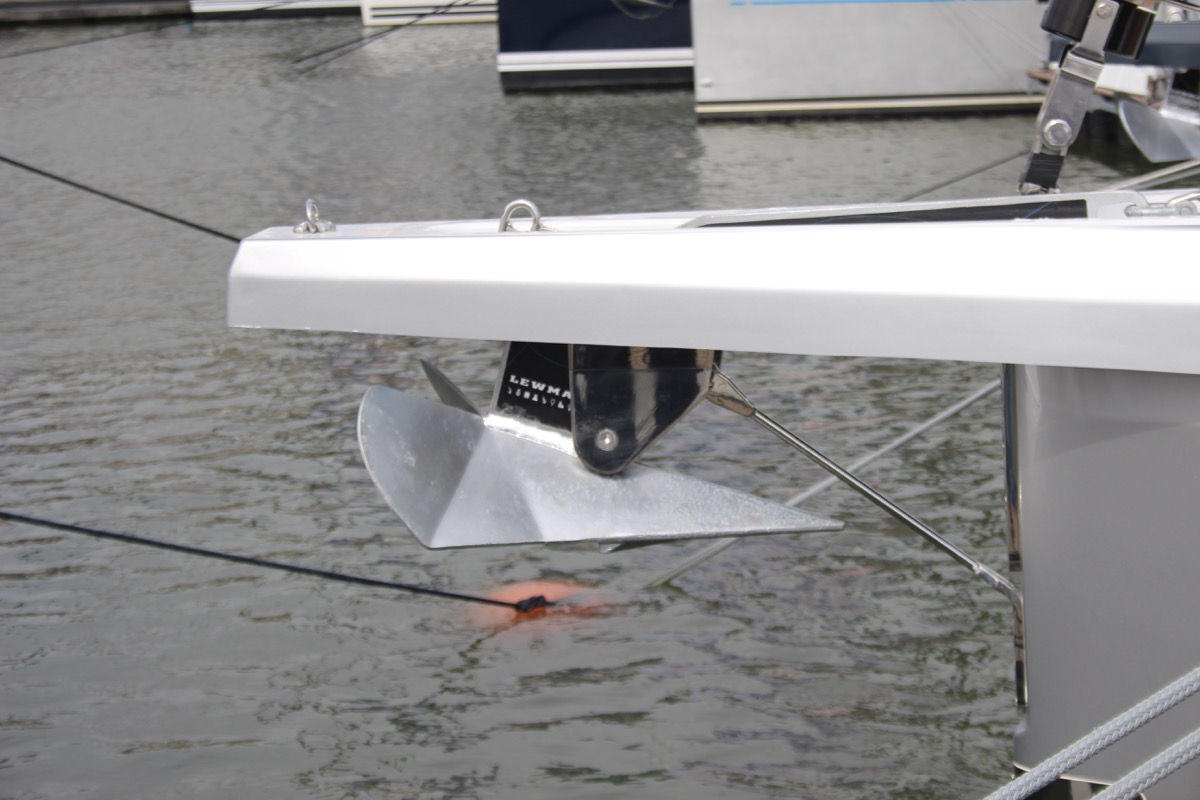
Most sailboats carry 1 - 3 anchors: one bow anchor (the main one) and two stern anchors. The last two are optional and are mostly used by bluewater cruisers.
I hope this was helpful, and that you've gained a good understanding of the different parts involved in sailing. I wanted to write a good walk-through instead of overwhelming you with lists and lists of nautical terms. I hope I've succeeded. If so, I appreciate any comments and tips below.
I've tried to be as comprehensive as possible, without getting into the real nitty gritty. That would make for a gigantic article. However, if you feel I've left something out that really should be in here, please let me know in the comments below, so I can update the article.
I own a small 20 foot yacht called a Red witch made locally back in the 70s here in Western Australia i found your article great and enjoyed reading it i know it will be a great help for me in my future leaning to sail regards John.
David Gardner
İ think this is a good explanation of the difference between a ”rope” and a ”line”:
Rope is unemployed cordage. In other words, when it is in a coil and has not been assigned a job, it is just a rope.
On the other hand, when you prepare a rope for a specific task, it becomes employed and is a line. The line is labeled by the job it performs; for example, anchor line, dock line, fender line, etc.
Hey Mr. Buckles
I am taking on new crew to race with me on my Flying Scot (19ft dingy). I find your Sailboat Parts Explained to be clear and concise. I believe it will help my new crew learn the language that we use on the boat quickly without being overwhelmed.
PS: my grandparents were from Friesland and emigrated to America.
Thank you Shawn for the well written, clear and easy to digest introductory article. Just after reading this first article I feel excited and ready to set sails and go!! LOL!! Cheers! Daniel.
steve Balog
well done, chap
Great intro. However, the overview diagram misidentifies the cockpit location. The cockpit is located aft of the helm. Your diagram points to a location to the fore of the helm.
William Thompson-Ambrose
An excellent introduction to the basic anatomy and function of the sailboat. Anyone who wants to start sailing should consider the above article before stepping aboard! Thank-you
James Huskisson
Thanks for you efforts mate. We’ve all got to start somewhere. Thanks for sharing. Hoping to my first yacht. 25ft Holland. Would love to cross the Bass Strait one day to Tasmania. 👌 Cheers mate
Alan Alexander Percy
thankyou ijust aquired my first sailboat at 66yrs of age its down at pelican point a beautifull place in virginia usa my sailboat is a redwing 30 if you are ever in the area i wouldnt mind your guidance and superior knowledge of how to sail but iam sure your fantastic article will help my sailboat is wings 30 ft
Thanks for quick refresher course. Having sailed in California for 20+ years I now live in Spain where I have to take a spanish exam for a sailboat license. Problem is, it’s only in spanish. So a lot to learn for an old guy like me.
Very comprehensive, thank you
Your article really brought all the pieces together for me today. I have been adventuring my first sailing voyage for 2 months from the Carolinas and am now in Eleuthera waiting on weather to make the Exumas!!! Great job and thanks
Helen Ballard
I’ve at last found something of an adventure to have in sailing, so I’m starting at the basics, I have done a little sailing but need more despite being over 60 life in the old dog etc, thanks for your information 😊
Barbara Scott
I don’t have a sailboat, neither do l plan to literally take to the waters. But for mental exercise, l have decided to take to sailing in my Bermuda sloop, learning what it takes to become a good sailor and run a tight ship, even if it’s just imaginary. Thank you for helping me on my journey to countless adventures and misadventures, just to keep it out of the doldrums! (I’m a 69 year old African American female who have rediscovered why l enjoyed reading The Adventures of Robert Louis Stevenson as well as his captivating description of sea, wind, sailboat,and sailor).
Great article and very good information source for a beginner like me. But I didn’t find out what I had hoped to, which is, what are all those noisy bits of kit on top of the mast? I know the one with the arrow is a weather vane, but the rest? Many thanks, Jay.
Louis Cohen
The main halyard is attached to the head of the mainsail, not the to the mainsheet. In the USA, we say gaff, not gaffer. The gaff often has its own halyard separate from the main halyard.
Other than that it’s a nice article with good diagrams.
A Girl Who Has an Open Sail Dream
Wow! That was a lot of great detail! Thank you, this is going to help me a lot on my project!
Hi, good info, do u know a book that explains all the systems on a candc 27,
Leave a comment
You may also like, guide to understanding sail rig types (with pictures).
There are a lot of different sail rig types and it can be difficult to remember what's what. So I've come up with a system. Let me explain it in this article.

The Ultimate Guide to Sail Types and Rigs (with Pictures)

The Illustrated Guide To Boat Hull Types (11 Examples)

How To Live On a Boat For Free: How I'd Do It

How To Live on a Sailboat: Consider These 5 Things
Spreaders are one of the main controls available to create or limit mast bend. They work by joining the mid-section of the mast to the shrouds. The amount that they distort the shrouds from their natural straight line determines the behavior of the mast under sail. It is important to realize that only the windward shroud and spreader are under strain and hence affect mast bend when sailing. Spreaders are not adjustable while sailing and must be altered before launching the boat.
Spreader angle
The angle of the spreaders to the centerline controls the fore and aft direction of the mast bend. If the spreaders are lixed in such a way that they do not distort the shrouds, they do not force the mast to bend. As the middle of the mast bends naturally, the spreader will move with it and try to force the shroud forward which will then resist the movement. Spreaders angled backwards pull the shrouds aft of their natural straight line (right). When the shroud is under tension it tries to straighten, pulling the spreader and the middle of the mast forward. Spreaders angled forwards pull the shrouds forward of their natural straight line (far right) so that when the shrouds are under tension they pull the spreader and the middle of the mast aft, thus preventing the natural mast bend or even introducing reverse bend if the tension is great enough.
Spreader length
In the same way. the length of the spreaders can also be adjusted before stepping the mast to alter the degree of mast bend. When longer (under compression —near right) they stiffen the mast sideways or even induce reverse bend, but when adjusted so that the shrouds are not distorted (neutral—center right) they simply reduce any natural mast bend. When short (in tension —far right) they induce sideways, mast bend.
Continue reading here: Starting lines
Was this article helpful?
Related Posts
- Catamaran sailing in rough weather
- Changing course - Sailing Procedures
- How to tack - Sailing Procedures
- Catamaran sailing downwind
- Foredeck - Sailing Procedures
- Capsizing - Sailing Procedures
Spreader (sailboat)

A spreader is a spar on a sailing boat used to deflect the shrouds to allow them to better support the mast . [1] The spreader or spreaders serve much the same purpose as the crosstrees and tops in a traditional sailing vessel. [2]
Spreaders are used to increase the angle between the rigging and the mast, providing better support, and to adjust the mast's shape and bend. This allows the mast and rigging to be lighter and thinner, reducing their total weight. [3] Spreaders may be made of metal, often aluminium ; wood, often spruce ; or composite material such as carbon fiber. [2]
Spreader design and tuning can be quite complex. The spreaders may be fixed (rigid) or swinging (pivoted at the mast). Most cruising boats have fixed spreaders, but swinging spreaders are found on some racing boats. The length of a boat's beam determines how long the spreaders may be, so some boats have multiple sets of spreaders so the shroud can reach the desired angle from the mast. [2] Boats with tall masts, such as racing yachts , may have up to five sets. [3]
Related Research Articles

Rigging comprises the system of ropes, cables and chains, which support a sailing ship or sail boat's masts— standing rigging , including shrouds and stays—and which adjust the position of the vessel's sails and spars to which they are attached—the running rigging , including halyards, braces, sheets and vangs.
A sailboat or sailing boat is a boat propelled partly or entirely by sails and is smaller than a sailing ship. Distinctions in what constitutes a sailing boat and ship vary by region and maritime culture.

Sailing rigs describe the arrangement of sailing vessels' rig components, including their spars, rigging, and sails. Examples include a schooner rig, cutter rig, junk rig, etc. Rigs may be broadly categorized as fore-and-aft and square-rigged. They may incorporate a mixture of both categories. Within the fore-and-aft category there is a variety of triangular and quadrilateral sail shapes. Spars or battens may be used to help shape a given kind of sail. Each rig may be described with a sail plan—formally, a drawing of a vessel, viewed from the side.

A catboat is a sailboat with a single sail on a single mast set well forward in the bow of a very beamy and (usually) shallow draft hull. Typically they are gaff rigged, though Bermuda rig is also used. Most are fitted with a centreboard, although some have a keel. The hull can be 12 to 40 feet long with a beam half as wide as the hull length at the waterline. The type is mainly found on that part of the Eastern seaboard of the USA from New Jersey to Massachusetts.

Standing rigging comprises the fixed lines, wires, or rods, which support each mast or bowsprit on a sailing vessel and reinforce those spars against wind loads transferred from the sails. This term is used in contrast to running rigging, which represents the moveable elements of rigging which adjust the position and shape of the sails.

The Albacore is a 4.57 m (15 ft) two-person planing dinghy, for competitive racing and lake and near-inshore day sailing. Hulls are made of either wood or fiberglass. The basic shape was developed in 1954 from an Uffa Fox design, the Swordfish. Recent boats retain the same classic dimensions, and use modern materials and modern control systems.

A genoa sail is a type of large jib or staysail that extends past the mast and so overlaps the main sail when viewed from the side, sometimes eliminating it. It was originally called an "overlapping jib" and later a genoa jib . It is used on single-masted sloops and twin-masted boats such as yawls and ketches. Its larger surface area increases the speed of the craft in light to moderate winds; in high wind, a smaller jib is usually substituted, and downwind a spinnaker may be used.

Boat building is the design and construction of boats and their systems. This includes at a minimum a hull, with propulsion, mechanical, navigation, safety and other systems as a craft requires.

A spinnaker is a sail designed specifically for sailing off the wind on courses between a reach to downwind. Spinnakers are constructed of lightweight fabric, usually nylon, and are often brightly colored. They may be designed to perform best as either a reaching or a running spinnaker, by the shaping of the panels and seams. They are attached at only three points and said to be flown .

Running rigging is the rigging of a sailing vessel that is used for raising, lowering, shaping and controlling the sails on a sailing vessel—as opposed to the standing rigging, which supports the mast and bowsprit. Running rigging varies between vessels that are rigged fore and aft and those that are square-rigged.

The mast of a sailing vessel is a tall spar, or arrangement of spars, erected more or less vertically on the centre-line of a ship or boat. Its purposes include carrying sails, spars, and derricks, giving necessary height to a navigation light, look-out position, signal yard, control position, radio aerial or signal lamp. Large ships have several masts, with the size and configuration depending on the style of ship. Nearly all sailing masts are guyed.
This glossary of nautical terms is an alphabetical listing of terms and expressions connected with ships, shipping, seamanship and navigation on water. Some remain current, while many date from the 17th to 19th centuries. The word nautical derives from the Latin nauticus , from Greek nautikos , from nautēs : "sailor", from naus : "ship".
Tacking or coming about is a sailing maneuver by which a sailing craft, whose next destination is into the wind, turns its bow toward and through the wind so that the direction from which the wind blows changes from one side of the boat to the other, allowing progress in the desired direction. Sailing vessels are unable to sail higher than a certain angle towards the wind, so "beating to windward" in a zig-zag fashion with a series of tacking maneuvers, allows a vessel to sail towards a destination that is closer to the wind that the vessel can sail directly.

In sailing, the trapeze is a wire that comes from a point high on the mast, usually where the shrouds are fixed, to a hook on the crew member's harness at approximately waist level. The position when extended on the trapeze is outside the hull, braced against it with the soles of the feet, facing the masthead, and clipped on by a hook on the trapeze harness. This gives the crew member more leverage to keep the boat flat by allowing the crew member's centre of gravity to balance the force of the wind in the sails.

A wingsail , twin-skin sail or double skin sail is a variable-camber aerodynamic structure that is fitted to a marine vessel in place of conventional sails. Wingsails are analogous to airplane wings, except that they are designed to provide lift on either side to accommodate being on either tack. Whereas wings adjust camber with flaps, wingsails adjust camber with a flexible or jointed structure. Wingsails are typically mounted on an unstayed spar—often made of carbon fiber for lightness and strength. The geometry of wingsails provides more lift, and a better lift-to-drag ratio, than traditional sails. Wingsails are more complex and expensive than conventional sails.

A sailing yacht , is a leisure craft that uses sails as its primary means of propulsion. A yacht may be a sail or power vessel used for pleasure, cruising, or racing. There is no standard definition, so the term applies here to sailing vessels that have a cabin with amenities that accommodate overnight use. To be termed a "yacht", as opposed to a "boat", such a vessel is likely to be at least 33 feet (10 m) in length and have been judged to have good aesthetic qualities. Sailboats that do not accommodate overnight use or are smaller than 30 feet (9.1 m) are not universally called yachts. Sailing yachts in excess of 130 feet (40 m) are generally considered to be superyachts.
The following outline is provided as an overview of and topical guide to sailing:

The B&R rig is a variant of the Bermuda sailboat rig, designed and patented by Swedish aeronautical engineers Lars Bergström and Sven Ridder. It employs swept spreaders that are usually angled aft, together with "stays" running diagonally downward from the tip of the spreaders to the attachment of the next pair of spreaders to the mast or to the intersection of the mast with the deck that facilitates a pre-bend of the mast that is sometimes tuned into the rig before it is stepped onto the boat. Conventional shrouds thereby contribute to both lateral and longitudinal stability, unlike rigs with unswept spreaders. A B&R rig can be a masthead or fractional rig depending on how stays are configured; a backstay is optional. Such rigs are employed in many of the models of at least one U.S. manufacturer and in many thousands of boats, worldwide.
A solent refers to a sail and rigging system on sailboats, typically sloops. Sailors, particularly French sailors, often refer to a 100% jib as a Solent, because its smaller size is preferable when sailing in the strong winds found in the Solent between the Isle of Wight and Britain. The common use of roller-furling headsails, or genoas, on modern cruising yachts allows the jib to be reduced in size, but partially-furled sails lack the efficiency of a sail that is actually cut to a smaller size. Accordingly, it is preferable to fly a separate, smaller jib—the solent—instead.
- 1 2 3 Launer, Don. "Spreaders 101" . Good Old Boat . Retrieved 23 March 2023 .
- 1 2 Compton, Nic (21 April 2015). The Anatomy of Sail: The Yacht Dissected and Explained . Bloomsbury USA. pp. 58–59. ISBN 9781472902757 . Retrieved 23 March 2023 .
| , and | ||
|---|---|---|
| , outdated | ||
| Rigs ( ) | ||
| Other | ||
| Three-sided | |
|---|---|
| Four-sided | ( ) |
| On | ( ) |
|---|---|
| On |
| ( ) ( , ) | |
| ( , ) | |
| Components | ( ) ( ) |
This naval article is a . You can help Wikipedia by . |

- Sails & Canvas
- Hull & Structure
- Maintenance
- Sailing Stories
- Sailing Tips
- Boat Reviews
- Book Reviews
- The Dogwatch
Select Page
Equal Angles, Equal Forces
Posted by Connie McBride | Sailing Tips

Correct adjustment of your spreaders may save your rig
Next time you’re at the marina, look up. If there are enough sailboats around, you’ll likely find a variety of rigs, with masts sporting anywhere from zero to several sets of spreaders. And in that mix of masts, chances are there will be quite a few wonky spreaders.
Spreaders serve a couple purposes on a rig. To start, they act as a means of increasing the staying angle. The staying angle is the inside angle that is formed at the top of the mast, between the mast and stay. For a stay to exert the force necessary to support a mast, the staying angle should be at least 12 degrees, the minimum magic number. Sailboats are generally long enough that it’s easy, in the case of a forestay or a backstay, to meet or exceed the 12-degree minimum. But monohulls are not normally beamy enough (or the masts not short enough) to run a stay from the top of the mast to the outside of the hull and create a staying angle of at least 12 degrees.
Enter the spreader.
By introducing a spreader (to spread the angle between the mast and shroud), a staying angle greater than 12 degrees is easy to achieve, even on a narrow-beamed boat.
At this point, you may be wondering why multihulls use spreaders. After all, with all that beam, surely shrouds can be easily fixed at deck level such that the critical 12-degree staying angle is exceeded. And what about boats with taller masts, why two or more sets of spreaders? After all, the first set of spreaders establishes the critical angle.
In both cases, the answer is the same. In addition to providing a greater staying angle for shrouds, spreaders act as a compression member, supporting the mast where they’re attached, shortening the unsupported length of mast. A single set of spreaders set 3 ⁄ 4 of the way up a 48-foot mast produces two unsupported sections of mast, 36 feet below the spreaders and 12 feet above, rather than a single 48-foot unsupported section. Consider the often-used analogy of a stick of uncooked spaghetti. Put your hands on either end of the spaghetti and push. SNAP! It will break fairly easily. Now, take one of the shorter pieces and try it again. You’ll be able to exert much more force on a shorter strand without breaking it. Because your mast is loaded under compression forces, it should be clear why this is an apt comparison.
Now, take another, longer stick of spaghetti and have a friend pinch it in the middle, or perhaps in two places, and repeat the experiment. This time, the longer “mast” is as stiff as a shorter one. This is because the unsupported length is shorter. Shrouds exert a compressive force on the spreaders, which in turn act like a friend pinching the spaghetti: they shorten the unsupported section of mast, allowing you to have a taller rig that can handle the compression loads imposed on it, without buckling.
But spreaders are only as effective as their installation. Rigger-extraordinaire Brion Toss calls improper spreader angle the “single most common flaw in rigging.” Looking around the harbor, I agree. It appears there’s a not-so-uncommon misperception that spreaders should be horizontal, level with the water. The dangers of having spreaders in this position are significant.
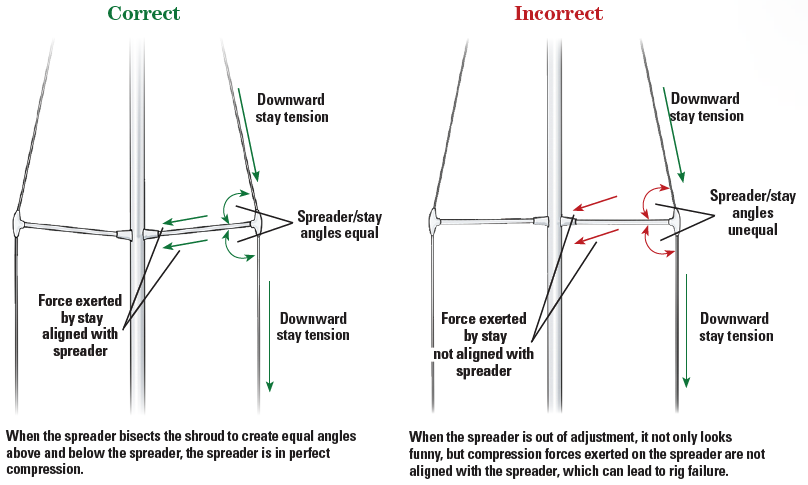
The compressive force exerted by a shroud upon a spreader should be in-line with the spreader itself, from the spreader tip to the spreader root. And the only way a shroud can exert a force evenly upon the spreader, is if the angle formed where the spreader intersects the shroud is the same above and below the spreader.
With that understanding, consider again the horizontal spreader. The only way a shroud could impart a compressive force aligned with the plane of a horizontally mounted spreader, is if that spreader was mounted exactly halfway between the deck and the top of the mast, and if the stay was attached to the masthead and at the point where the deck and mast meet — like a bow and arrow.
But boats aren’t rigged that way and so spreaders should never be level (and never drooping downward!). Consider that same improperly leveled spreader in the conventional position, much higher on the mast, and with the lower end of the shroud attached well-outboard, near the toe rail. Now the shroud is exerting a downward force on the horizontally aligned spreader. If the seizing, or whatever mechanism holds the spreader tip in place, slips or breaks, the downward component of the force exerted could collapse the spreader and result in a dismasting.
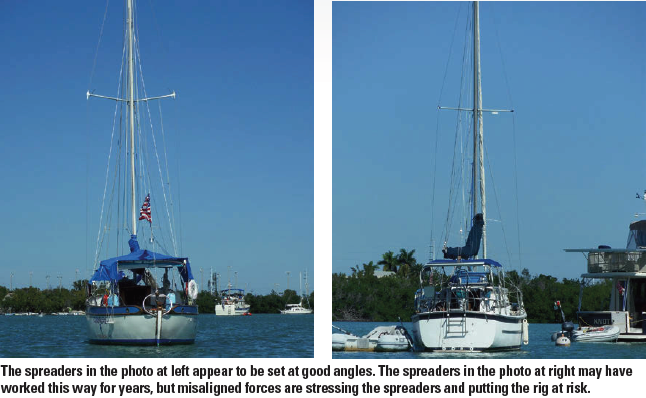
Fortunately, even without measuring angles, it’s easy, with the right perspective, to visually identify correct and incorrect spreader angles. Look at your boat and others head on, from a couple hundred feet away. Does a spreader seem to be horizontal? Incorrect. But note that when the angle between the spreader and the shroud, both above and below the spreader, appears to be the same, the spreader is angled slightly upward. This is correct. Do your own spreaders look correct?
If not, the remedy is simple, and urgent. Climb your rig. Arrange hand signals with a friend whose got the right perspective. Based on your friend’s input, adjust the angle of the spreader. But before you secure the spreader tip to the shroud, use a bevel gauge to double-check that the above and below angles are the same. (An eye can get it close, but a gauge can confirm they are the same angle.)
Spreader angles are too important to neglect. Take a row around the harbor, study your own spreaders, then take a bevel gauge aloft. Your rig will thank you.
Using a Bevel Gauge

A bevel gauge, though primarily a carpenter’s tool, can be handy to have aboard. It can be used to verify, compare, and transfer angles, or bevels. In the case of rigging, a bevel gauge can be used to compare the angle formed by the shroud and the spreader both above and below the spreader. Properly aligned spreaders should create equal angles.
To use a bevel gauge, first loosen the wing nut.The metal half slides and pivots (thus its other name, sliding T-bevel) to form any angle with the handle. When using it to verify spreader angle, it is easiest to align the handle with the spreader, let’s say the bottom side, and adjust the metal half to lay against the shroud.Tighten the wing nut to keep the gauge at that angle.Then, flip the bevel gauge to the other side of the spreader, in this case, the top side, and verify that the angle formed with the shroud is the same as what your gauge shows. If not, move the spreader toward the smaller angle. In other words, if you mark the bottom angle, then compare it to the top angle and see that your gauge is bigger than that angle, move the outboard end of the spreader up.
Don’t believe everything you read (or hear) – Editors
We’ve seen it in the online forums and heard it said on the docks that the best way to ensure the proper spreader angle is to make sure the distance from the masthead to the root of the spreader is equal to the distance from the masthead to the tip of the spreader. This sounds pretty good and moves the spreaders in the right direction — and may even serendipitously turn out to be true on a few rigs — but it’s inaccurate. That approach ensures only that the two angles above the spreader — where the spreader root intersects the mast and where the spreader tip intersects the shroud — are equal.This is not relevant. Not only is it easier to use a bevel gauge or the good eyes of a helper to guide your spreader adjustment, you’ll get a better result.
About The Author

Connie McBride
Connie McBride and her husband, Dave, raised three boys aboard their 34-foot sailboat Eurisko while cruising the Caribbean. After 15 years, they now divide their time between enjoying being empty nesters and visiting their grandson, the third-generation McBride cruiser.
Related Posts

No Fender Covers? No Problem!
April 10, 2023

Shoreside Cooking Hack
August 1, 2018

Up the Mast
July 25, 2019

Boat Insurance 101
April 20, 2022
Current Edition
Join Our Mailing List
Get the best sailing news, boat project how-tos and more delivered to your inbox.
You have Successfully Subscribed!
Practical Boat Owner
- Digital edition

How to set up your rig: tension your shrouds on masthead or fractional
- David Harding
- March 15, 2021
How to set up three common types of rig: the traditional masthead with a single set of in-line spreaders, single-spreader swept fractional rigs, and fractional rigs with two sets of swept spreaders. David Harding reports

How to set up your rig : tension your shrouds on masthead or fractional
If boats were cars, many of those I see sailing along would be coughing and spluttering down the motorway at 35mph in third gear with three flat tyres and a smoky exhaust. Others would cruise past in top gear at 70, making half the noise and using a fraction of the fuel.
Would these top-gear drivers be working any harder? Would they have cars that were faster by design and more expensive? Not at all. They would simply be the ones who had pumped up their tyres, learned their way around the gearbox and had their engines serviced.

It’s worth keeping an eye on your leeward cap shrouds during early-season outings after the mast has been re-stepped. The ones on this yacht could do with a little more tension
The obvious question, then, is why so many boat owners seem to leave their quest for efficiency and economy on the dockside.
One answer is that many are unaware how inefficiently their boats are performing. Another is that there’s no MOT for sailing boats and no driving test to make sure people know how to sail them (thank goodness on both counts).
Whatever the reasons, the fact remains that an efficient rig is fundamental. If the rig’s not right, the sails have no hope of setting properly.
And that’s important whether you’re racing or cruising, because sailors of both persuasions ultimately want the same: maximum lift for minimum drag.
For racers, that means more speed and better results. They carry more sail because they have more crew to handle it and more weight on the rail to balance it.
Cruisers carry less sail but, if it works efficiently, it means less heel, less leeway, better pointing, less tacking, a lighter helm and greater comfort than if it’s working inefficiently – plus the ability to get home before night falls or the pub shuts. Who can object to that?
What matters is that the sail you’re carrying is driving you forwards, not pushing you sideways.
When I question cruising sailors about the state of their rig I often get the reply ‘Oh it doesn’t matter – I’m not racing!’.
Those I know who have done something about it, however, have been delighted by the transformation their boats have undergone and have had to agree that cruising fast and comfortably is definitely better.
Setting up your boat rigging
In this article we’re going to look at how to set up the three most common types of rig: the traditional masthead with a single set of in-line spreaders, single-spreader swept fractional rigs, and fractional rigs with two sets of swept spreaders.
For simplicity we’re assuming the use of 1×19 rigging except where mentioned otherwise.
Variations in boat rig type are almost infinite by the time you take into account deck-stepped and keel-stepped masts, masthead rigs with swept spreaders, jumper struts, fractional rigs with in-line spreaders, and so on.
Once you understand the basics, however, you’ll find that you can apply your knowledge to good effect on most types of rig.
Rig tuning is not only for the experts. Experience helps, of course, and a multiple-spreader fractional rig is harder to tune than an old tree-trunk of a masthead rig from the 1970s.
Nonetheless, with practice, a good eye and some observation you will probably find you can set it up pretty well.
You might want to call in a rigger or an experienced rig-tweaker to help or to do it for you the first time, and perhaps to check it periodically thereafter, but at least if you know what to look for you’ll notice when anything needs adjusting.
A word of warning when it comes to boatyards that have re-stepped your mast: sometimes re-stepping means just that and no more.
I have been on boats whose owners have assumed that the yard had set up the rig, whereas in fact it had just been dropped in and the bottlescrews hand-tensioned to stop it falling over.
It’s scary to think of the number of boats that must have been sailed in this condition.
What you will need to tune your rig Essential A calm day: don’t try setting up your rig in more than a few knots of wind A boat that’s floating level fore-and-aft (and preferably laterally as well) Screwdriver/lever bar Spanners (fixed or adjustable) Needle-nose pliers for split-pins Electrical insulation or self-amalgamating tape Lubricant for bottlescrews Tape measure (folding/small cassette type, or ideally folding rule) Useful Spring balance Long tape-measure Rig-tension gauge
The importance of enough tension: Why tight is right
If you think you’re being kind to your boat by leaving the rigging slack, think again. It’s true that some keelboats (such as Squibs and XODs) sail with the leeward cap shroud waving around in the wind, but that doesn’t work on yachts designed to go to sea.
Rigging that’s under-tensioned puts infinitely more load on the wire, bottlescrews, terminals and hull structure because of the snatch loads every time the boat falls off a wave. When it hits the bottom of the trough, anything that’s free to move gets thrown forwards and sideways before being brought up short by whatever happens to be in the way to stop it. That applies to the crew, to loose gear down below or to the mast. Think of the inertia to which a mast is subjected because of its height, and you can imagine the loads involved.
If the rigging is sensibly tight, on the other hand, movement and the consequent stresses are minimised.
Boats are built to withstand the static loads of a properly-tensioned rig, but asking them to cope with constant snatch loading is unfair – so don’t kill your boat with kindness.
As we discuss in the sections on the types of rig (below), masthead configurations with in-line spreaders need less cap-shroud tension than swept-spreader fractional rigs. This is because in-line caps are only supporting the mast laterally. The backstay stops it moving forwards, so each wire has a separate, clearly-defined role.
Aft-swept caps support the mast both laterally and fore-and-aft. Being swept aft typically about 25°, they need to be under a lot of tension to keep the forestay tight. Because they’re also at a much shallower angle to the mast, they bear between three and five times the load of the forestay.
With fractional rigs, then, it’s vital to keep the cap shrouds tight. If they’re too loose, the forestay will sag too much, the headsail will become too full and its leech will be too tight. Then the boat will become unbalanced, heel too far, make more leeway and lose both speed and pointing ability.
Structurally, under-tensioned rigging with a swept-spreader rig presents a problem in addition to the issue of snatch loading. Tension in the leeward cap shroud is important in keeping the mast in column, to the extent that Loos and Co (the manufacturer of the popular rig-tension gauges) states that a mast loses 50% of its lateral stiffness when the leeward cap goes slack. When this happens, the mast is effectively hinging around the forestay and the windward cap shroud and is far more prone to pumping as the boat bounces around.
The main reason why under-tensioned rigs on cruising boats stay standing as they do is that manufacturers build in enormous margins.
Even so, proper tension means better performance and greater safety. The ‘it doesn’t matter – I’m only cruising’ excuse for slack rigging just doesn’t cut it!
How to measure rig tension

This Loos gauge (left image) is indicating that the 6mm wire in the cap shroud is at 22% of its breaking strain (730kg). To measure the stretch, extend a tape measure (right) (or ideally a folding rule) to 2,000mm and mark this distance up the wire…
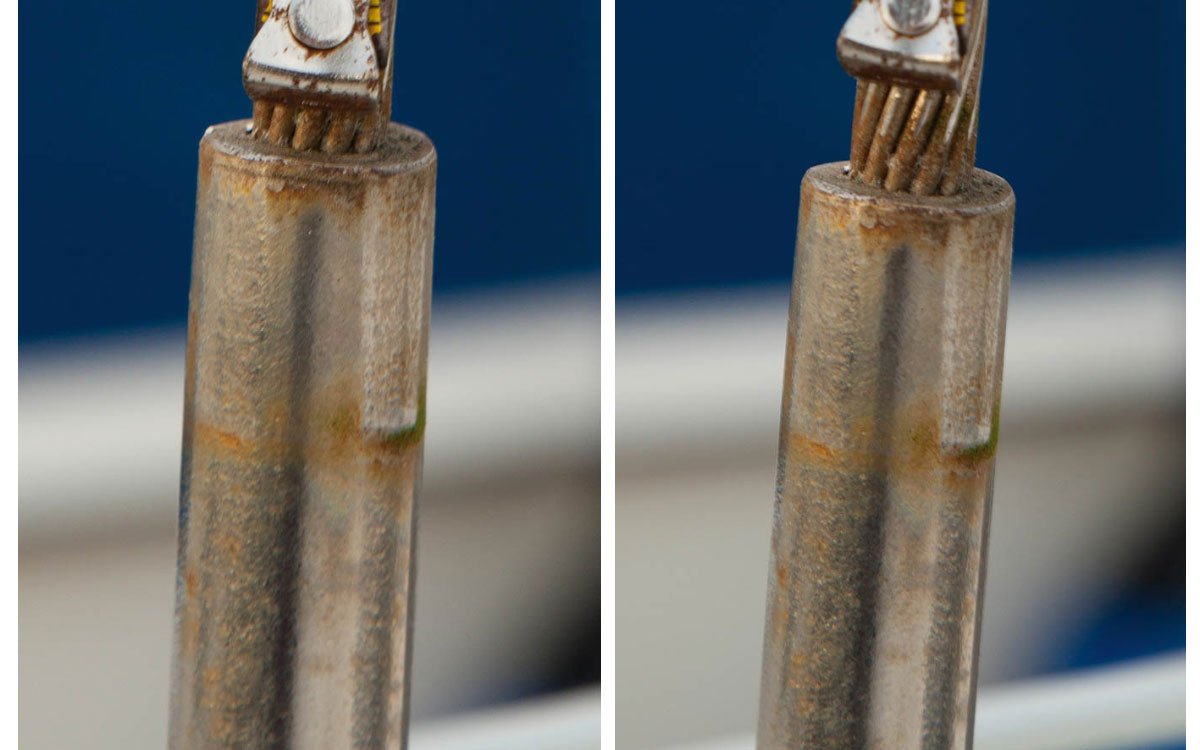
…but start with the end of the tape a couple of millimetres above the top of the swaging. As the wire is tensioned it will stretch, increasing the gap below the end of the tape.
Experienced riggers and rig-tweakers will often tension the rigging at the dockside by feel, then sight up the mast and make any adjustments under way.
Most people aren’t confident enough to do this, though – so what are the best ways to check the tension as you wind down the bottlescrews?
The simplest and quickest way is to use a rig-tension meter, such as the Loos gauge. Once you know the diameter of the wire, it will give you the load both in kg and as a percentage of its breaking strain.
The gauge for rigging of 5m and 6mm (and up to 14% of breaking strain on 7mm) typically costs around £65, while the bigger version for wire from 7mm to 10mm is closer to £200.
If you don’t have a tension gauge, you can calculate the percentage of a wire’s breaking strain by measuring its stretch, normally over a distance of 2m: when 1×19 wire has stretched by 1mm over a 2,000mm length, it’s at 5% of its breaking load whatever its diameter.
Most cruising boats have rigging made from 1×19 wire. On sportier boats, it might be Dyform or rod, in which case 5% of breaking load is indicated by stretch of 0.95 and 0.7mm respectively. For the purpose of our illustrations, we’ll assume 1×19.
For accurate measurement the rigging needs to be completely slack. Hold the end of the tape a couple of millimetres above the top of the swaging, then measure 2,000mm up the wire, secure the other end of the tape here and start tensioning. When the gap between the top of the swaging and the end of the tape has increased by 1mm, you have reached 5% of the wire’s breaking strain, so 3mm equates to 15% and 5mm to 25%.
Bear in mind that 1×19 wire will be affected by bedding-in stretch during its first few outings, so new rigging will need to be re-tensioned a time or two during the first season.
Sensible precautions 1. Don’t force dry bottlescrews: keep them well lubricated. 2. Don’t use massively long tools for extra leverage on the bottlescrews. If you can feel the load, you’re less likely to strain or break anything. 3. Most boats will flex to some extent when the rig is properly tensioned. If you’re concerned about excessive bend, take it easy, use a straight edge across the deck to check for movement, and seek advice. 4. The percentages of breaking load quoted assume that the rigging is of the correct diameter as specified by the designer, builder or rigger.
How to set up a masthead rig with single in-line spreaders
This is the simplest type of rig to set up. Whether it’s keel-stepped or deck-stepped and supported by forward lowers or a babystay, it’s the same basic procedure.
Step 1: Get the mast upright athwartships

Measure the distance to fixed points on both sides that are symmetrical about the centreline, such as the base of the chainplates.
If you don’t have a long tape measure, use the halyard itself (this is where a spring balance can help you gauge the same tension on each side).
Centre the masthead by adjusting the port and starboard cap shrouds until the measurements are the same, then hand-tighten the bottlescrews by taking the same number of turns on each side.
Re-check and adjust as necessary.
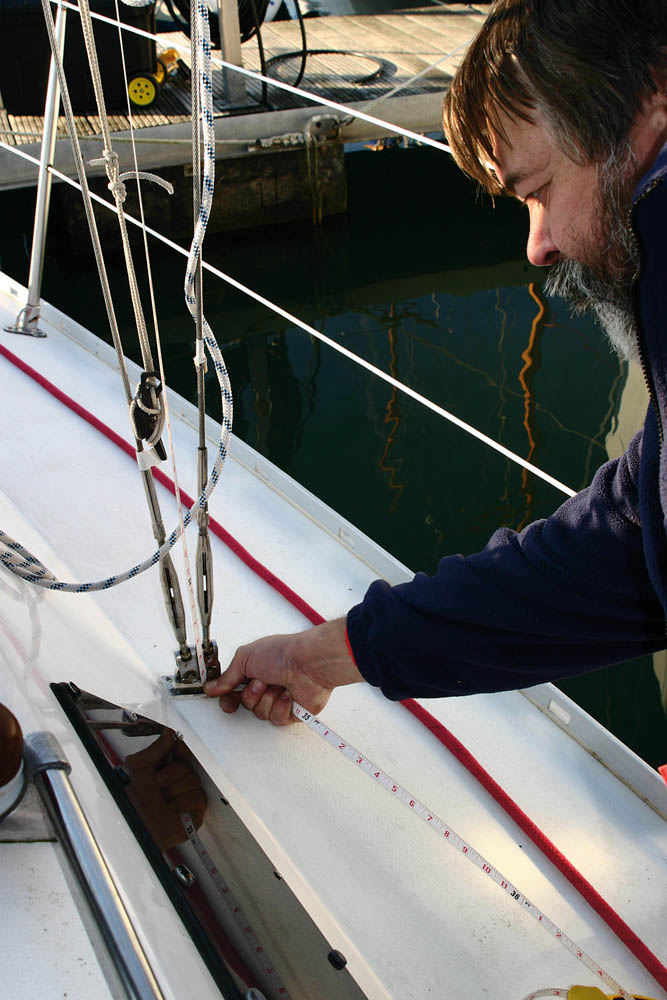
A long tape measure is useful for getting the mast upright.
Step 2: Setting the rake

Rake is determined principally by the length of the forestay. Some roller-reefing systems allow no adjustment but you can increase length by adding toggles.
Adjust the forestay and backstay, checking the rake with a weight suspended from the end of the main halyard. One degree of rake is about 6in (15cm) in 30ft (9m).
Hand-tight on the backstay’s bottlescrew (or gentle use of the tensioner) is fine at this stage.
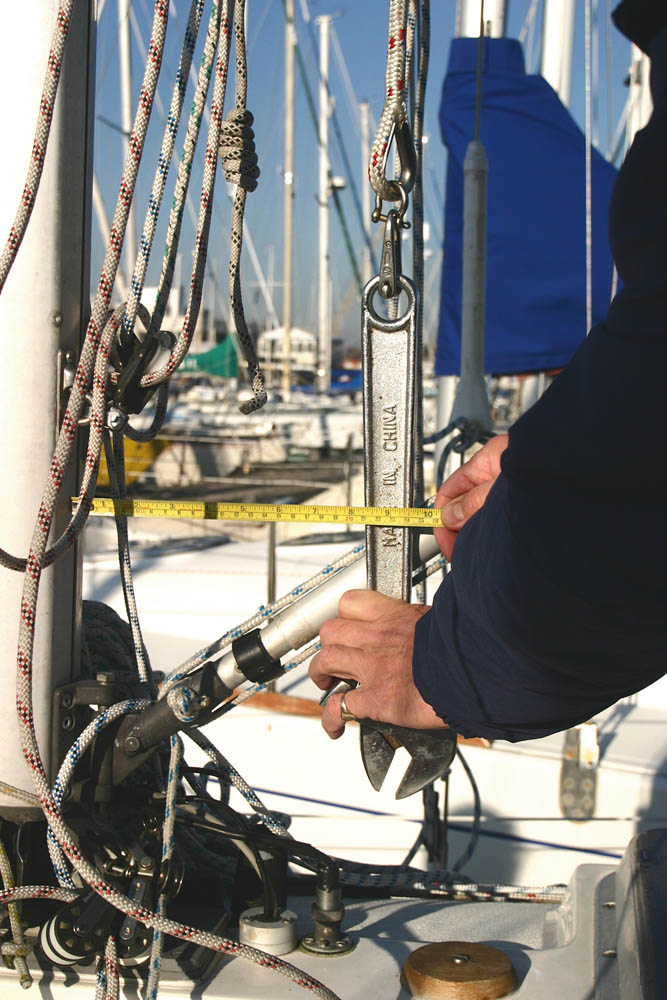
Rake is measured from the aft face of the mast, at or below boom-level. If the boat’s rocking around, suspend the weight in a bucket of water to dampen the movement.
Step 3: Tighten the cap shrouds and backstay

Take no more than two or three full turns on one side before doing the same on the other.
Count carefully.
You’re aiming to tension the caps to 15% of their breaking strain, measured as explained on page 41.
That might be much tighter than you’ve ever had them before!
Tension the backstay to 15% of its breaking load.
Note: Using ordinary hand-tools on the bottlescrews, it’s hard to over-tension the rigging
Step 4: Tighten the lowers / babystay

A mast should bend forward in the middle, though only to a small extent on masthead rigs of heavy section.
This ‘pre-bend’ is principally to counter two factors in heavy weather: increased forestay loads pulling the top of the mast forward, and the head of a reefed mainsail pulling the middle aft.
Together, they can result in the middle of the mast bowing aft, which makes it unstable and is bad for sail trim. For maximum strength in extremis it should be straight.
Use the forward lowers or babystay to pull the middle of the mast forward. The bend thus induced should be no more than half the mast’s fore-and-aft measurement.
Then take up the slack in the aft lowers.
They don’t need to be tight; they’re just countering the forward pull.
Sight up the luff groove to make sure the mast is straight laterally. Correct any deflections with the lowers.
If you set up the caps properly to start with, you should not adjust them again at this stage.
Step 5: Check the rig under sail

First, make sure the leeward cap shroud isn’t waving around in the breeze. You should be able to deflect it with a finger by a few inches; no more.
If it’s too loose, take a turn or two on the leeward bottlescrew, then tack and do the same on the other side.
Now sight up the back of the mast.
It should be straight athwartships and bending slightly forward in the middle.
Athwartships deflection might make it look as though the top is falling away to one side (see diagram), but it won’t be if it was centred properly in Step 1. Straighten the middle by adjusting the lowers
If it’s straight or bending aft in the middle, try increasing the backstay tension (but not beyond 30% of its breaking strain) and, if necessary, tensioning the forward lowers/babystay and slackening the aft lowers.
Remove any lateral bends by adjusting the lowers.
Once you’re happy, lock off the bottlescrews to make sure they can’t come undone.

Inverted bend (mast bowing aft in the middle) is bad for sail trim and potentially dangerous for the rig.
Setting up a fractional rig with single, aft-swept spreaders
Widely used on smaller cruisers and cruiser/racers, this configuration needs a very different approach from an in-line masthead rig
This stage is the same as with a masthead rig (scroll up).
Step 2: Set the rake

This time, however, rake is set by the forestay and cap shrouds rather than the forestay and backstay.
With a swept-spreader fractional rig it’s the cap shrouds, not the backstay, that stop the mast moving forward. They provide both fore-and-aft and lateral support, so they’re doing two jobs.
The backstay’s principal role is to control the topmast and mast-bend. Because it’s above the point where the forestay joins the mast, it’s not pulling directly against the forestay and therefore has less effect on forestay tension. How much it pulls against the forestay depends on factors including the height of the topmast, the stiffness of the mast section and the tension of the lower shrouds (which determine the bend).
Step 3: Tighten the cap shrouds

Forestay tension is achieved primarily through the caps, and because they’re swept back at such a shallow angle they need to be seriously tight.
Their maximum tension is 25% of breaking load, but it’s best not to tension them all the way in one go because that would result in a very bent mast: tensioning the caps pushes the spreaders, and therefore the middle of the mast, forward.
Start by taking them to about 15% of breaking load, then tighten the lowers to pull the middle of the mast back so it’s straight.
This is how the swept-spreader fractional rig works: the caps and lowers are working against each other, caps pushing and lowers pulling, to stabilise the middle of the mast. Sight up the mast when it’s straight to check for lateral deflection, correcting it with the lowers.
With a flexible mast you might need to repeat the process, taking the caps to 20% before tensioning the lowers again.
Otherwise go straight to the next stage, which is to pull on the backstay.
Since the backstays on fractional rigs often have cascade purchases at the bottom you can’t measure the tension by stretch as you can with wire, so you have to do this by feel: pull it tight, but don’t go mad.
Tensioning the backstay bends the mast and therefore shortens the distance from the hounds (where the caps join) to the deck. This loosens the caps, so it’s easier to tension them back to the 20% mark.
When you let the backstay off, the caps will tension again and should be at about 25% of breaking load – but no more.
Step 4: Set the pre-bend

Take a few turns on the lowers to achieve the right amount of pre-bend. It should be more than with an in-line masthead rig, but a mast should never bend to more than 2% of the height of the foretriangle even with the backstay tensioned (that’s about 180mm in 9m, or 7in in 30ft).
Check to see how far the mast bends with a tight backstay. The optimum bend will often be determined by the cut of the mainsail, or recommended by the sailmaker or class association.
Pre-bend is vital because most fractional rigs don’t have forward lowers or a babystay, so if the mast were to bend aft in the middle (inverted bend) it could collapse.
In fresh conditions, especially under spinnaker , it’s a wise precaution never to release the backstay completely. That stops the upper section of the mast being pulled too far forward.
The caps should be tighter than with a masthead rig, with no significant slack on the leeward side when the boat’s hard on the wind and heeling 15-20°.
If the static tension is up to 25% but the leeward cap is always slack, the boat might be bending. That’s a topic beyond the scope of this article!
Sight up the mast to check the bend both fore-and-aft and athwartships, adjusting the lowers as necessary.
Setting up a fractional rig with two sets of aft-swept spreaders
As mast sections have become slimmer, this is now a popular configuration on boats between 30ft (9m) and 40ft (12m) but it’s more complex to tune.
This stage is the same as with the other types of rig.
Follow the procedure as described for single-spreader fractional rigs. Generally speaking, more rake improves upwind performance but too much will induce excessive weather helm and hamper performance downwind. Getting it right might involve some trial and error.
Steps 3 & 4: Tighten the caps and set the bend

The same fundamentals apply as for a single-spreader rig, but this time after each tensioning of the cap shrouds, which induces bend, you have to straighten the mast by tensioning both the lowers (also known as D1s) and the intermediates (D2s).
The D1s control the bend between the deck and the upper spreaders and the D2s between the lower spreaders and the hounds, so their areas of influence overlap.
On boats where the D2s terminate at the lower spreaders you have to send someone aloft to adjust them. These are referred to as discontinuous intermediates.
If they run over the spreader tips and down to the chainplates (continuous intermediates) you can do everything from on deck.
You need to achieve an even bend fore-and-aft. If the mast is bending too much at the bottom and is too straight at the top, tighten the D1s and slacken the D2s.
S-bends can creep in athwartships and make it look as though the top of the mast is off-centre. If you set up the cap shrouds properly it shouldn’t be, so don’t fiddle with them any further now: take out the bends with the D1s and D2s.
You’re aiming for a cap-shroud tension of 20-25% of breaking strain, as with a single-spreader fractional rig, and again the sweep-back of the spreader means that the caps will be slackened as you pull on the backstay.
As with other types of rig, get the boat heeling around 20° on the wind, tension the backstay and feel the leeward cap to make sure there’s only minimal slack.
Removing any kinks and S-bends can take more tweaking of lowers and intermediates, the latter being more fiddly to adjust if they’re discontinuous.
If the masthead looks as though it’s falling off one way, it’s probably because the D2 on the opposite side is too tight.

Left: Windward lower too loose. Right: Windward intermediate too tight.
Why not subscribe today?
This feature appeared in the May 2012 edition of Practical Boat Owner . For more articles like this, including DIY, money-saving advice, great boat projects, expert tips and ways to improve your boat’s performance, take out a magazine subscription to Britain’s best-selling boating magazine.
Subscribe, or make a gift for someone else, and you’ll always save at least 30% compared to newsstand prices.
See the latest PBO subscription deals on magazinesdirect.com
What You Need to Know About Rig Tune & Performance
March 18, 2022 Updated August 8, 2024
For many sailors, the relationship between rig tune and performance often seems like a black hole. Quantum’s Dave Flynn takes us on a tour of the core elements of the rig and what you need to know to demystify tuning for optimum performance.

Mastering rig tuning for optimal sail trim and performance might seem daunting, but fortunately it’s not as complicated as tuning a Stradivarius violin! To keep it in perspective, remember you are just pulling on a hunk of aluminum or carbon with cables. To master the rig, there are four elements you need to understand: rake, athwartship tuning, mast bend, and headstay sag. Each of the four elements of rig tune either adds power or takes it away. If you understand the basic mechanics of each element, you can tune your rig to improve trim and overall setup.
Mast rake is a measure of how far the mast is angled aft from a straight vertical. A typical mast rake ranges from one to one-and-a-half degrees on a cruising masthead rig to as much as four degrees on a fractional racing rig. A mast should never be raked forward unless there is something unusual in the boat design (you’ll know if this is the case!). When you add rake to the mast, you tilt the whole sail plan aft. This, in turn, shifts the power aft, pushing more load on the stern and forcing the bow up into the wind, creating weather helm.
Rake is determined by headstay length: The longer the headstay, the greater the rake. To adjust your rake, adjust the length of the headstay. How much rake a boat needs to generate the right amount of weather helm is a function of hydrodynamics (hull form, keel shape, and placement). In most one-design racing classes, where lots of time is invested in figuring out what works best, tuning guides specify headstay lengths for conditions. In more developed classes, this will change as a function of wind speed. You’ll want more rake in light air when it is hard to generate helm and less as the breeze builds. For boat setup and trim, adding rake is a tool for generating power in light air, and reducing rake is part of the de-powering process in heavy air.
For cruisers and many non-one-design rigs, you likely don’t have a tuning guide to work from, so to optimize upwind performance you need some helm loading in light-to-moderate conditions. Three to five degrees of rudder angle in 8kts-10kts of wind is a commonly cited target. To test if this angle works for you, sail upwind in 8kts-10kts and let the helm go; the boat should turn gently into the wind. If it goes straight or bears off, you need more rake and vice versa if it spins out of control. Don’t try this test when it is windy; your boat will round up and exhibit too much helm due to heel not rake, and you’ll get a false read.
ATHWARTSHIP TUNING
If the rig is not centered, performance and trim will be different tack to tack. To remedy this, center the top of the rig. Using the diagonal shrouds, bring each successive panel in line with the top. The amount of tension you need is tough to predict at the dock–the mast really needs to be under load. Test tension by sailing upwind in 10kts-12kts of breeze with appropriate trim settings and then check the mast. Is it straight when you put your eye to the aft face and look up the mainsail track? If the tip is falling off, you need more upper tension. If the leeward upper shrouds are flopping around, you need more tension for a given velocity. The shrouds should be firm.
Work on the diagonals next. How much tension you need in the leeward diagonals is determined by how stiff the mast is. In over 10 kts, you definitely want the mast to be straight. For more power in light air, you can let the middle of the mast sag an inch or two to leeward to increase the depth in the mainsail. It is common in one-design classes to ease tension on the diagonals in light air to create this smooth sag.
Dinghies and small keelboats are great boats to experiment with how tuning inputs affect your sail plan. The smaller diameter wire shrouds and relatively small masts dramatically show the impact of tuning adjustments. This isn’t as visible on larger racing or cruising boats with rod rigging. Cruisers will want to set a good base athwartship tune as well. If the rig is uneven side-to-side, you will experience frustrating differences in point and power on each tack. Skip the headache and set a good base tune early in the season. Whatever the condition you are sailing in, once you have established good upwind trim, have a look up the mast to make sure it is in column or sagging slightly to leeward in the middle in light air.
If you have an older cruising boat with a mast stiffness that resembles that of a telephone pole, you can skip this section! But for cruisers with a relatively modern rig, swept-back spreaders, traditional sails with flaking system, or even in-boom or in-mast furling, pay attention here.
While rake is the amount the mast is angled aft, mast bend is the amount you bend the mast aft after you have set your rake. A rig that bends gives you a powerful tool for changing the shape of the mainsail: More mast bend flattens the sail and de-powers it; a straighter mast creates shape and power. Rig tune affects how much a mast bends, particularly on modern fractional rig boats with swept back spreaders. But no matter what type of rig you have, you want to start with a little mast bend, or pre-bend, which refers to the amount of bend that has no backstay tension. Lengthening the headstay increases the bending moment and adds pre-bend. This is why it’s important to set the rake first. Other factors affecting the pre-bend are the position of the mast step and the blocking of the mast in the partner, which is the hole where the mast goes through the deck. To add pre-bend, either move the mast step aft or move the mast forward in the partners. A target of 1”-3” of pre-bend is typical on a medium-sized boat. Pre-bend ensures the mast will move forward in the middle and flatten the mainsail when you pull on the backstay.
On a rig with in-line spreaders (typically masthead rigs), the side shrouds have little impact on the mast bend created by pulling on the backstay. On some rigs, however, there are check stays to keep the mast from bending too far. Sometimes there are even multiple sets.
How far is too far when bending the mast? You’ll know when your mainsail develops diagonal wrinkles from the clew up to the luff and is beginning to turn inside out. For maximum de-powering, bend just to the point where wrinkles appear. If available, use check stays to help.
On modern fractional rigs with spreaders swept well aft, the side shrouds have a big impact on mast bend. The diagonal shrouds are controlling not only athwartship tuning but also acting like check stays to inhibit mast bend, since they are swept back and pulling aft. Too tight, and the diagonal shrouds will keep the mast from bending and flattening the mainsail; too loose, and the mast can over-bend and turn the sail inside out. In many classes, overall rig tension is increased by taking turns on the shrouds, shortening the headstay, or pumping the whole rig up with a mast jack for more backstay tension without allowing the rig to over-bend as it gets windier.
HEADSTAY SAG
If some mast bend is good, why isn’t more better? The answer is headstay sag. When the headstay sags, the headsail becomes full and more powerful, which is great in light conditions. But as the breeze builds, you want to reduce the amount of sag as much as possible to de-power the boat and help with pointing. In breeze, it’s all about headstay tension–you can’t get too much. So why is mast bend a factor? When you pull back on the rig with the backstay, it will tighten the headstay, which is good. But you are also pulling down and compressing the rig, which makes it bend. You want some mast bend in order to flatten the mainsail, but not so much that you soften the whole rig and increase headstay sag. This is why we use check stays to control mast bend on a masthead rig and tighter diagonal tension on a swept aft spreader rig.
Rig tune still matters even when you aren’t routinely adding turns to your shrouds based on the wind and conditions. Many modern cruising sailboats with in-mast furling rigs have comparatively smaller tune adjustments, as the rig needs to stay in column for the mainsail to furl properly. Some boats are outfitted with a cascading backstay adjuster that allows for minor tweaks and lets you easily reset the rig when it’s time to furl the mainsail. To get the most performance from your cruising setup, don’t overlook rig tune. Racing sailboats often have their rigs removed for transport and then re-rigged, whereas many cruising boats may never have had the rig adjusted since the boat was first commissioned. If you can't remember the last time your rig was tuned, now is a great time to give your local loft a call.
Having a properly tuned rig is essential to boat setup and performance. While this can be a DIY process, if you have questions or need additional input, please contact a professional rigger or your local loft where our expert Quantum team can help sort out your rig and tune. For one-design tuning guides and resources, select your OD class on the Quantum website or get in touch with a Quantum Class Expert.
Get in touch with David Flynn with additional questions and dive deeper into rig tune for performance. E: [email protected] P: 410-268-1161 ext. 206
The Discussion
This website uses cookies and collects usage statistics. Privacy Policy
Us, too. We pour that passion into each of our newsletters to help you enjoy sailing even more.
- Mastering the Mast: A Comprehensive Dive into the World of Sailboat Masts and Their Importance
A mast is not just a tall structure on a sailboat; it's the backbone of the vessel, holding sails that catch the wind, driving the boat forward. Beyond function, it's a symbol of adventure, romance, and humanity's age-old relationship with the sea.
The Rich Tapestry of Sailboat Mast History
From the simple rafts of ancient civilizations to the majestic ships of the Renaissance and the agile sailboats of today, masts have undergone significant evolution.
- The Humble Beginnings : Early masts were basic structures, made from whatever wood was available. These rudimentary poles were designed to support basic sails that propelled the boat forward.
- The Age of Exploration : As ships grew in size and began journeying across oceans, the demands on masts increased. They needed to be taller, stronger, and able to support multiple sails.
- Modern Innovations : Today's masts are feats of engineering, designed for efficiency, speed, and durability.
A Deep Dive into Types of Boat Masts
There's no 'one size fits all' in the world of masts. Each type is designed with a specific purpose in mind.
- Keel Stepped Mast : This is the traditional choice, where the mast runs through the deck and extends into the keel. While providing excellent stability, its integration with the boat's structure makes replacements and repairs a task.
- Deck Stepped Mast : Gaining popularity in modern sailboats, these masts sit atop the deck. They might be perceived as less stable, but advancements in boat design have largely addressed these concerns.
Materials and Their Impact
The choice of material can profoundly affect the mast's weight, durability, and overall performance.
- Aluminum : Lightweight and resistant to rust, aluminum masts have become the industry standard for most recreational sailboats.
- Carbon Fiber : These masts are the sports cars of the sailing world. Lightweight and incredibly strong, they're often seen on racing boats and high-performance vessels.
- Wood : Wooden masts carry the romance of traditional sailing. They're heavier and require more maintenance but offer unparalleled aesthetics and a classic feel.
Anatomy of a Sail Mast
Understanding the various components can greatly improve your sailing experience.
- Masthead : Sitting atop the mast, it's a hub for various instruments like wind indicators and lights.
- Spreaders : These are essential for maintaining the mast's stability and optimizing the angle of the sails.
- Mast Steps and Their Critical Role : Climbing a mast, whether for repairs, adjustments, or simply the thrill, is made possible by these "rungs." Their design and placement are paramount for safety.
Deck vs. Yacht Masts
A common misconception is that all masts are the same. However, the requirements of a small deck boat versus a luxury yacht differ drastically.
- Yacht Masts : Designed for grandeur, these masts are equipped to handle multiple heavy sails, sophisticated rigging systems, and the weight and balance demands of a large vessel.
- Sailboat Masts : Engineered for agility, they prioritize speed, wind optimization, and quick adjustments.
Maintenance, Repairs, and the Importance of Both
Seawater, winds, and regular wear and tear can take their toll on your mast.
- Routine Maintenance : Regular checks for signs of corrosion, wear, or structural issues can prolong your mast's life. Using protective coatings and ensuring moving parts are well-lubricated is crucial.
- Common Repairs : Over time, parts like spreaders, stays, or even the mast steps might need repair or replacement. Regular inspections can spot potential problems before they escalate.
Read our top notch articles on topics such as sailing, sailing tips and destinations in our Magazine .
Check out our latest sailing content:
Costing: The Investment Behind the Mast
While the thrill of sailing might be priceless, maintaining the mast comes with its costs.
- Regular Upkeep : This is an ongoing expense, but think of it as insurance against larger, more costly repairs down the line.
- Repairs : Depending on severity and frequency, repair costs can stack up. It's always advisable to address issues promptly to avoid more significant expenses later.
- Complete Replacement : Whether due to extensive damage or just seeking an upgrade, replacing the mast is a significant investment. Consider factors like material, type, and labor when budgeting.
Upgrading Your Mast: Why and How
There comes a time when every sailor contemplates upgrading their mast. It might be for performance, compatibility with new sail types, or the allure of modern materials and technology.
- Performance Boosts : New masts can offer better aerodynamics, weight distribution, and responsiveness.
- Material Upgrades : Shifting from an old wooden mast to a modern aluminum or carbon fiber one can drastically change your sailing experience.
- Compatibility : Modern sails, especially those designed for racing or specific weather conditions, might necessitate a mast upgrade.
The Impact of Weather on Masts
Weather conditions significantly influence the longevity and performance of your mast. From strong winds to salty sea sprays, each element poses unique challenges. Regularly washing the mast, especially after sailing in saltwater, can help prevent the onset of corrosion and wear.
Customization and Personal Touches
Every sailor has a unique touch, and this extends to the mast. Whether it's intricate carvings on wooden masts, personalized masthead designs, or innovative rigging solutions, customization allows sailors to make their vessel truly their own.
The Role of Sails in Mast Design
It's not just about the mast; the type and size of sails greatly influence mast design. From the full-bellied spinnakers to the slender jibs, each sail requires specific support, tension, and angle, dictating the rigging and structure of the mast.
Safety First: The Role of Masts in Overboard Incidents
A mast isn't just for sailing; it plays a crucial role in safety. In overboard situations, the mast, especially when fitted with steps, can be a lifeline, allowing sailors to climb back onto their boat. Its visibility also aids in search and rescue operations.
The Rise of Eco-Friendly Masts
As the world grows more eco-conscious, the sailing community isn't far behind. New materials, designed to be environmentally friendly, are making their way into mast production. They aim to provide the strength and durability of traditional materials while reducing the environmental footprint.
The Intricate World of Rigging
The mast serves as the anchor for a complex system of ropes, pulleys, and cables – the rigging. This network, when fine-tuned, allows sailors to adjust sails for optimal wind capture, maneuverability, and speed. Mastery over rigging can elevate a sailor's experience and prowess significantly.
Historical Significance: Masts in Naval Warfare
In historical naval battles, the mast played a pivotal role. Damaging or destroying an enemy's mast was a strategic move, crippling their mobility and rendering them vulnerable. The evolution of masts in naval ships offers a fascinating glimpse into maritime warfare tactics of yesteryears.
The Science Behind Mast Vibrations
Ever noticed your mast humming or vibrating in strong winds? This phenomenon, known as aeolian vibration, arises from the interaction between wind and the mast's
structure. While it can be a mesmerizing sound, unchecked vibrations over time can lead to wear and potential damage.
Future Trends: What Lies Ahead for Sailboat Masts
With technological advancements, the future of masts is bright. Concepts like retractable masts, integrated solar panels, and smart sensors for real-time health monitoring of the mast are on the horizon. These innovations promise to redefine sailing in the years to come.
Paying Homage: Celebrating the Mast
Across cultures and ages, masts have been celebrated, revered, and even worshipped. From the Polynesians who viewed them as spiritual totems, to modern sailors tattooing mast symbols as badges of honor, the mast, in its silent grandeur, continues to inspire awe and respect.
Conclusion: The Mast’s Place in Sailing
In the grand scheme of sailing, the mast holds a place of reverence. It's not just a structural necessity; it's a testament to human ingenuity, our quest for exploration, and the sheer love of the sea.
How often should I inspect my mast?
At least twice a year, preferably before and after sailing season.
Can I handle repairs myself?
Minor repairs, yes. But for major issues, it's best to consult a professional.
Is there an average lifespan for a mast?
With proper care, masts can last decades. Material and maintenance quality play a huge role.
How do I know if it's time to replace my mast?
Constant repairs, visible wear, and decreased performance are indicators.
What's the most durable mast material?
Carbon fiber is incredibly strong and durable, but aluminum also offers excellent longevity.
So what are you waiting for? Take a look at our range of charter boats and head to some of our favourite sailing destinations.
Mast Queries Answered
I am ready to help you with booking a boat for your dream vacation. contact me..

Denisa Kliner Nguyenová
Standing Rigging (or ‘Name That Stay’)
Published by rigworks on november 19, 2019.
Question: When your riggers talk about standing rigging, they often use terms I don’t recognize. Can you break it down for me?
From the Rigger: Let’s play ‘Name that Stay’…

Forestay (1 or HS) – The forestay, or headstay, connects the mast to the front (bow) of the boat and keeps your mast from falling aft.
- Your forestay can be full length (masthead to deck) or fractional (1/8 to 1/4 from the top of the mast to the deck).
- Inner forestays, including staysail stays, solent stays and baby stays, connect to the mast below the main forestay and to the deck aft of the main forestay. Inner forestays allow you to hoist small inner headsails and/or provide additional stability to your rig.
Backstay (2 or BS) – The backstay runs from the mast to the back of the boat (transom) and is often adjustable to control forestay tension and the shape of the sails.
- A backstay can be either continuous (direct from mast to transom) or it may split in the lower section (7) with “legs” that ‘V’ out to the edges of the transom.
- Backstays often have hydraulic or manual tensioners built into them to increase forestay tension and bend the mast, which flattens your mainsail.
- Running backstays can be removable, adjustable, and provide additional support and tuning usually on fractional rigs. They run to the outer edges of the transom and are adjusted with each tack. The windward running back is in tension and the leeward is eased so as not to interfere with the boom and sails.
- Checkstays, useful on fractional rigs with bendy masts, are attached well below the backstay and provide aft tension to the mid panels of the mast to reduce mast bend and provide stabilization to reduce the mast from pumping.
Shrouds – Shrouds support the mast from side to side. Shrouds are either continuous or discontinuous .
Continuous rigging, common in production sailboats, means that each shroud (except the lowers) is a continuous piece of material that connects to the mast at some point, passes through the spreaders without terminating, and continues to the deck. There may be a number of continuous shrouds on your boat ( see Figure 1 ).
- Cap shrouds (3) , sometimes called uppers, extend from masthead to the chainplates at the deck.
- Intermediate shrouds (4) extend from mid-mast panel to deck.
- Lower shrouds extend from below the spreader-base to the chainplates. Fore- (5) and Aft-Lowers (6) connect to the deck either forward or aft of the cap shroud.
Discontinuous rigging, common on high performance sailboats, is a series of shorter lengths that terminate in tip cups at each spreader. The diameter of the wire/rod can be reduced in the upper sections where loads are lighter, reducing overall weight. These independent sections are referred to as V# and D# ( see Figure 2 ). For example, V1 is the lowest vertical shroud that extends from the deck to the outer tip of the first spreader. D1 is the lowest diagonal shroud that extends from the deck to the mast at the base of the first spreader. The highest section that extends from the upper spreader to the mast head may be labeled either V# or D#.
A sailboat’s standing rigging is generally built from wire rope, rod, or occasionally a super-strong synthetic fibered rope such as Dyneema ® , carbon fiber, kevlar or PBO.
- 1×19 316 grade stainless steel Wire Rope (1 group of 19 wires, very stiff with low stretch) is standard on most sailboats. Wire rope is sized/priced by its diameter which varies from boat to boat, 3/16” through 1/2″ being the most common range.
- 1×19 Compact Strand or Dyform wire, a more expensive alternative, is used to increase strength, reduce stretch, and minimize diameter on high performance boats such as catamarans. It is also the best alternative when replacing rod with wire.
- Rod rigging offers lower stretch, longer life expectancy, and higher breaking strength than wire. Unlike wire rope, rod is defined by its breaking strength, usually ranging from -10 to -40 (approx. 10k to 40k breaking strength), rather than diameter. So, for example, we refer to 7/16” wire (diameter) vs. -10 Rod (breaking strength).
- Composite Rigging is a popular option for racing boats. It offers comparable breaking strengths to wire and rod with a significant reduction in weight and often lower stretch.
Are your eyes crossing yet? This is probably enough for now, but stay tuned for our next ‘Ask the Rigger’. We will continue this discussion with some of the fittings/connections/hardware associated with your standing rigging.
Related Posts
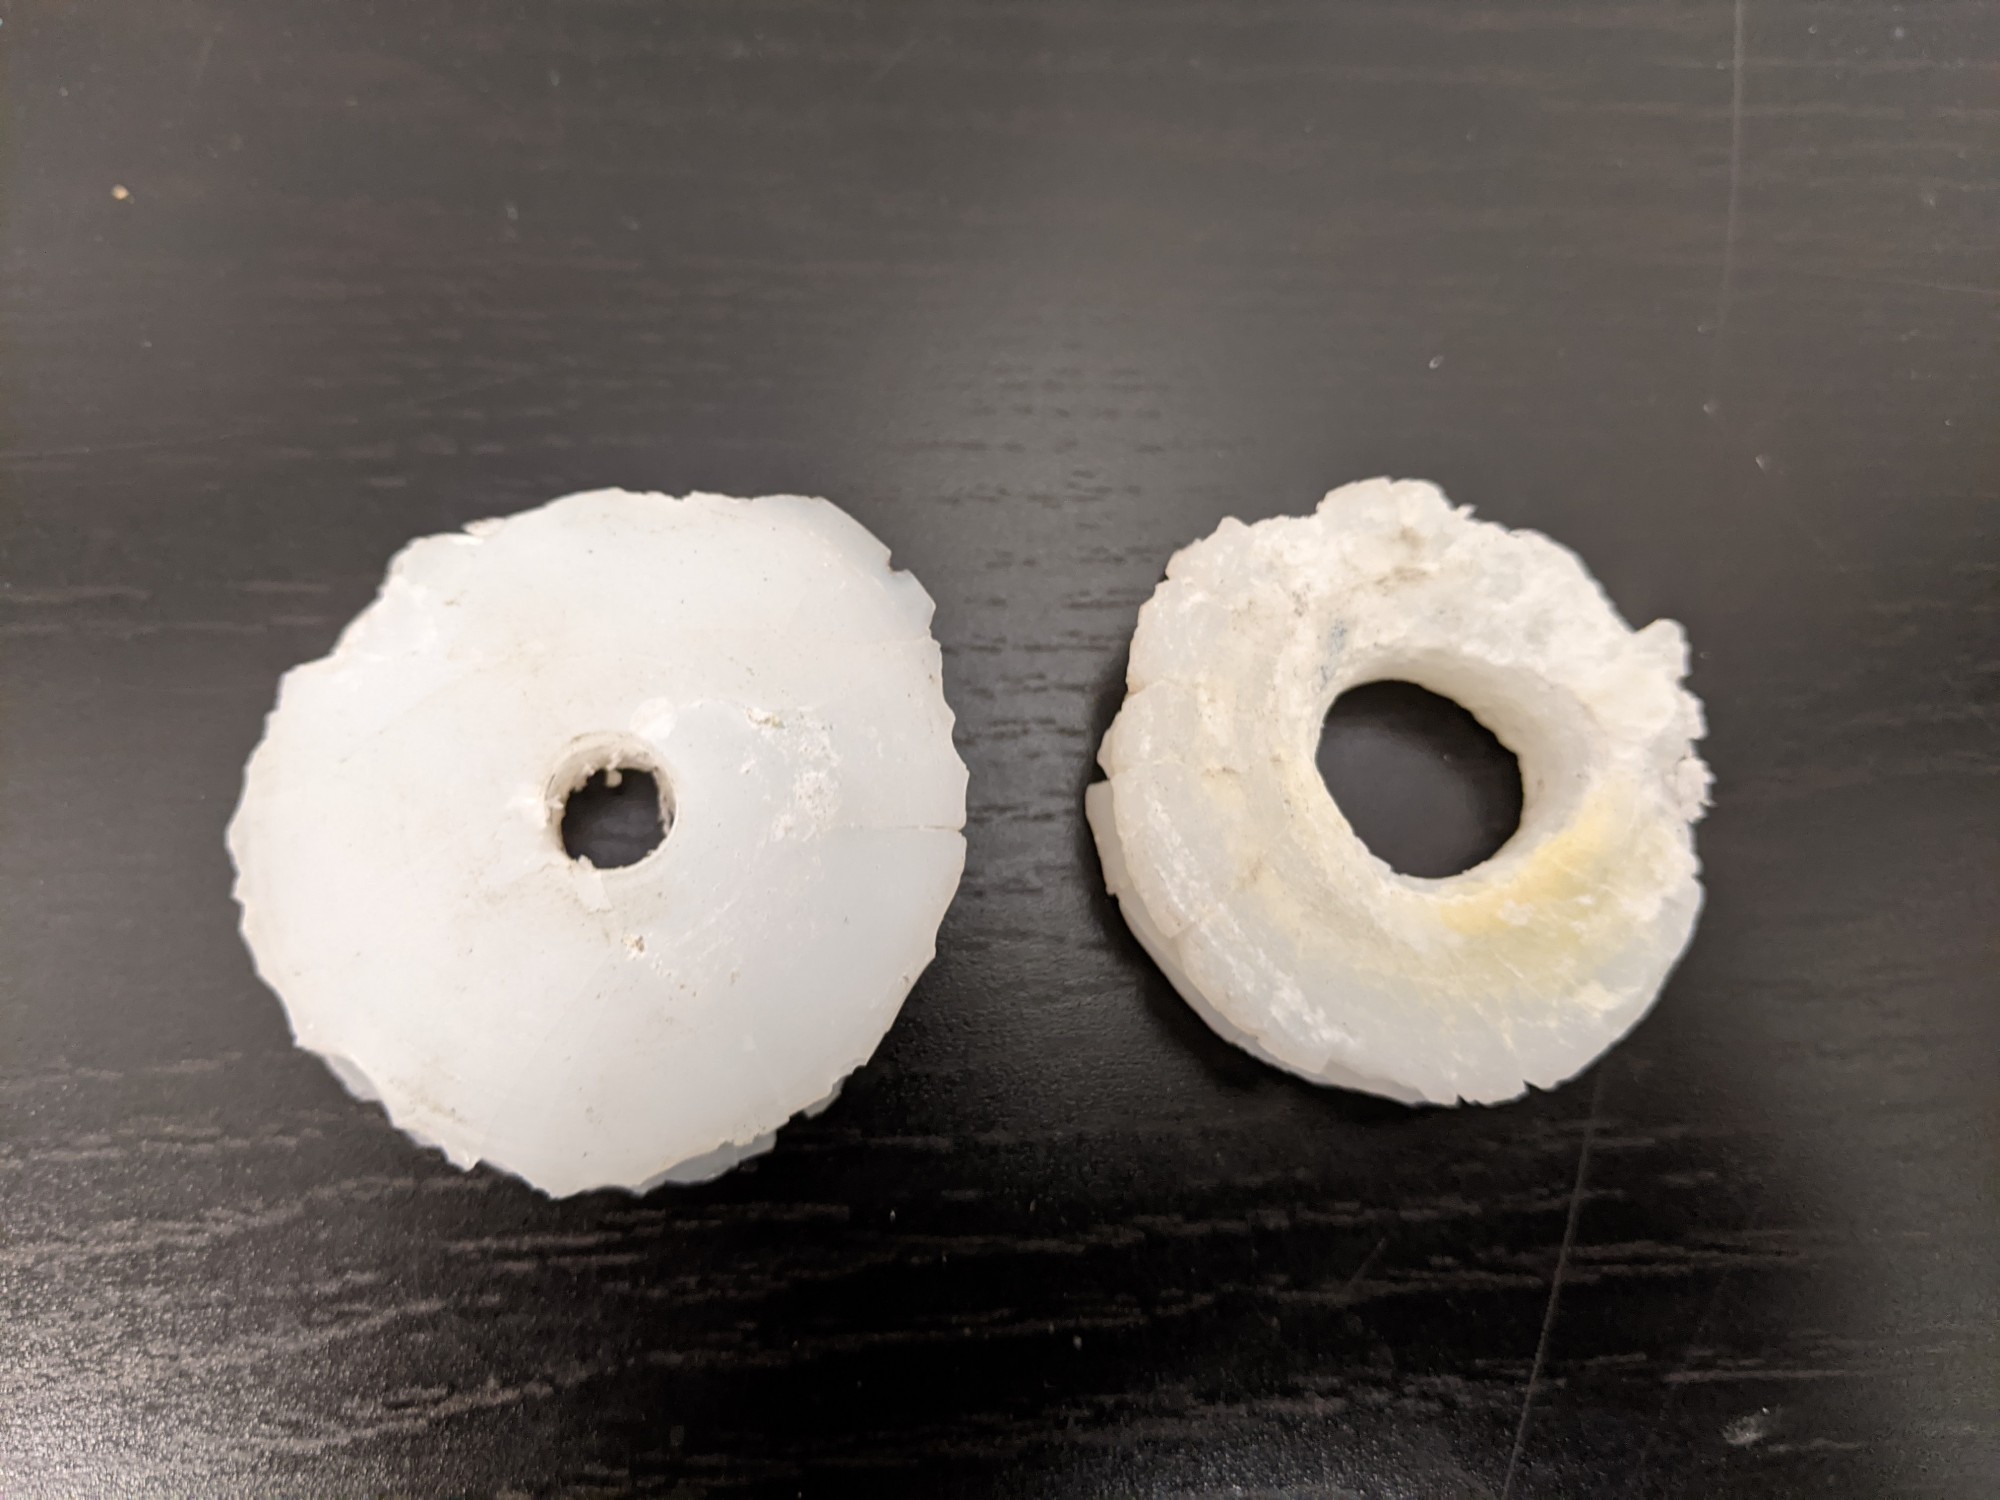
Ask the Rigger
Do your masthead sheaves need replacing.
Question: My halyard is binding. What’s up? From the Rigger: Most boat owners do not climb their masts regularly, but our riggers spend a lot of time up there. And they often find badly damaged Read more…
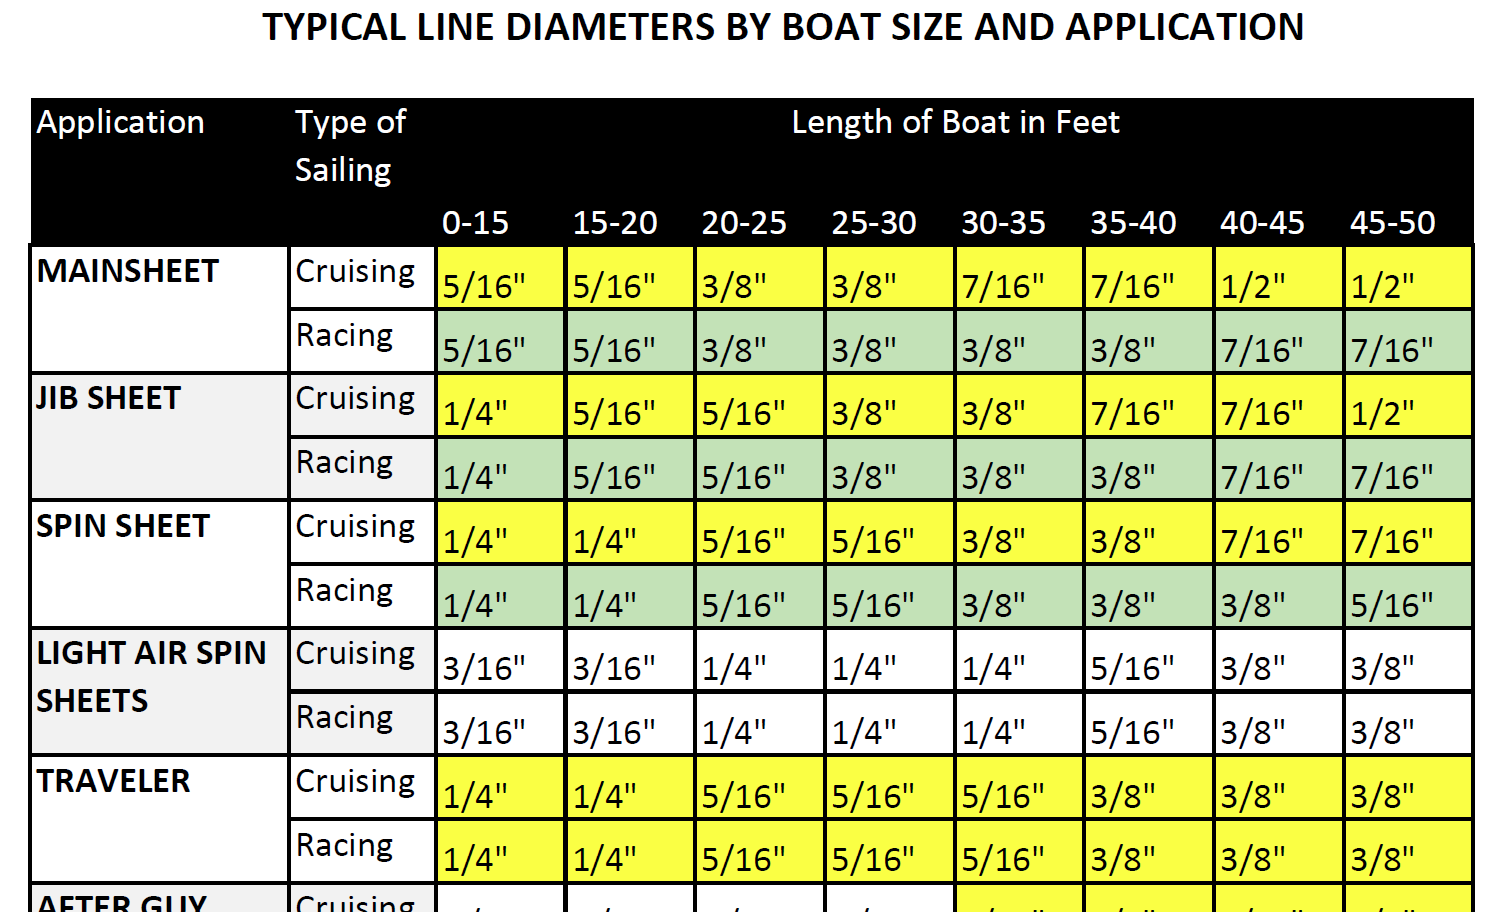
Selecting Rope – Length, Diameter, Type
Question: Do you have guidelines for selecting halyards, sheets, etc. for my sailboat? From the Rigger: First, if your old rope served its purpose but needs replacing, we recommend duplicating it as closely as possible Read more…
Spinlock Deckvest Maintenance
Question: What can I do to ensure that my Spinlock Deckvest is well-maintained and ready for the upcoming season? From the Rigger: We are so glad you asked! Deckvests need to be maintained so that Read more…
| (001) 401-739-1140 -- (001) 401-739-1149 | |
| |
| Spreaders are used on most Rigs to improve Mast support by increasing Upper (and Intermediate) Shroud angles. Spreaders are specific to particular Spreader Bases (or Spreader Bars), which, in turn are specific to individual Mast Sections. A variety of extruded Aluminum Spreader shapes are listed below. it is necessary to determine the Outside diameter (for Round Spreaders), or the specific Spreader Section (for Airfoil Spreaders).
Rig-Rite stocks a large selection of replacement Spreaders, most are listed below. If you require Spreaders listed here, please forward details on your Spreader, including a tracing of your Spreader Section with maximum Outside dimensions, wall thickness, and boat model and year. |
| All Round Spreader sections are extruded of 6063-T6 Aluminum Alloy, unless otherwise noted. , below, for additional specifications, and to see hardware commonly used with those Sections. | ||||
| 1/2" x 3/8" (.384") | .058" | 0.098 lbs./ft. | ||
| 5/8" x 1/2" (.509") | .058" | 0.125 lbs./ft. | ||
| 3/4" x 5/8" (.634") | .058" | 0.148 lbs./ft. | ||
| 7/8" x 3/4" (.759") | .058" | 0.175 lbs./ft. | ||
| 1" x 7/8" (.870") | .065" | 0.225 lbs./ft. | ||
| 1 1/16" x 7/8" | ." | 0. lbs./ft. | ||
| 1 1/8" x 7/8" | .125" | 0.472 lbs./ft. | ||
| 1 1/4" x 1" | .125" | 0.519 lbs./ft. | ||
| 1 5/16" x 1 3/16" | .133" | 0.581 lbs./ft. | ||
| 1 1/2" x 1" | .250" | 1.160 lbs./ft. | ||
| 1 1/2" x 1 1/8" | .188" | 0.911 lbs./ft. | ||
| 1 1/2" x 1 1/4" | .125" | 0.640 lbs./ft. | ||
| 1 1/2" x 1 3/8" | .065" | 0.345 lbs./ft. | ||
| 1 11/16" x 1 1/2" | .109" | 0.625 lbs./ft. | ||
| Extruded Aluminum Airfoil Spreader Sections are produced by different Manufacturers and are usually quite specific to the bases or inboard attachments provided by those Manufacturers. it is necessary to determine the Spreader Section you have. If you know the Manufacturer of your Spars this process can be simplified. If not, look through the Manufacturers listed below to see if you can find your Spreader Section. Airfoil Spreaders are listed by individual sizes, See . Airfoil Spreaders are listed by individual sizes, See . Airfoil Spreaders are listed by individual sizes, See . Airfoil Spreaders are listed by individual sizes, and were commonly used on a variety of yachts built by Cape Dory, C&C, Pearson, Tartan and others. See . Airfoil Spreader Tips are available, See . Airfoil Spreaders are listed by individual sizes, See . Airfoil Spreaders are listed by individual sizes, See . Airfoil Spreaders are listed by individual sizes, See . See: . See . If you require Airfoil Spreaders (or Parts) listed here, please forward details on your Spreader, including a tracing of your Spreader Section with maximum Outside dimensions, wall thickness, and boat model and year. |
~ Back to Spars Main Page ~
- Forums New posts Unanswered threads Register Top Posts Email
- What's new New posts New Posts (legacy) Latest activity New media
- Media New media New comments
- Boat Info Downloads Weekly Quiz Topic FAQ 10000boatnames.com
- Classifieds Sell Your Boat Used Gear for Sale
- Parts General Marine Parts Hunter Beneteau Catalina MacGregor Oday
- Help Terms of Use Monday Mail Subscribe Monday Mail Unsubscribe
Double spreader rigs vs single spreader rigs
- Thread starter Scott T-Bird
- Start date Mar 9, 2020
- Forums for All Owners
- Ask All Sailors

Scott T-Bird
Scott, there is the simple explanation and the more complex explanation. I'll stick to the simple. If you get Brion Toss's book, he goes in to greater detail. The big description involves mast stiffness, shroud angles, spreader length and stiffness and chain plate locations. As well as a lot of math and trigonometry. The short answer is, lighter more flexible masts and masts with a taper require more support in critical areas than a tree trunk mast. Lighter and tapered masts need the second set of spreaders to get the correct angles to keep the mast vertical. If you look at both boats, I'm going guess the 34 MK II has a stiffer heavier mast than the 320 and the chain plates are further outboard on the 34 than the 320. It is a performance issue. Lighter more flexible masts allow for using backstay tension to shape sails and reduce weight aloft. Both good things for optimizing performance.

Davidasailor26
The downside of the double spreader rigs is that tuning the rig is a more complicated process, and may require going aloft if the shrouds are not continuous and turnbuckles are above the spreaders.

The nice thing for my observations from the double on the 310 is the deck is clear and easy to walk without ducking. Also and trim in tighter. The 34 is a nice big boat, especially the mkII. If there was one as nice as my 310 we probably would have gone that way just for the space. But after a year with the 310 I'm happy how it worked out.

Will Gilmore

Will Gilmore said: I could never see the advantage of double spreaders on boats under 45 feet. It seems that any weight savings is lost with the extra set of spreaders aloft as well as the extra cable and hardware. Perhaps, but really? The added complexity would, it also seems to me, to make performance tuning a pain. If it were really so, wouldn't larger high performance boats all have multiple spreaders? Of course, I suppose it depends on how much you want to spend on a mast . -Will (Dragonfly) Click to expand

JK_Boston_Catalina310
There is a simpler answer that probably played more of an issue with Catalina going from single to double spreaders. Single spreader masts "pump" at slips in the wind. It's not loud but something that is noticed when people try to sleep on boats in slips. Catalina 30s have this problem also. On a mooring or the hook it is less noticable. Good luck with the search.
JRT said: The nice thing for my observations from the double on the 310 is the deck is clear and easy to walk without ducking. Also and trim in tighter. The 34 is a nice big boat, especially the mkII. Click to expand
Great comments! As usual, there does not seem to be a clear advantage and always trade-offs. Sue wants to look at a 34 near us over the weekend, so I guess I will have to follow! As always, there are multiple factors to consider!
Scott T-Bird said: I don't think I understand this comment unless you weren't making a comparison. Both models appear to have fore and aft lower shrouds mounted the same way. Click to expand
dlochner said: Where are the chainplates on the 320? I believe they are next to the deck house, so the side decks are clear. Click to expand
JK_Boston_Catalina310 said: There is a simpler answer that probably played more of an issue with Catalina going from single to double spreaders. Single spreader masts "pump" at slips in the wind. It's not loud but something that is noticed when people try to sleep on boats in slips. Catalina 30s have this problem also. On a mooring or the hook it is less noticable. Good luck with the search. Click to expand
Scott T-Bird said: Yes, same as the 34 so I don't think there was intended to be a distinction between the 2 models. Click to expand
- This site uses cookies to help personalise content, tailor your experience and to keep you logged in if you register. By continuing to use this site, you are consenting to our use of cookies. Accept Learn more…
Sailboat Shroud: Everything You Need to Know
by Emma Sullivan | Jul 27, 2023 | Sailboat Maintenance

Short answer sailboat shroud:
A sailboat shroud is a part of the standing rigging system that supports the mast and helps maintain its stability. These load-bearing wires or cables are attached to the sides of the boat and provide crucial support for the mast by counteracting lateral forces.
Understanding the Importance of a Sailboat Shroud: A Comprehensive Guide
The sailboat shroud: an often overlooked yet indispensable component of any sailing vessel. While its name may sound somewhat unfamiliar to the uninitiated, its significance in ensuring a safe and successful sailing experience cannot be overstated. In this comprehensive guide, we will delve into the critical role that sailboat shrouds play, unraveling their importance to both the functionality and safety of your beloved watercraft.
Firstly, let’s demystify what exactly a sailboat shroud entails. The term “shroud” refers to a collection of wires (usually made from stainless steel) or synthetic fibers that are strategically positioned on either side of the mast, providing structural support to maintain its stability during navigation. These rigging components act as tension-bearing elements that transfer various forces between the mast and the hull of the sailboat, ensuring its structural integrity is maintained under varying wind conditions.
One might wonder: why are these shrouds so important? Well, at their core, they serve primarily to counteract lateral forces acting upon the mast while also assisting in maintaining its vertical alignment. When properly tensioned, they prevent excessive sideways movement known as “mast rake,” thereby allowing for improved directional control and optimized sailing performance. In essence, sailboat shrouds directly contribute to maximizing your vessel’s efficiency by minimizing unnecessary energy loss due to excess mast movement.
Beyond optimizing performance, however, shrouds are instrumental in guaranteeing your safety whilst out on the open water. By firmly securing the mast in place through their tensioned presence, they help distribute loads evenly throughout the sailboat’s structure – preventing it from collapsing or compromising stability under heavy gusts or turbulent conditions. This aspect is particularly crucial during rough weather conditions or when encountering strong currents where failing to account for these external factors could potentially lead to catastrophic consequences.
Moreover – and here comes one of their most valuable features – well-maintained sailboat shrouds can actually save you money by keeping the rest of your rigging in good condition. When appropriately tensioned, they actively contribute to reducing stress on other interconnected components such as spreaders, stays, and halyards, thus minimizing wear and tear caused by excessive movement or strain. By employing sailboat shrouds effectively, you’ll be able to avoid unnecessary repair costs and extend the lifespan of your entire rigging system.
Understanding the significance of proper sailboat shroud maintenance is equally essential to fully grasp their overall importance. Regular inspection for signs of wear or corrosion should form part of routine boat maintenance. Any damaged wires or weak points must be promptly replaced to maintain optimal functionality and prevent potential accidents. Additionally, adjusting the shroud tension periodically – in harmony with manufacturer recommendations and prevailing weather conditions – will ensure consistent performance over time.
In conclusion, a sailboat shroud may be just one part of your vessel’s intricate rigging system, but its contribution cannot be understated. From optimizing sailing efficiency through improved handling and control to ensuring safety during challenging conditions, these unassuming yet vital components play an integral role in any sailor’s experience. Acknowledging their worth and prioritizing proper maintenance will undoubtedly lead to smoother journeys on the open seas while extending the longevity of your prized sailboat investment.
How to Properly Install a Sailboat Shroud: Step-by-Step Instructions
Title: Rigging Your Sailboat with Finesse: A Step-by-Step Guide to Installing Shrouds
Introduction: Setting up the shrouds on your sailboat is an essential part of rigging. These vital components provide support for the mast and ensure stability while sailing. While many sailors rely on professionals for this task, understanding how to properly install a sailboat shroud can be incredibly empowering and save you money. In this step-by-step guide, we will walk you through the process with detailed professional instructions, spiced with a touch of wit and cleverness.
Step 1: Gather Your Tools – Preparation is Key Before you get started, arm yourself with the necessary tools: – Wrench or shroud tension gauge – Wire cutters – Cotter pins or stainless steel stoppers – Tape measure
Step 2: Measure Twice, Cut Once – Determining Shroud Lengths Measurements are crucial when it comes to installing shrouds accurately. Starting from each attachment point (chainplate or turnbuckle), stretch a tape measure upward toward your masthead. Make sure the measurements are precise, accounting for any additional hardware like spreader ends or mast tangs that may affect length requirements. Repeat this process for every shroud.
Step 3: Remove Old Shrouds – Out with the Old! If you’re working on an existing rigging setup, start by removing any old shrouds using wire cutters to clip off their bottom parts — near chainplates or turnbuckles.
Step 4: Preparing New Shrouds – Who Says Rework Isn’t Fun? Now that your old shrouds have hit the deck (pun intended!), it’s time to prepare new ones. When choosing replacement wire, opt for high-quality marine-grade stainless steel cables as they offer excellent corrosion resistance and longevity.
Cut your newly acquired cables according to the measurement gathered in Step 2. Remember to leave a little extra length for fine-tuning and adjustments during installation. Once cut, use wire cutters to fray the ends slightly. This process will aid in affixing fittings later on.
Step 5: Attaching the Bottom Ends – Keep Calm and Connect On! Starting with one side of your sailboat, connect the bottom end of each shroud cable to its respective chainplate using cotter pins or stainless steel stoppers. Ensure that you exert tension by pulling the shrouds downward while inserting and securing these fasteners. Double-check for any twisting or misalignment.
Step 6: Securing the Top Ends – Reaching New Heights! Now it’s time to ascend your mast—well, figuratively speaking! Attach each shroud’s top end to their corresponding turnbuckle, ensuring they’re oriented correctly without any twists or kinks. – Pro Tip: Orienting turnbuckles with open slots facing opposite directions makes tuning easier in future adjustments.
Step 7: Balancing Act – Find Your Sailboat’s Equilibrium Begin tightening the turnbuckles evenly on both sides of your mast while keeping an eye on their lengths. Use either a wrench or a shroud tension gauge to ensure consistent tension across all shrouds. Establish good baseline stiffness without excess rigidity, allowing flexibility required for proper sailing dynamics.
Step 8: The Final Touches – Safety First! Once satisfied with your tension setup and balance, secure each turnbuckle to avoid accidental untwisting under pressure. Cotter pins can be used here as well if they serve as an extra peace-of-mind measure against tampering.
Conclusion: By mastering how to properly install sailboat shrouds through our step-by-step guide packed with professional instructions and a sprinkle of wit, you’ve gained valuable knowledge in maintaining your vessel’s rigging setup independently. Rigging becomes an enjoyable journey when accomplished with confidence, and remember: those who sail their own shrouds are the captains of their fate on the open sea!
Common FAQs About Sailboat Shrouds Answered
Title: Unraveling the Mysteries of Sailboat Shrouds: Answering Common FAQs
Introduction: Sailing enthusiasts, both seasoned and beginners alike, often find themselves bombarded with questions about various aspects of their beloved watercraft. One such area that constantly generates curiosity is sailboat shrouds. These integral components play a crucial role in maintaining stability and safety while out on the open waters. Today, we aim to demystify these enigmatic structures by answering some frequently asked questions about sailboat shrouds.
1. What are sailboat shrouds? Sailboat shrouds are a vital part of a sailing vessel’s standing rigging system, consisting of sturdy wires or cables that support the mast from the sides. They provide lateral stability for the mast, ensuring it stays upright even under strong winds or rough seas.
2. How do sailboat shrouds work? When properly tensioned and adjusted, sailboat shrouds counteract the force exerted by the sails on the mast, preventing excessive bending or swaying. By distributing this load evenly across multiple points on either side of the mast, they effectively keep it centered and help maintain optimal performance during sailing.
3. What materials are sailboat shrouds made of? Traditionally, sailboat shrouds were constructed using stainless steel wire ropes due to their exceptional strength, durability, and resistance to corrosion in marine environments. However, modern advancements have also introduced alternatives like Dyneema®, a high-performance synthetic fiber known for its remarkable strength-to-weight ratio.
4. How often should I inspect my sailboat shrouds? Regular inspections of your sailboat’s standing rigging are essential for ensuring safety at sea. We recommend conducting thorough inspections before each sailing season and after any significant weather event or prolonged period of disuse. Typically, closely examine key areas such as fittings, turnbuckles, tangs (attachment points), and wires for signs of wear, cracks, corrosion, or loose connections.
5. Can I replace sailboat shrouds myself? While some experienced sailors may tackle minor maintenance tasks on their own, replacing sailboat shrouds is a job best left to professionals. The process involves carefully adjusting tension levels, ensuring proper alignment, and verifying that all components are compatible and correctly installed. Expert riggers possess the necessary knowledge and specialized tools to carry out these intricate procedures safely and efficiently.
6. Are there different types of sailboat shrouds? Yes, there are various configurations of sailboat shrouds tailored to specific sailing requirements. Common designs include single lower shrouds (found on smaller boats), double lower shrouds (enhanced stability for larger vessels), cap shrouds (supporting the mast from the top), and intermediate or diamond stays (adding lateral support). Consulting with a professional rigger can help determine the suitable setup for your specific sailboat.
7. How do I know if my sailboat shroud needs replacement? Several indicators might suggest it’s time to consider replacing your sailboat shroud. These include visible signs of damage such as broken wires or fatigue-induced cracking, excessive corrosion, reduced tension capacity due to stretched wires, noticeable misalignment when compared to other rigging components, or simply reaching its recommended lifespan as specified by the manufacturer.
Conclusion: Sailboat shrouds may seem like a complex subject at first glance but understanding their purpose and knowing how to properly maintain them ensures safer and more enjoyable sailing experiences. By addressing some common FAQs about these essential rigging elements, we hope to have shed light on their significance in keeping your vessel steady while conquering the magnificent seas ahead. So set your course confidently knowing that your trusty sailboat shrouds have got you covered!
The Role of a Sailboat Shroud in Ensuring Safety at Sea: Explained
Sailing is an exhilarating experience that combines the beauty of nature with the thrill of adventure. It allows us to disconnect from the chaos of our daily lives and immerse ourselves in the vastness of the open sea. However, amidst all this excitement, it is crucial to prioritize safety above all else. One vital component that plays a significant role in ensuring a safe sailing journey is the sailboat shroud.
Now, you might be wondering, what exactly is a sailboat shroud? Well, let’s dive into its importance and how it guarantees our safety while sailing.
At its core, a sailboat shroud refers to a series of tensioned cables or wires that support the mast on a sailing vessel. It acts as an essential connective element between the mast and the deck, providing stability and integrity to the entire structure. In simple terms, without sturdy sailboat shrouds, your mast would be prone to wobbling or even collapsing entirely – definitely not something you want in the middle of your oceanic voyage!
So, why are sailboat shrouds so crucial for safety? Let’s take a closer look at their key functions:
1. Stability: Imagine you’re steering your sleek yacht through choppy waters with strong winds gusting against your sails. Without reliable sailboat shrouds to support your mast, your vessel could easily lose balance and capsize – turning your exciting adventure into a dangerous nightmare. The primary function of these shrouds is to provide lateral stability by counteracting excessive sideways forces acting on the mast.
2. Structural Integrity: A sailboat shroud ensures that all elements comprising your boat’s rigging work together harmoniously. By distributing load evenly across various points on the hull and deck fittings, it prevents concentrated stress on any particular area – reducing the risk of structural failures such as cracked hulls or bent masts.
3. Control and Comfort: Sailing is about harnessing the power of wind to navigate your craft efficiently. Sailboat shrouds play a vital role in achieving this balance by allowing you to trim your sails effectively. By adjusting the tension in these rigging components, sailors can optimize their boat’s performance, maintaining a stable course and comfortable sailing experience even in rough conditions.
4. Prevention of Catastrophic Failures: In the worst-case scenario, where extreme conditions or unforeseen events create immense stress on your mast, sailboat shrouds act as a safety net, preventing catastrophic failures. They absorb excessive forces and provide a buffer zone for potential damage – giving you precious time to react before things take a turn for the worse.
However, bear in mind that sailboat shrouds aren’t invincible superheroes; they require regular inspection and maintenance to ensure their effectiveness. Over time, exposure to saltwater environments and constant tension can cause wear and tear on these critical components. Routine checks for signs of corrosion, fraying wires, or damaged fittings are essential practices that should never be neglected.
In conclusion, sailboat shrouds are not only essential but invaluable when it comes to ensuring safety at sea. From providing stability and structural integrity to enabling control and preventing catastrophic failures, these unassuming wires play an instrumental role in our nautical adventures.
So next time you find yourself aboard an elegant sailboat venturing into the vast blue unknown, remember to thank those trusty sailboat shrouds silently working behind the scenes – safeguarding your journey amidst windswept waves while allowing you revel in nature’s embrace with peace of mind knowing you’re well protected!
Expert Tips for Maintaining and Inspecting Your Sailboat Shrouds
Title: Mastering the Art of Sailboat Shroud Maintenance and Inspection: Expert Tips Unveiled
Introduction: Embarking on a sailing adventure is a thrilling experience, but it’s crucial to ensure that your vessel is maintained in top-notch condition. Among the many critical components of your sailboat, the shrouds play a paramount role in supporting your mast, preserving stability, and guaranteeing safety. In this blog post, we aim to equip you with expert tips that will assist you in maintaining and inspecting your sailboat shrouds effectively. Let’s dive into the world of sailboat care!
1. Brush Up Your Knowledge: Before delving into maintenance techniques, it is essential to understand what sailboat shrouds are and how they function. Shrouds are stainless steel cables or rods that run from various parts of the mast down to the hull. They prevent excessive bending and swaying of the mast when under high wind-pressure conditions or while under sail. Being aware of their purpose will help you comprehend why their proper upkeep is indispensable.
2. Routine Inspections are Vital: Begin by conducting frequent inspections around every two to three months or whenever you return from extended voyages. Look out for signs of rust, elongation, fraying, or corrosion on both ends (connectors) as well as along its length using a magnifying glass if necessary. Any indication of wear or damage should not be taken lightly; instead, take immediate action.
3. Check Tensions Regularly: Maintaining optimum tension on your shrouds promotes overall boat performance and reduces unnecessary strain on other rigging elements such as stays and spreaders – enhancing stability during sailing trips.
4. Replace Worn Parts Promptly: As soon as you identify any deformities, such as frayed strands or localized corrosion spots on your shrouds during an inspection, it is paramount to replace them promptly with new ones that meet the manufacturer’s specifications. Ignoring these signs could lead to catastrophic failures at sea, jeopardizing both your safety and that of your beloved sailboat.
5. Don’t Overlook Turnbuckles: Pay special attention to the turnbuckles that adjust the tension in your shrouds, as they are often vulnerable to corrosion due to their exposed location. Applying a high-quality, marine-grade lubricant regularly will keep them functioning smoothly and preserve their longevity.
6. Tidy Up Your Shroud Rigging: Over time, accumulated dirt, salt residue, or bird droppings can affect the structural integrity of your shrouds. Use mild soapy water and a non-abrasive brush to clean them gently. Avoid harsh chemical cleaners as they might damage the stainless steel surface. Remember, cleanliness goes hand in hand with durability!
7. Consult Professionals for Detailed Inspections: While regular inspections are indispensable, it is still prudent to consult professional riggers or sailing experts for periodic thorough assessments of your sailboat’s rigging system – including sailboat shrouds. Their experience enables them to detect issues not apparent during routine checks and provide expert advice on maintenance practices tailored specifically to your vessel.
Conclusion: Maintaining and inspecting your sailboat shrouds shouldn’t be taken lightly; they form an integral part of keeping you safe during all sailing endeavors. By following these expert tips diligently, conducting routine inspections, addressing issues promptly, and seeking professional assistance when necessary—you’ll ensure optimal performance from the essential components that embellish your prideful sailboat! Set sail confidently knowing that you’ve mastered the art of maintaining and inspecting your sailboat shrouds like a true professional!
Upgrading Your Sailboat Shrouds: Key Considerations for Performance Enhancement
When it comes to upgrading your sailboat shrouds, there are several key considerations that can enhance your vessel’s overall performance. Shrouds play a crucial role in supporting the mast and maintaining its stability, so it’s important to carefully evaluate all aspects before making any changes. In this blog post, we will delve into the intricacies of upgrading sailboat shrouds, discussing various factors to take into account and guiding you towards an informed decision.
Before embarking on this upgrade journey, it is imperative to assess the current condition of your sailboat shrouds. Inspect them thoroughly for signs of wear and tear such as rust, fraying wires, or any obvious structural weaknesses. If you notice any concerning issues, it may be wise to consult with a professional rigging expert or rigger who can provide an objective assessment.
One key consideration when upgrading your shrouds is the material from which they are made. Traditionally, stainless steel has been the go-to choice due to its durability and strength. However, advancements in textile technology have paved the way for alternative materials such as Dyneema or carbon fiber composites which offer substantial weight savings without compromising strength.
Choosing the right size and diameter for your upgraded shrouds is another vital aspect to consider. The load-bearing capacity of the mast and rigging system should be evaluated in order to determine the appropriate size that can effectively withstand anticipated stresses during sailing maneuvers. Consulting with a rigging specialist or naval architect can help ensure accurate calculations based on your specific vessel’s design parameters.
Additionally, assessing the angle at which your sailboat shrouds intersect with the mast is essential for optimizing performance. An improper angle can lead to excessive mast bend or unwanted sagging of sails. Adjusting these angles through advanced tuning techniques like dynamic rigging allows for fine-tuning adjustments that improve windward performance and overall boat handling characteristics.
While analyzing all these technical aspects is crucial, it’s essential not to overlook the aesthetic element. Upgrading your sailboat shrouds presents an opportunity to add a touch of personality and uniqueness to your vessel. With a wide range of colors and finishes available, you can enhance the visual appeal of your rigging while still prioritizing performance.
One last consideration that should not be overlooked when upgrading shrouds is budget allocation. Sailboat shroud replacements can vary widely in cost depending on factors such as material choice, size, and customization options. It is advisable to establish a realistic budget beforehand and prioritize factors accordingly.
In conclusion, upgrading sailboat shrouds requires careful evaluation of various key considerations. From material selection to size determination, angle adjustments, aesthetics, and budget allocation – each aspect plays a vital role in optimizing your vessel’s performance on the water. By approaching this upgrade decision with a professional mindset while also injecting some wit and cleverness into the process, you can elevate both the functionality and allure of your sailboat shrouds. So set sail towards better performance enhancement by exploring these considerations in detail!
Recent Posts

- Sailboat Gear and Equipment
- Sailboat Lifestyle
- Sailboat Maintenance
- Sailboat Racing
- Sailboat Tips and Tricks
- Sailboat Types
- Sailing Adventures
- Sailing Destinations
- Sailing Safety
- Sailing Techniques
- New Sailboats
- Sailboats 21-30ft
- Sailboats 31-35ft
- Sailboats 36-40ft
- Sailboats Over 40ft
- Sailboats Under 21feet
- used_sailboats
- Apps and Computer Programs
- Communications
- Fishfinders
- Handheld Electronics
- Plotters MFDS Rradar
- Wind, Speed & Depth Instruments
- Anchoring Mooring
- Running Rigging
- Sails Canvas
- Standing Rigging
- Diesel Engines
- Off Grid Energy
- Cleaning Waxing
- DIY Projects
- Repair, Tools & Materials
- Spare Parts
- Tools & Gadgets
- Cabin Comfort
- Ventilation
- Footwear Apparel
- Foul Weather Gear
- Mailport & PS Advisor
- Inside Practical Sailor Blog
- Activate My Web Access
- Reset Password
- Customer Service

- Free Newsletter
Blue Jacket 40 Used Boat Review

Catalina 270 vs. The Beneteau First 265 Used Boat Match-Up

Ericson 41 Used Boat Review

Mason 33 Used Boat Review

How to Create a Bullet-Proof VHF/SSB Backup

Tips From A First “Sail” on the ICW

Tillerpilot Tips and Safety Cautions

Best Crimpers and Strippers for Fixing Marine Electrical Connectors

Polyester vs. Nylon Rode

Getting the Most Out of Older Sails

How (Not) to Tie Your Boat to a Dock

Stopping Mainsheet Twist
Fuel Lift Pump: Easy DIY Diesel Fuel System Diagnostic and Repair

Ensuring Safe Shorepower

Sinking? Check Your Stuffing Box

What Do You Do With Old Fiberglass Boats?

Boat Repairs for the Technically Illiterate

Boat Maintenance for the Technically Illiterate

Whats the Best Way to Restore Clear Plastic Windows?

Stopping Holding-tank Odors

Giving Bugs the Big Goodbye

Galley Gadgets for the Cruising Sailor

The Rain Catcher’s Guide

Sailing Gear for Kids

What’s the Best Sunscreen?

UV Clothing: Is It Worth the Hype?

Preparing Yourself for Solo Sailing

R. Tucker Thompson Tall Ship Youth Voyage

On Watch: This 60-Year-Old Hinckley Pilot 35 is Also a Working…

On Watch: America’s Cup

On Watch: All Eyes on Europe Sail Racing

Dear Readers
- Systems & Propulsion
- Sails, Rigging & Deck Gear
Spreader Light Test
Leds lead test field of 10 spreader and deck lights..

Sailors often have a love-hate relationship with spreader lights. On one hand, they can turn a dark deck into broad daylight, making whatever task is at hand easier to accomplish. But this abundance of illumination causes pupils to constrict and spoils night vision. Photopic (cone-based) vision dominates in daylight, while scotopic (rod-based) vision is the eyes response to darkness. It takes 30 to 45 minutes for eyes to fully adjust to the latter. If youre the helmsperson, overly bright or misdirected spreader lights can be a big problem.

Photos by Ralph Naranjo
The upside of spreader/deck lights is the reassuring bubble of glow that surrounds the boat. The downside is the pitch-black abyss that extends just beyond the perimeter of the deck. Prior to turning on the boats spreader light(s), the helmsman can usually discern shapes in the dark, see the horizon, and has a good chance of spotting other boats running lights in time to take evasive action. Unfortunately, when lots of light hits the deck, all of those important visual cues to collision avoidance tend to disappear.
In the last decade or so, marine light housings have changed, and a light emitting diode (LED) revolution is in full play. These are two of the reasons we decided to take a fresh look at deck illumination and the options available. In this round of spreader/deck light testing, weve taken a close look at lamp design, manufacturing approaches, and how each unit works. Weve bench tested each product and looked at how the light beam behaves at simulated spreader heights. Brightness has been measured, field of coverage quantified, and the current consumption tracked.
We found that too much light can be as much a detriment as too little, and that theres a fine art to illuminating the area from the mast step to the bowsprit, while keeping the helmsmans night vision intact. LED lights offered the best lumens-per-watt ratio in our tests, and when it comes to good waterproof longevity, we found that housings and brackets do matter.

The good old days of seeing a pair of chrome-plated Perko sealed beams perched under the cross trees are gone. There was a lot to like about those venerable sources of even lighting, but what caused concern was the 10-amp draw they demanded when switched into action. Smaller, but only slightly more energy-efficient quartz halogen bulbs chased sealed beams from the waterfront. And as LEDs entered the picture-and proved that they do a much better job of turning electrical energy into light, run cooler, last longer, and give a lighter, more compact deck illumination-the evolution became a revolution.
What We Tested The Doctor LED crew, based in Seattle, has been making marine LED lights and replacement bulbs for some time. The two products they sent us were the Kevin, an inline, four LED single-point, pivoting deck light, and the DaveX3, a low-profile, submersible puck-style light. From Forespar, a Southern California maker of a variety of marine products, we tested a cost-effective pair of mast-mounted deck lighting products: the ML-1 and ML-2. The lamps have injection-molded plastic housing and conform to the shape of the leading edge of the spar. Hella Marine, which is a worldwide marine lighting specialist headquartered in New Zealand, submitted its Sea Hawk light for the test. The light has a 12-LED array and a polyamide lens. From Scandvik Marine, a Florida manufacturer of a range of marine products, we tested a four-LED flush-mount light and a four-LED spreader light.

The high-tech LED lighting and safety product company Misea Group markets the Signal Mate line of LED lights. All of their deck illumination lamps are based on LED lighting that provides even, highly directable illumination. We tested several Signal Mate lights: two spreader-mounted lamps, one projecting a white beam and the other a red; a combo bow and deck light that has a 3-nautical-mile rating; and a standalone mast-mount deck light.
As a side test, we checked out a generic set of LED mini bullet lights that we picked up at a boat show. The small, energy efficient, bell-shaped lights are stainless-steel and adjustable, but the wiring requires that extra holes be drilled into the spar. We found that these little lamps behaved like a dim flashlight, providing enough discernment to get a foredeck job done while having the least impact on night vision, and using only 0.1 amps at 12.6 volts DC. Testing determined that rather than deck lights, the compact bullet lights would serve well in wet lockers and other spots where a small, water-resistant, wired light fixture is desired, so we decided not include them in the roundup.

Some of the test lights are adjustable (see Value Guide), but adjustability in a spreader light isn’t that big of a plus, in our opinion. Wed prefer to mount them at a fixed angle rather than risk them being redirected by a flailing halyard.
Dr. LED Dr. LEDs Kevin and DaveX3 lights offered lots of light per watt, delivered even illumination through a wide voltage spectrum, and the lamp housings are marine quality.
The four-LED Kevin provided wide-area illumination and topped our intensity scale. The 0.7 amps at 12.6 volts was just a little higher in current appetite than other similarly configured deck lights. The Kevin has lots in common with the Scandvik unit we tested. Their performance, color temperature, beam width, current demand, and minimal heat generation were both superior. However, the T-shaped mount is likely to snag errant lines, and it would be up to the boat owner to come up with a better bracket arrangement. The Kevin runs about $153 and comes with a one-year warranty. The model is set to be upgraded in 2014, according to Dr. LED.
The DaveX3 is a small, sealed dome light thats built to ISO 8846 standards and belongs underwater, and thats precisely why we kept it in the deck light mix-a sailboat at sea is as close to being underwater as you can get. Testers appreciated that its polycarbonate body is corrosion resistant and galvanically inert.

The three-LED DaveX3 is meant to be water cooled for continuous-duty operation, but as a flare up light for intermittent sail-trim checks, it can be mounted on the foredeck, directing its beam upward toward the mast and sail. Keep in mind that when looking aloft while hoisting a sail, one stares into spreader/deck lights, and thats why a foredeck-mounted light makes lots of sense.
At $180, the DaveX3 waterproof light runs at the mid to high end of the test fields price spectrum, and it comes with a one-year warranty.
Bottom line: Those looking for power to light up a large area should take a close look at the Kevin lamp. The ruggedly built DaveX3 is an ultra waterproof unit that will survive a wet foredeck and is handy for short-term headsail trim checking or as a flare up light for others to visually pinpoint your vessels location.
Forespar The design features of the two Forespar lights we tested, the ML-1 and ML-2, make it obvious that they were engineered by a company that understands spars and rigging. Their injection-molded plastic housings are immune to electrolysis and can be easily mounted on most masts, using self-tapping screwed or pop rivets.

The ML-1 unit is solely for deck illumination, and its sealed quartz-halogen bulb and efficient reflector lens do a good job of keeping the beam aimed at the mast base and foredeck. It was the most current hungry of all we tested (1.8 amps at 12.6 volts DC), but if the light is not used for continuous duty, the total power consumed will remain small.
The ML-2 unit uses the same deck light as its sibling, but it also has a 2-nautical-mile, U.S. Coast Guard-certified, long-filament festoon bulb steaming light. Its a handy combo and at $75, its priced very close to the $66 ML-1. In tests, it consumed 1.2 amps at 12.6 volts DC. Both come with a three-year warranty.
Bottom line: The Forespar ML-2 is an appealing product for the price-point shopper not looking for LED energy efficiency. Its our Budget Buy. The ML-1 is a compact, lightweight light, and its easy to install on smaller spars.

Hella The Hella Sea Hawks polyamide lens and 12-LED array provide an even beam with good brightness that effectively and evenly illuminates the deck. The absolute brightness was a little lower than the four-LED inline units from Dr. LED and Scandvik, but when looking aloft, the Hella lamp was not as blinding as the others.
The Hellas current consumption (0.3 amps at 12.6 volts DC) was half that of the slightly brighter Scandvik and Dr. LED units. Its not surprising to see that New Zealand-based Hella had a solution to the halyard snagging issue testers noted in other inline multi-LED deck lamps. The Kiwis are consummate sailors, and their full-width, 316 stainless-steel bracket keeps halyards from snagging the lamp as if it were a horn cleat. Priced in the middle of the pack, the $136 Hella comes with an impressive five-year warranty.
Bottom line: Hellas Sea Hawk edged out the competition with its light weight (8.8 ounces) and snag-free mount design. Its our Best Choice. The even illumination and brightness, without a central hot spot, earned high ratings.
Scandvik The two Scandvik lights we tested-one flush-mount, one bracket mount-are both well-made, well-engineered lamps that employ an inline four-LED design. Their illumination is excellent. When compared with lamps containing quartz-halogen bulbs, Scandviks deck lights deliver equivalent brightness and a radius of illumination at about 20-percent of the formers power usage. We measured a 0.6-amp current demand at 12.6 volts DC and were pleased by the wide circular beam. Initially, we assumed that there would be more of an ellipse shape beam, but by optically setting up the lens and LED configuration, the inline housing still delivers a circular beam.

Scandviks deck lights are energy-efficient, effective light sources, but the bracket mount is less than ideal. It consists of a single stainless-steel toggled machine screw that allows one-axis tilting. The problem is the brackets potential to snag a halyard and change the lights tilt angle, resulting in light being redirected toward the cockpit instead of the foredeck. A bit of creative mount fabrication under a radar bracket would solve the halyard snag factor. In short, high marks are given to the flush-mount lamp, but bracket mounting on sailboats will be an issue.
The flush- and bracket-mounted lights run $90 each and come with a one-year warranty.
Bottom line: Efficient lighting in a well-made housing, but the T-shaped bracket and non-flush mount is a halyard snagger.
Signal Mate The energy-efficient, mast-mounted LED deck light is aligned with the spars centerline, rather than raked forward to send more illumination to the foredeck. Fortunately, the optical ability of the light to deliver sharp cutoff edges was good, and the 0.3 amps volts DC current demand (at 12.6 volts DC) delivered effective illumination. At $289, the Signal Mate deck light was the most expensive standalone light in the test.
Signal Mates three-LED spreader light also focused a similar, medium-radius white beam, using the same current demand. The red version of the LED lamp delivered a narrower beam, and testers found looking aloft toward the red light to be very visually disconcerting. While we like the idea of preserving night vision, we had some concern about beating to windward and having the heel angle cause the red LED to be misconstrued as a navigation light. The spreader lights, at $199, are more expensive than the other brands of lights we tested.
The combo bow and deck light was a very efficient package. The 3-nautical-mile steaming light consumed only 0.2 amps, and the low-profile housing fits closely to the spar. It runs $689.

The Lexan and anodized aluminum Signal Mate lights come with three-year warranties.
Bottom line: Signal Mates well-made LED combo light is a good choice for larger vessels. The deck light and spreader lights provide even illumination, using very little current.
Conclusion Brilliance is in the eye of the beholder, and determining how bright deck lighting should be is a balance of competing interests. We maintain a strong pitch for the maintenance of night vision, and those who chase solutions with technology may want to install two different intensity spreader/deck lights. It was a tough task to come up with a winner among the inline LED lamps. Dr. LEDs Dave X3 put out the brightest, broadest beam. Scandvik put out nearly as much light, using a pinch less current. But Hella, which offered a little less brightness, proved to be a current miser, and nosed out the competitors with its sensible bracket design and lighter weight.
Signal Mates combo lamp is an expensive but well-made piece of kit. We will do a longer-term test on the red LED version of Signal Mates spreader light and report our findings in the future.
When all is said and done, LED efficiency needs to be thought of in a duty-cycle context, and if your spreader/deck light(s) are seldom used, and used for only short duration, LED efficiency may not justify the added expense. Running lights are another story-they remain on all night, and for passagemakers, LED lights can add up to significant power savings.
But when it comes to infrequent, short-term deck illumination, perhaps the Forespar ML-2 makes the most sense. You can compromise short-term by putting up with bright but inefficient deck lighting, and investing in a good LED masthead tricolor lamp for the time you are under sail and tapping into the battery bank reserve.

- Signal Mate
RELATED ARTICLES MORE FROM AUTHOR
What model of the Hella light did you test?
I have bought Lumitec LED Spreader Light. A little pricey, but functionally it’s the cat’s wazoo! Great stuff. Two color, both dimmable, on a standard on/off circuit. I replaced two old halogen spreaders with just one of these and it’s great.
Water can be fun in the dark but I also have to ensure my safety. Great article. Most folks have to learn this the hard way.
Boaters would agree that the deck is one of the most important parts of a boat. It’s where I stay when docking my boat. The best marine LED spreader lights can light up the whole deck so I can work safely and easier.
LEAVE A REPLY Cancel reply
Log in to leave a comment
Latest Videos

Cabo Rico 34 Boat Review

Super Shallow Draft Sailboat: The Leeboard Sharpie

Hans Christian 41T – Boat Review

Seven dead after superyacht sinks off Sicily. Was the crew at...
Latest sailboat review.

- Privacy Policy
- Do Not Sell My Personal Information
- Online Account Activation
- Privacy Manager
Please verify you are a human
Access to this page has been denied because we believe you are using automation tools to browse the website.
This may happen as a result of the following:
- Javascript is disabled or blocked by an extension (ad blockers for example)
- Your browser does not support cookies
Please make sure that Javascript and cookies are enabled on your browser and that you are not blocking them from loading.
Reference ID: ffd6828f-7586-11ef-b52c-ca9f26515c76
Powered by PerimeterX , Inc.
- ABBREVIATIONS
- BIOGRAPHIES
- CALCULATORS
- CONVERSIONS
- DEFINITIONS
Vocabulary
What does spreader mean?
Definitions for spreader ˈsprɛd ər spread·er, this dictionary definitions page includes all the possible meanings, example usage and translations of the word spreader ., princeton's wordnet rate this definition: 0.0 / 0 votes.
- spreader noun
a hand tool for spreading something
"he used his knife as a spreader"
broadcaster, spreader noun
a mechanical device for scattering something (seed or fertilizer or sand etc.) in all directions
Wiktionary Rate this definition: 0.0 / 0 votes
An object or person who spreads.
A spacer or device for keeping two objects apart.
A device used to spread bulk material.
James put grass seed on the lawn with a seed spreader.
A knife or spatula used to distribute a substance such as butter or jelly.
Ellen used a spreader to butter her bagel.
A horizontal athwartships spar attached to the mast of a sailboat in order to extend the shrouds away from the mast.
A machine for combining and drawing fibers of flax to form a sliver preparatory to spinning.
Samuel Johnson's Dictionary Rate this definition: 0.0 / 0 votes
Spreader noun
Etymology: from spread.
By conforming ourselves we should be spreaders of a worse infection than any we are likely to draw from Papists by our conformity with them in ceremonies. Richard Hooker.
If it be a mistake, I desire I may not be accused for a spreader of false news. Jonathan Swift.
ChatGPT Rate this definition: 0.0 / 0 votes
A spreader is a tool, machine or device used to evenly distribute a substance, such as fertilizer, seeds, or salt. It can also refer to a person who transmits or dissecribes something like a disease or information. The term is often used in different contexts and its specific meaning may vary depending on the industry or field it is referred to.
Webster Dictionary Rate this definition: 0.0 / 0 votes
one who, or that which, spreads, expands, or propogates
a machine for combining and drawing fibers of flax to form a sliver preparatory to spinning
Wikidata Rate this definition: 0.0 / 0 votes
A spreader is a spar on a sailboat used to deflect the shrouds to allow them to better support the mast. Often, there are multiples, called spreaders. The spreader or spreaders serve much the same purpose as the crosstrees and tops in a traditional sailing vessel. Spreader design and tuning can be quite complex. The spreaders may be fixed or swinging. The purpose of the spreaders is to control, by either limiting, or inducing, bend into the spar so that when the windward shroud is loaded the mast achieves the desired bend characteristics. The spreaders may be designed to be angled in a way that either forces bend in to the spar or reduces bend, depending on the desired results.
Matched Categories
- Mechanical Device
Usage in printed sources From:
[["1644","1"],["1672","1"],["1685","2"],["1703","1"],["1705","2"],["1715","1"],["1728","2"],["1732","1"],["1735","1"],["1738","1"],["1742","1"],["1744","2"],["1745","1"],["1749","1"],["1755","2"],["1757","1"],["1758","2"],["1759","1"],["1761","4"],["1764","1"],["1765","1"],["1766","1"],["1768","2"],["1769","1"],["1774","1"],["1775","1"],["1776","1"],["1778","1"],["1783","1"],["1784","2"],["1787","1"],["1790","2"],["1794","1"],["1798","4"],["1799","1"],["1801","14"],["1802","1"],["1803","4"],["1804","4"],["1805","7"],["1806","4"],["1807","1"],["1808","3"],["1809","3"],["1810","2"],["1811","2"],["1812","8"],["1813","3"],["1814","5"],["1815","2"],["1816","1"],["1817","1"],["1818","1"],["1819","2"],["1820","20"],["1821","3"],["1822","4"],["1823","5"],["1824","37"],["1825","8"],["1826","15"],["1828","24"],["1829","5"],["1830","20"],["1831","8"],["1832","12"],["1833","16"],["1834","15"],["1835","18"],["1836","4"],["1838","7"],["1839","2"],["1840","14"],["1841","7"],["1842","5"],["1843","4"],["1844","17"],["1845","5"],["1846","14"],["1847","6"],["1848","7"],["1849","9"],["1850","10"],["1851","25"],["1852","14"],["1853","10"],["1854","17"],["1855","13"],["1856","14"],["1857","4"],["1858","9"],["1859","24"],["1860","42"],["1861","4"],["1862","12"],["1863","51"],["1864","8"],["1865","27"],["1866","39"],["1867","13"],["1868","27"],["1869","28"],["1870","13"],["1871","28"],["1872","20"],["1873","15"],["1874","15"],["1875","36"],["1876","41"],["1877","33"],["1878","59"],["1879","18"],["1880","29"],["1881","36"],["1882","40"],["1883","50"],["1884","50"],["1885","51"],["1886","38"],["1887","47"],["1888","62"],["1889","49"],["1890","43"],["1891","62"],["1892","71"],["1893","54"],["1894","144"],["1895","85"],["1896","88"],["1897","76"],["1898","82"],["1899","77"],["1900","89"],["1901","131"],["1902","100"],["1903","146"],["1904","196"],["1905","140"],["1906","182"],["1907","286"],["1908","236"],["1909","351"],["1910","272"],["1911","322"],["1912","417"],["1913","585"],["1914","292"],["1915","544"],["1916","538"],["1917","504"],["1918","541"],["1919","406"],["1920","609"],["1921","492"],["1922","526"],["1923","531"],["1924","477"],["1925","346"],["1926","322"],["1927","386"],["1928","474"],["1929","612"],["1930","662"],["1931","519"],["1932","578"],["1933","356"],["1934","408"],["1935","321"],["1936","603"],["1937","874"],["1938","465"],["1939","699"],["1940","716"],["1941","625"],["1942","955"],["1943","698"],["1944","462"],["1945","571"],["1946","839"],["1947","852"],["1948","1157"],["1949","1106"],["1950","1365"],["1951","1016"],["1952","1343"],["1953","1166"],["1954","1243"],["1955","1049"],["1956","1044"],["1957","1088"],["1958","926"],["1959","932"],["1960","1131"],["1961","1271"],["1962","1089"],["1963","1342"],["1964","1147"],["1965","1321"],["1966","1139"],["1967","1596"],["1968","1253"],["1969","1222"],["1970","1225"],["1971","1398"],["1972","1422"],["1973","1558"],["1974","1846"],["1975","1905"],["1976","1917"],["1977","1933"],["1978","1847"],["1979","1687"],["1980","1927"],["1981","1635"],["1982","2332"],["1983","1930"],["1984","1928"],["1985","1714"],["1986","2556"],["1987","1941"],["1988","2058"],["1989","2061"],["1990","2046"],["1991","2284"],["1992","2456"],["1993","2637"],["1994","2606"],["1995","2525"],["1996","2813"],["1997","3133"],["1998","3054"],["1999","3139"],["2000","3624"],["2001","2755"],["2002","4577"],["2003","4299"],["2004","4515"],["2005","3981"],["2006","4201"],["2007","3708"],["2008","4151"]]
Anagrams for spreader »
How to pronounce spreader.
Alex US English David US English Mark US English Daniel British Libby British Mia British Karen Australian Hayley Australian Natasha Australian Veena Indian Priya Indian Neerja Indian Zira US English Oliver British Wendy British Fred US English Tessa South African
How to say spreader in sign language?
Chaldean Numerology
The numerical value of spreader in Chaldean Numerology is: 3
Pythagorean Numerology
The numerical value of spreader in Pythagorean Numerology is: 5
Examples of spreader in a Sentence
Kristina Hooper :
We have to worry about the potential for a resurgence in infections. Any one of these protests could be a super- spreader event.
United States.Alex Piquero :
I don't agree about the word 'super spreader event' because I don't see, at least as of now, enough evidence that they are super spreader s. Is there going to be spread at large-scale, in-person events? I'm going to predict that there will be some spread.
Minnesota Governor Walz :
I am deeply concerned about a super- spreader type of incident, we're going to see a spike in Covid-19. It's inevitable.
Shawn Nolan :
The government completed its unprecedented slaughter of 13 human beings tonight by killing Dustin Higgs, a Black man who never killed anyone, on Martin Luther King’s birthday, there was no reason to kill him, particularly during the pandemic and when he, himself, was sick with Covid that he contracted because of these irresponsible, super- spreader executions.
Jared Baeten :
Just because someone has a high viral load doesn't make them Super Spreader ' if they're behind a mask [ or ] at home, because the super spreading happens when someone who is able to transmit the virus is in contact with enough people that they end up spreading the virus to more people than the average.
Popularity rank by frequency of use
- ^ Princeton's WordNet http://wordnetweb.princeton.edu/perl/webwn?s=spreader
- ^ Wiktionary https://en.wiktionary.org/wiki/Spreader
- ^ Samuel Johnson's Dictionary https://johnsonsdictionaryonline.com/views/search.php?term=spreader
- ^ ChatGPT https://chat.openai.com
- ^ Webster Dictionary https://www.merriam-webster.com/dictionary/spreader
- ^ Wikidata https://www.wikidata.org/w/index.php?search=spreader
- ^ Usage in printed sources https://books.google.com/ngrams/graph?content=spreader
Translations for spreader
From our multilingual translation dictionary.
- مفرشة الأسمدة Arabic
- salingshorn Danish
- esparcidor Spanish
- levitin, vantinlevittäjä, levittäjä, spriidari, saalinki Finnish
- épandeur, séparateur French
- फैलानेवाला Hindi
- ಸ್ಪ್ರೆಡರ್ Kannada
- spreader Latin
- kihau Māori
- salingshorn Norwegian
- స్ప్రెడర్ Telugu
- پھیلانے والا Urdu
Word of the Day
Would you like us to send you a free new word definition delivered to your inbox daily.
Please enter your email address:
Citation
Use the citation below to add this definition to your bibliography:.
Style: MLA Chicago APA
"spreader." Definitions.net. STANDS4 LLC, 2024. Web. 18 Sep. 2024. < https://www.definitions.net/definition/spreader >.
Discuss these spreader definitions with the community:
Report Comment
We're doing our best to make sure our content is useful, accurate and safe. If by any chance you spot an inappropriate comment while navigating through our website please use this form to let us know, and we'll take care of it shortly.
You need to be logged in to favorite .
Create a new account.
Your name: * Required
Your email address: * Required
Pick a user name: * Required
Username: * Required
Password: * Required
Forgot your password? Retrieve it
Are we missing a good definition for spreader ? Don't keep it to yourself...
Image credit, the web's largest resource for, definitions & translations, a member of the stands4 network, free, no signup required :, add to chrome, add to firefox, browse definitions.net, are you a words master, brought into agreement or cooperation on the side of a faction, party, or cause, Nearby & related entries:.
- spread-out verb
- spreadability
- spreadeagle verb
- spreader bar
- spreadhead noun
- spreading noun
- spreading bellflower noun
- spreading dogbane noun
Alternative searches for spreader :
- Search for spreader on Amazon
IMAGES
VIDEO
COMMENTS
Spreader (sailboat) Four sets of swept and fixed spreaders on a large yacht. A spreader is a spar on a sailing boat used to deflect the shrouds to allow them to better support the mast. [1] The spreader or spreaders serve much the same purpose as the crosstrees and tops in a traditional sailing vessel. [2]
Spreaders refer to horizontal bars extending from the mast on either side of a sailboat. These bars serve as a support structure for the mast and help maintain proper alignment and tension in the sails. Think of them as the backbone that keeps everything in place while you navigate through wind and waves.
Spreaders are struts attached to the sides of a mast to hold the shrouds away from the mast and increase the angle at which they meet the mast. The greater the angle between shroud and mast, the lower the shroud tension required to provide lateral support and, therefore, the less the compression on the mast. This means the shrouds' diameter ...
Most sailboats use at least two sidestays (one on each side). Spreader - The sidestays are spaced to steer clear from the mast using spreaders. Running Rigging: different words for rope. Ropes play a big part in sailing, and especially in control over the sails. In sailboat jargon, we call ropes 'lines'.
Ever wonder why sailboats have spreaders? And why some have many while others only have one?In this video, Herby and Maddie explain what spreaders are for an...
A masthead rig had its forestay pinned to the top of the mast and had straight spreaders. If the boat was designed to a racing rule (as most were), it had large overlapping headsails and a tall, skinny main. A boat with a fractional rig, on the other hand, had its forestay attached 3/4 to 7/8 of the distance from the cabintop to masthead, had ...
Spreaders. Spreaders are one of the main controls available to create or limit mast bend. They work by joining the mid-section of the mast to the shrouds. The amount that they distort the shrouds from their natural straight line determines the behavior of the mast under sail. It is important to realize that only the windward shroud and spreader ...
The spreaders on the mast affect how much and where the mast bends. Particularly the middle of the mast. It is important to have the spreader length and how much they are swept back correct to suit the luff round that is cut into your sail. Most mainstream sailmakers can provide
Spreader (sailboat) Last updated March 24, 2023 Four sets of swept and fixed spreaders on a large yacht. A spreader is a spar on a sailing boat used to deflect the shrouds to allow them to better support the mast. [1] The spreader or spreaders serve much the same purpose as the crosstrees and tops in a traditional sailing vessel. [2] Spreaders are used to increase the angle between the rigging ...
The staying angle is the inside angle that is formed at the top of the mast, between the mast and stay. For a stay to exert the force necessary to support a mast, the staying angle should be at least 12 degrees, the minimum magic number. Sailboats are generally long enough that it's easy, in the case of a forestay or a backstay, to meet or ...
Step 5: Check the rig under sail. The caps should be tighter than with a masthead rig, with no significant slack on the leeward side when the boat's hard on the wind and heeling 15-20°. If the static tension is up to 25% but the leeward cap is always slack, the boat might be bending.
A target of 1"-3" of pre-bend is typical on a medium-sized boat. Pre-bend ensures the mast will move forward in the middle and flatten the mainsail when you pull on the backstay. On a rig with in-line spreaders (typically masthead rigs), the side shrouds have little impact on the mast bend created by pulling on the backstay.
Sailboat Masts: Engineered for agility, they prioritize speed, wind optimization, and quick adjustments. Maintenance, Repairs, and the Importance of Both. Seawater, winds, and regular wear and tear can take their toll on your mast. Routine Maintenance: Regular checks for signs of corrosion, wear, or structural issues can prolong your mast's life.
A sailboat's standing rigging is generally built from wire rope, rod, or occasionally a super-strong synthetic fibered rope such as Dyneema ®, carbon fiber, kevlar or PBO. 1×19 316 grade stainless steel Wire Rope (1 group of 19 wires, very stiff with low stretch) is standard on most sailboats. Wire rope is sized/priced by its diameter which ...
Spars, Rigging, and Hardware for Sailboats. Rig-Rite, Inc. Phone: (001) 401-739-1140 -- FAX: (001) 401-739-1149 www.RigRite.com Ordering/Questions: ... For Airfoil Spreader replacement applications (and parts), it is necessary to determine the specific Spreader Section you have. If you know the Manufacturer of your Spars this process can be ...
April 13, 2016. The mast may appear stiff and rigid, but it is best to think of it as a wet noodle! In order to get a wet noodle to stand up straight, you need to support it at different points along its length. Even though the stays pull down, it is best to think of them as "support points". The top of the mast is "supported" by the cap shrouds.
May 17, 2004. 5,327. Beneteau Oceanis 37 Havre de Grace. Mar 9, 2020. #3. The downside of the double spreader rigs is that tuning the rig is a more complicated process, and may require going aloft if the shrouds are not continuous and turnbuckles are above the spreaders.
Short answer sailboat shroud: A sailboat shroud is a part of the standing rigging system that supports the mast and helps maintain its stability. ... Make sure the measurements are precise, accounting for any additional hardware like spreader ends or mast tangs that may affect length requirements. Repeat this process for every shroud. Step 3 ...
The spreader lights, at $199, are more expensive than the other brands of lights we tested. The combo bow and deck light was a very efficient package. The 3-nautical-mile steaming light consumed only 0.2 amps, and the low-profile housing fits closely to the spar. It runs $689.
Standing rigging comprises the fixed lines, wires, or rods, which support each mast or bowsprit on a sailing vessel and reinforce those spars against wind loads transferred from the sails. This term is used in contrast to running rigging, which represents the moveable elements of rigging which adjust the position and shape of the sails.
Das Boot! By The Rigging Company June 28, 2014. There are many styles of mast boots and spreader boots. Just like with anything else, choosing the right product and installing it properly is essential to its functionality. Installing a mast boot that doesn't leak, has a low profile, ensures that the chocks (pictured below) or Spartite ...
Spreader light housings are corrosion resistant and sealed to keep out rain and spray. Spreader lights with LEDs eliminate the possibility of broken bulbs that can occur with incandescents. Unlike halogen or tungsten incandescent fixtures, LED spreader lights do not require bulb replacements—meaning that once the light is in place you won't ...
Definition of spreader in the Definitions.net dictionary. Meaning of spreader. What does spreader mean? Information and translations of spreader in the most comprehensive dictionary definitions resource on the web. ... Spreader. A spreader is a spar on a sailboat used to deflect the shrouds to allow them to better support the mast. Often, there ...