How to Make a Paper Boat: Easy Step-by-Step Guide
Making a paper boat is a classic and entertaining activity for kids and adults alike. It's a simple and creative way to spend time and learn basic origami techniques. What's more, making a paper boat is not only an enjoyable pastime, but it also teaches patience and focus, making it an excellent educational activity.

In this article, you'll learn how to make a paper boat using a step-by-step tutorial. This guide will cover everything from selecting the appropriate materials to folding and decorating your paper boat, ensuring that it's both aesthetically pleasing and capable of floating. By carefully following the instructions provided, you'll be able to create a variety of boat shapes and sizes to suit your preferences.

Key Takeaways
- Learn how to make a versatile and entertaining paper boat with a clear, step-by-step tutorial.
- Discover creative ways to decorate your boat and how to make boats with different shapes and sizes.
- Explore educational activities related to paper boat making to enhance the learning experience.
Materials Needed
Choosing Your Paper
When making a paper boat, the first decision to make is the type of paper to use. While traditional origami paper can be used, it's not a requirement. A simple square sheet of paper will work well. If you're starting with a rectangular sheet, simply trim it down to a square before proceeding. Construction paper, card stock, and even waxed paper can be utilized for this project. For a more durable boat, consider using aluminum foil as an alternative material.
Preparing Additional Supplies
Aside from the paper, you can gather a few additional items to enhance your paper boat crafting experience. If you're using plain white paper, consider adding some colors to your boat with crayons , markers, or colored pencils. Younger children might enjoy decorating their boats with stickers or other craft supplies.
When selecting your materials, keep in mind the end goal of your paper craft . If you plan to float your boat on water, avoid materials that are too heavy or prone to absorbing water. Additionally, for increased stability, consider using heavier papers like card stock or waxed paper.
With the right materials, making a paper boat can be an enjoyable and educational activity. Remember to experiment with different types of paper and decorations to create unique and personalized boats.
Basic Paper Folding Techniques
Making Creases
Before folding a paper boat, it is essential to learn how to make creases properly. Creases are the foundation for any paper folding project. To create a strong and precise crease, first, align the edges of the paper and hold them in place using the thumb and index finger of one hand. Gently press down the folded edge with the other hand's thumb, moving from one end to the other, making sure it is even and firmly pressed. The more accurate the creases, the better the end result will be.
Basic Folds
There are a few basic folds that one must master to make a paper boat. Here's a list of folds used in creating a paper boat:
- Valley fold : Fold the paper towards itself, creating a downward crease.
- Mountain fold : Fold the paper away from itself, resulting in an upward crease.
- Triangle fold : Create a triangle shape by folding one edge of the paper to meet the other edge.
- Diamond fold : Form a diamond by opening up the bottom of a previously made triangle, aligning the bottom corners of the triangle, and folding them over each other.
These basic folds play a crucial role in creating a well-executed paper boat that not only looks good but also floats stably on water.
Unfolding Tips
As important as folding techniques, unfolding tips should be considered to ensure a successful paper boat. When unfolding the paper , be cautious not to tear or wrinkle it, as this can impact the boat's balance and appearance. One should be gentle when opening flaps, using fingertips to apply_even pressure on both sides to maintain the paper's overall structural integrity.
Utilize the basic folding techniques, like making precise creases and understanding the essential folds, combined with careful unfolding to create a perfectly-shaped paper boat . Remember, practice makes perfect, so don't be discouraged if the first few attempts are not perfect—keep folding, and soon creating a paper boat will become second nature.
Step-by-Step Guide to Making a Paper Boat
Creating the Base Shape
Begin by selecting a square sheet of paper, preferably origami paper . Place the paper in front of you with one corner facing upwards, forming a diamond shape. Fold the paper in half diagonally, so that the top corner meets the bottom corner, creating a triangle shape. Make sure the edges align perfectly and press firmly to create a sharp crease.
Forming the Boat
Now, grab the triangle and rotate it 45 degrees. Gently open up the bottom of the triangle and pull the paper apart until it pops into a square shape. Make sure the bottom corners of the triangle overlap each other, forming the bottom corner of the new diamond shape. Next, pick up the folded piece of paper and at the top point, pull apart the two sides. As you pull it apart, it should open into a boat shape. Adjust the paper as needed to make sure it's boat-shaped and pinch along the bottom edges to create a fold on each side.
Adding the Mast and Sail
To complete your paper boat, consider adding a mast and sail for added flair. With a separate piece of paper, cut a smaller square and fold it diagonally to create a triangle. This will serve as the sail. For the mast, use a thin wooden dowel or a straight piece of string and insert it through a small hole in the center of the sail. Attach the other end of the mast to the bottom center of the boat using glue or tape.
Your paper boat is now complete. Follow the above instructions to create more paper boats and enjoy your new fleet!
Decorating Your Paper Boat
Coloring and Customization
Before assembling your paper boat, it's a great idea to add some personal touches. Crayons , markers , and colored pencils can be used to create unique designs on your boat. You can also print coloring pages with different patterns or themes and use them as templates for your boat.
To further customize your paper boat, consider using stickers or other decorative items. Be creative and think of ways to make your boat stand out. For a more detailed guide on decoration techniques, refer to this video tutorial .
Waterproofing Considerations
When decorating, it's important to consider waterproofing as well. After all, a paper boat must withstand water. Common waterproof materials include clear tape, wax paper, or even a layer of wax from a candle.
Here's a brief list of materials that can be used to waterproof your paper boat:
- Waterproof spray
Remember to apply these waterproofing materials as an extra layer of protection after you've finished decorating your boat. This will help ensure your boat stays afloat and retains its colors and designs.
By following these decorating and waterproofing tips, your paper boat will not only look visually appealing, but also be ready for its maiden voyage.
Making Different Shapes and Sizes of Boats
Altering Dimensions for Variability
In order to create different shapes and sizes of paper boats, you can experiment with the size of the paper itself. A larger paper size will result in a larger boat, while smaller paper will create a smaller boat. Additionally, the paper shape can be altered for variability. For example, you can use a square or a rectangular sheet , which will result in slightly different boat shapes.
To begin, choose a paper size appropriate for your desired boat size. Here are some suggestions for paper size and corresponding boat shapes:
- Square paper (e.g. 20cm x 20cm, 30cm x 30cm): Traditional boat shape
- Rectangular paper (e.g. 20cm x 40cm, 30cm x 60cm): Longer, narrower boat shape
Experiment with folding techniques that involve triangles , diamonds , and other shapes. For instance, folding a rectangular sheet of paper in half, followed by folding the corners down into triangular shapes will eventually result in a boat shape. Such techniques can help create various boat styles and shapes.

Advanced Origami Boats
For those interested in trying more complex boat designs, advanced origami techniques can be used to create a variety of intricate boat shapes. Some examples include:
- Double-layered boats : These boats can be made by folding the paper in a way that creates two layers, adding stability and a unique appearance to the boat.
- Boats with sails : Create boats with sails by folding additional paper into triangular shapes and attaching them to the boat's top.
- Multi-hulled boats : Construct multi-hulled boats, such as catamarans or trimarans, by folding multiple boat shapes and connecting them together.
In summary, by varying the paper size, shape, and folding techniques, you can create an array of different boat shapes and sizes. Experiment with square and rectangular sheets of paper, and try advanced origami techniques to take your paper boat-making skills to the next level.
Ensuring Your Boat Floats
The Science of Floating
To ensure that your paper boat floats, it's essential to understand the basic science behind the floating phenomenon. When an object is placed in water, it displaces an amount of liquid equal to its own weight, in accordance with Archimedes' principle . If the displaced water weighs more than the object, the object will float as it experiences an upward buoyant force.
In the case of a paper boat, it is important to create a design that will displace enough water to counteract its weight. Key factors that affect the boat's ability to float include:
- Surface area: A wider base increases the surface area in contact with the water, which helps increase water displacement and stability.
- Weight distribution: Distributing the weight evenly across the base will help the boat remain stable and balanced.
- V-shape: Origami paper boats usually have a V-shaped hull , which helps them cut through the water and maintain stability while moving.
Testing and Troubleshooting
Once you have crafted your paper boat, it's crucial to test and troubleshoot its ability to float. Some key steps include:
- Make sure the boat's surface area is wide enough and the shape is correct, as shown in this tutorial .
- Test your boat in calm water conditions, avoiding windy areas or strong currents that can tip the boat over.
- If the boat is sinking, you may need to adjust the shape and make sure all folds are properly made.
- If the boat is unstable, check the weight distribution and ensure that the sides are symmetrical.
- To enhance your boat's stability and buoyancy, you can add waterproof material like tape or a layer of wax on the paper.
Testing and troubleshooting are essential steps in achieving a boat that floats and is stable in water. Once you are confident in your paper boat's ability to float, you can enjoy watching it sail across the water surface or even set up races with your friends.
Educational Resources and Activities
Incorporating Paper Boats into Lessons
Teaching the art of paper folding , also known as origami, is a wonderful way for teachers and parents to engage children in creative and educational activities. Paper boats are a perfect example of an easy-to-learn origami craft that can be incorporated into various subjects such as history, geography, and physics. One of the main advantages of this activity is that it only requires a single piece of paper - making it a cost-effective and easily accessible craft.
To incorporate paper boats into lessons, teachers can use Japanese origami as a starting point for discussing the history and cultural significance behind this art form. In geography, they can explore the role of boats and water travel in different countries. For physics, young learners can experiment with the buoyancy of their paper boats, demonstrating principles like Archimedes' principle.
Some useful resources for teaching origami paper folding include:
- Online tutorials: Websites like wikiHow and YouTube channels offer step-by-step guides on how to fold a paper boat.
- Books: Origami-themed books are available at local libraries or bookstores, which can provide inspiration for both children and adults.
- Workshops: Some museums, cultural centers, and schools may offer workshops on origami paper folding, where children can learn from a knowledgeable instructor.
Craft Ideas for Parents and Teachers
When it comes to incorporating paper boats into kids' craft activities, the options are endless. Here are a few Summer-themed ideas to consider:
- Nautical-themed parties: Use paper boats as decorations or centerpieces at a kids' summer party, encouraging the children to race their boats in a kiddie pool or a shallow water area.
- Storytelling sessions: Incorporate paper boats into your storytelling sessions, using them as props to act out scenes from classic tales like "The Owl and the Pussycat" or "Paddle-to-the-Sea."
- Art projects: Encourage your kids to decorate their paper boats with paint, glitter, or colored pencils, making each boat unique and personal.
- Races and competitions: Organize paper boat races, offering small prizes or certificates of achievement to the fastest boats.
Remember, involving the children in the creative process helps to foster a sense of accomplishment and reinforces the educational benefits of these activities. So, whether you're a teacher, a parent, or simply a fan of Japanese origami craft, there are countless ways to enjoy and share the fun of making paper boats with the younger generation.
Frequently Asked Questions
What are the steps to create a floating paper boat?
To create a floating paper boat, first, fold a square piece of paper diagonally in half to form a triangle. Then, fold the bottom corners of the triangle towards the center, forming a diamond shape. Open up the bottom of the diamond and shape it into a square. Gently pull the top flaps apart to form the boat shape. For detailed steps, visit this tutorial .
Can you show how to make a paper boat with a sail?
Yes, to make a paper boat with a sail, start by following the steps for a basic paper boat. Then, create a small sail out of a rectangle of paper. Finally, attach the sail to the boat using a small piece of tape or glue. You can watch this video for a visual guide.
What is the ideal paper type for constructing origami boats?
The ideal paper type for constructing origami boats would be a lightweight yet sturdy paper, such as origami paper or regular printer paper. Keep in mind that heavy paper may not fold as easily, and thin paper may not hold its shape well. Visit this guide for tips on choosing the right paper.
How can I make a simple paper boat for children?
For children, start with a square piece of paper and follow the same steps mentioned above for creating a floating paper boat. Make sure an adult is present to supervise and help children with folding. Visit this tutorial for an easy-to-follow guide specifically designed for children.
Are there any specific designs that help paper boats float better?
Yes, specific designs can help paper boats float better, such as wider and more stable bases. Experimenting with different folding techniques and boat shapes can lead to more efficient designs. Refer to this step-by-step guide for more ideas on paper boat designs.
Could you provide a guide on making a paper boat using square paper?
Certainly. To make a paper boat using square paper, begin by folding the paper diagonally in half to form a triangle. Then, fold the bottom corners towards the center to create a diamond shape. Open the bottom of the diamond and re-shape it into a square. Gently pull the top flaps apart to form the boat shape. For a detailed guide, check out this tutorial .

Related Articles

Top 10 Bass Boats for Sale Houston Texas: Premier Options for Every Angler

Monterey Boats: Ultimate Guide to Luxury and Performance

Riff und Delfinschnorchel Ecoadventure: Exploring Marine Life Up Close

Flycraft Inflatable Boat: Expert Guide to Durability and Performance

Hula Bay Club Tampa: Your Ultimate Waterfront Destination Guide

Wicked Tuna Cast 2024: Meet the Expert Fishermen Dominating the Seas

Tracker Boats: Your Ultimate Guide to Choosing the Perfect Model
Robalo Boats: Unrivaled Performance and Luxury on the Water
- PRO Courses Guides New Tech Help Pro Expert Videos About wikiHow Pro Upgrade Sign In
- EDIT Edit this Article
- EXPLORE Tech Help Pro About Us Random Article Quizzes Request a New Article Community Dashboard This Or That Game Happiness Hub Popular Categories Arts and Entertainment Artwork Books Movies Computers and Electronics Computers Phone Skills Technology Hacks Health Men's Health Mental Health Women's Health Relationships Dating Love Relationship Issues Hobbies and Crafts Crafts Drawing Games Education & Communication Communication Skills Personal Development Studying Personal Care and Style Fashion Hair Care Personal Hygiene Youth Personal Care School Stuff Dating All Categories Arts and Entertainment Finance and Business Home and Garden Relationship Quizzes Cars & Other Vehicles Food and Entertaining Personal Care and Style Sports and Fitness Computers and Electronics Health Pets and Animals Travel Education & Communication Hobbies and Crafts Philosophy and Religion Work World Family Life Holidays and Traditions Relationships Youth
- Browse Articles
- Learn Something New
- Quizzes Hot
- Happiness Hub
- This Or That Game
- Train Your Brain
- Explore More
- Support wikiHow
- About wikiHow
- Log in / Sign up
- Hobbies and Crafts
- Paper Craft
How to Fold an Origami Sail Boat
Last Updated: April 25, 2024
This article was co-authored by Robert Homayoon . Robert Homayoon is an Origami Expert known for his engaging YouTube videos and accessible instructions. He has been teaching origami on YouTube since 2009. His channel has a following of over 676,000 subscribers, and his videos have garnered over 211 million views. Robert uses his channel to highlight his passion for teaching people origami, crafts, and how to solve puzzles. He graduated from SUNY Albany in 2007 and earned his D.M.D degree from Temple University Dental School in 2013. This article has been viewed 65,444 times.
Origami is fun, and can be a boredom buster. Learn how to make a sailboat with origami.
Expert Q&A

- You can also use wax paper so it can float on water, or other liquids. Normal paper will get soggy. Thanks Helpful 1 Not Helpful 0
- Use colored paper to make it look creative. Thanks Helpful 1 Not Helpful 0
- Don't get discouraged if you mess up the first time. Nobody is perfect! Thanks Helpful 1 Not Helpful 0

- Don't get paper cuts! Thanks Helpful 13 Not Helpful 3
- Be careful while using scissors. Thanks Helpful 12 Not Helpful 4
- Handle everything with care-or have an elder help you. Thanks Helpful 11 Not Helpful 5
Things You'll Need
- 8 1/2 by 11 sheet copy paper
- Wax paper (optional)
- Scissors (for wax paper if needed)
You Might Also Like

Expert Interview

Thanks for reading our article! If you’d like to learn more about origami, check out our in-depth interview with Robert Homayoon .
About This Article

- Send fan mail to authors
Did this article help you?

Featured Articles

Trending Articles

Watch Articles

- Terms of Use
- Privacy Policy
- Do Not Sell or Share My Info
- Not Selling Info
Don’t miss out! Sign up for
wikiHow’s newsletter
- Skip to primary navigation
- Skip to main content
- Skip to primary sidebar

How To Make an Origami Boat

Sail the art of origami with our captivating paper boat. Unfold creativity, craft wonders, and set sail on a paper adventure today!

Is your favorite childhood memory sailing a boat in your backyard pool? Or is it playing with a paper boat in the bathtub? Either way, you've likely had some experience with origami boats. Good old days, right?
Luckily, the time when you can relive these memories is here! Make an origami boat with your little one and have a joyous boat ride without getting wet. You'll need some colorful origami paper and a special folding technique. It's going to be so much fun.

Want to save this project?
Enter your email below, and then we'll send it straight to your inbox. Plus get awesome new projects from us each week.
Is an Origami Craft Too Much for Young Kids?
Not at all! Having young children make origami boats is a great way to introduce them to the art of origami. With some guidance, even the smallest fingers can put together a beautiful boat that will impress everybody. Furthermore, it's a delightful experience for both children and adults alike.
Moreover, folding a rectangular piece of paper into different shapes is an excellent way to practice patience and attention to detail in preschoolers. It'll increase their concentration levels and fine motor skills.

What Is the Best Origami Paper for Making a Boat?
Usually, origami boats spend their lives as bath toys, so it's best to choose waterproof origami paper that won't smudge easily. A thin foil paper works best, as it gives the boat a shiny finish and adds extra durability. Moreover, it enhances the overall appearance of the boat.
Can't find it? No worries. Use construction paper. Even an ordinary plain white paper would do.
When I declutter my desk, I give my kids colorful Post-it notes and extra newspapers. It reduces paper waste and eliminates the worries about getting it wrong.
Rember if you are using it in water, air drying the boat at the side of a bath or dry place is best so there isn't growth of bacteria and there is multiple use.
Don't miss our other boat crafts including the Paper Plate Boat , Juice Box Boat , Pirate Ship Craft , and How to Draw a Sailboat .

Tips and Tricks for Making an Origami Boat
Most origami boat templates are not too complicated; in fact, they are relatively straightforward. You and your kids will soon get them right. Still, here are some helpful tips to make your project even easier:
- To begin, start with a flat square sheet of paper, as it simplifies the process of folding and makes it easier for kids to understand what they are doing.
- Use the reverse fold technique when folding the edges of the boat. It will give it a crisp and neat look.
- To make the boat sturdier, use a few dots of glue when you're done.

Ideas to Decorate the Origami Boat
Where's the fun in a solid-colored boat when you can liven it up with bright colors? Here are some ideas for decorative objects for your boat:
- Use colorful paper and stickers for endless fun
- Create tiny flags and sails from paper or fabric to make a boat look like a real one
- Draw a beautiful scene on the boat to make it artsier

What Else Can I Do with an Origami Boat?
The first thing that comes to our minds when we think of a boat is sailing. But you can do so much more with these paper creations!
- Attach strings to hang them as a whimsical mobile
- Display a tiny origami boat in a terrarium
- Use them as gift tags for special occasions
- Make them into keychains to remember the fun you had
Check Out These Other Origami Crafts!
Origami Butterflies
Hugs and Kisses Origami
Origami Car
Bunny Origami
How to Fold a Paper Football

Origami Boat Craft Is an Exciting and Creative Activity for All Ages
Not only is origami art suitable for adults, but it's also perfect for children! Engaging in making an origami boat with your little ones, moreover, is a wonderful way to spend quality time together. And, rest assured, it's not hard at all! With the right techniques, you can easily master it. Additionally, I've attached the step-by-step guide for you all below. I hope it helps.

Boat Origami Supplies
- A sheet of craft paper - origami paper
- Glue (optional).
- Scissors (optional).
- Colorful craft paper and or card stock paper (for the flag).

Step 1: Start with a rectangular sheet of craft paper. If the paper has a colored side, make sure it is facing down.

Step 2: Fold the paper in half horizontally to create a crease in the center of the paper.

Step 3: Fold the paper in half vertically to create another crease in the center.
Origami Boat Triangle

Step 4: Bring the right edge of the paper towards the center crease line, folding it diagonally to create a triangle shape. Crease the fold well.

Step 5: Repeat the previous step for the other edge of the paper, folding it diagonally to create another triangle shape. Crease the fold well.
Bottom of Boat

Step 6: Fold the bottom edge of the paper up. Fold up to the bottom of the diagonal creases you made in the last two steps.

Step 7: Flip it over.

Step 8: Repeat the step. Fold the bottom edge.

Step 9: Open the gap of the folded triangular-shaped origami pieces.

Step 10: Bring the top corners of the paper down.
Bring it toward the center of the paper.
Fold them along the diagonal creases on two sides.

Step 11: This will create a diamond shape.

Step 12: Fold the top layer of the bottom point of the paper up. This should be folded along the top edge of the paper to create a triangle shape.

Step 13: Flip it over.

Step 14: Repeat the process. It will create a triangle shape.

Step 15: Similar to step 9 open the gap in the middle.

Step 16: Fold it along the two creases. Fold on to sides to create a diamond shape.

Step 17: Gently pull the two sides of the boat apart to create a small opening.

Step 18: Pinch the bottom corners of the boat. Then pull them down slightly to make the boat more stable.

Step 19: To make the flags cut out triangular colorful craft paper and a thin strip from cardstock paper.

Your origami boat is now complete! You can now use it as a decoration or float it in water.
We highlighted these Origami Crafts along with some other fun kid's crafts in our June Crafts along with our 101+ Easy Kids Crafts .
You also do not want to miss our 101+ Coloring Pages For Kids and 101+ Printables full of Crafts and Coloring Pages.

Summer Crafts
Here are some of our other super fun summer crafts that we are sure you are going to love.
- Paper Plate Sun
- Strawberry Painted Rock
- Squirt Gun Painting
- Beach Please Hat
- Popsicle Stick Bird Feeder
- Airplane Craft
Origami Boat

- Origami paper
- Card Stock Paper (for the flag)
- Scissors (optional)
- Glue (optional)
Instructions

CONNECT WITH MADE WITH HAPPY!
Be sure to follow me on social media, so you never miss a post!
Facebook | Twitter | Youtube | Pinterest | Instagram
Looking for crafts to keep your child busy? Sign up for my 5 Ridiculous HAPPY Activities in under 30 minutes for your kids delivered directly to your inbox!
Find and shop my favorite products on my Amazon storefront here!
ORIGAMI BOAT
Pin it to your diy board on pinterest.
FOLLOW MADE WITH HAPPY ON PINTEREST FOR ALL THINGS HAPPY!

More Happy Summer

Discover a world of creativity and joy with Alli Ward, the creative mind behind Made with Happy. From DIY crafts to delicious recipes, Alli brings happiness to every project!
Making an Easy Origami Boat
:max_bytes(150000):strip_icc():format(webp)/chrissy-pk01-56a6d65e3df78cf772907c07.png "make paper sailboat")
The Spruce Crafts / Chrissy Pk
- Total Time: 10 mins
In Japanese, the word origami means "the art of folding paper," with ori meaning "folding" and kami meaning "paper." In modern usage, origami is an inclusive term for all paper folding practices. The goal when practicing origami is to transform a flat square sheet of paper into a finished sculpture through folding and sculpting techniques.
Learn how to make the most well-known origami boat using this quick and easy step-by-step tutorial. The origami boat you'll make with these instructions can also float in water .
Watch Now: How to Make an Origami Boat
This origami boat is a great model to teach to kids. It's similar to the origami hat you make with newspaper or the origami crane many of us made as children. Also, origami can be a great math-related activity for kids, allowing them to create using geometry.
What You'll Need
- 1 Rectangular sheet of paper
Instructions
Make the first folds.
Start with your rectangular paper , orienting it vertically, with the long edges going up and down. Fold the bottom half up to the top. Fold the bottom right corner to the left corner and make a small pinch, just enough to crease the paper. Open it back up.
Create a Triangle Shape
Fold the left and right bottom corners up and to the middle using the crease as a guide. Flatten the folded pieces down. Rotate the paper. Fold one layer from the bottom up along the bottom of the front flaps.
A Boat Begins to Take Shape
Flip the paper over to the other side. Fold the bottom edge up in the same way. Unfold, and then fold the bottom right corner along the crease you made. Repeat on the bottom left flap.
Form the Bottom of the Boat
Re-fold the bottom edge back up. Open the bottom of the model. Look at the corners. Flatten and then insert the overlapping flap on the left underneath the right section.
Continue Folding
Fold one layer up to the top. Repeat on the back. Open the bottom of the model.
Finalize the Folds
Pull apart the left and right flaps. Flatten your paper sculpture in the shape of a boat. Open it slightly. The triangle in the middle resembles a sail .
More from The Spruce Crafts

How to make a paper boat (step-by-step instructions)

I think everyone has made a paper boat at least once in their lifetime. Making paper boat is easy as we don’t need many materials to make it.
This is an origami craft, so all you need is a sheet of paper.
And this is a craft that every parent passes onto their kids, right?
Here is the step-by-step way to make a boat out of paper.
Materials required
A4 sheet / Letter size paper/Any rectangular paper
Step-by-step tutorial to make an easy paper boat for kids

a. Take an A4 sheet paper. Hold it horizontally as shown in the picture.
b. Fold it from left to right.
c. Make a crease.
d. Now, fold the paper from bottom to top.

e. Fold it well and make a crease.

f. Unfold the fold we just made in step d.
g&h. Now, fold the right corner towards the centre and make a crease.
i. Similarly, fold the left corner towards the centre.

j. Flatten the folded pieces down and now you have the figure as shown in pic j.
k&l. Now, from the bottom, fold one layer upwards along the bottom of the folds we made in j.
m. Make a crease and flatten it well.

n. Turn the figure over.
o. Now, like we did in the previous step, fold the bottom layer upwards.
p. Flatten the fold and make a crease again.

q&r. Open the bottom of the figure.
s. After opening as shown in pic r, flatten the top corner to the bottom as you can see in pic s.
You can see that the edges of the paper boat are overlapping on each other.
t. Insert one edge into the other (see pic t).

u. You get the figure in u.
v. Now, fold the layer from bottom to the top as shown in pic v.
w. Flatten the fold.
x. Flip the paper over and fold the other layer too. You will get the triangle shape in x.
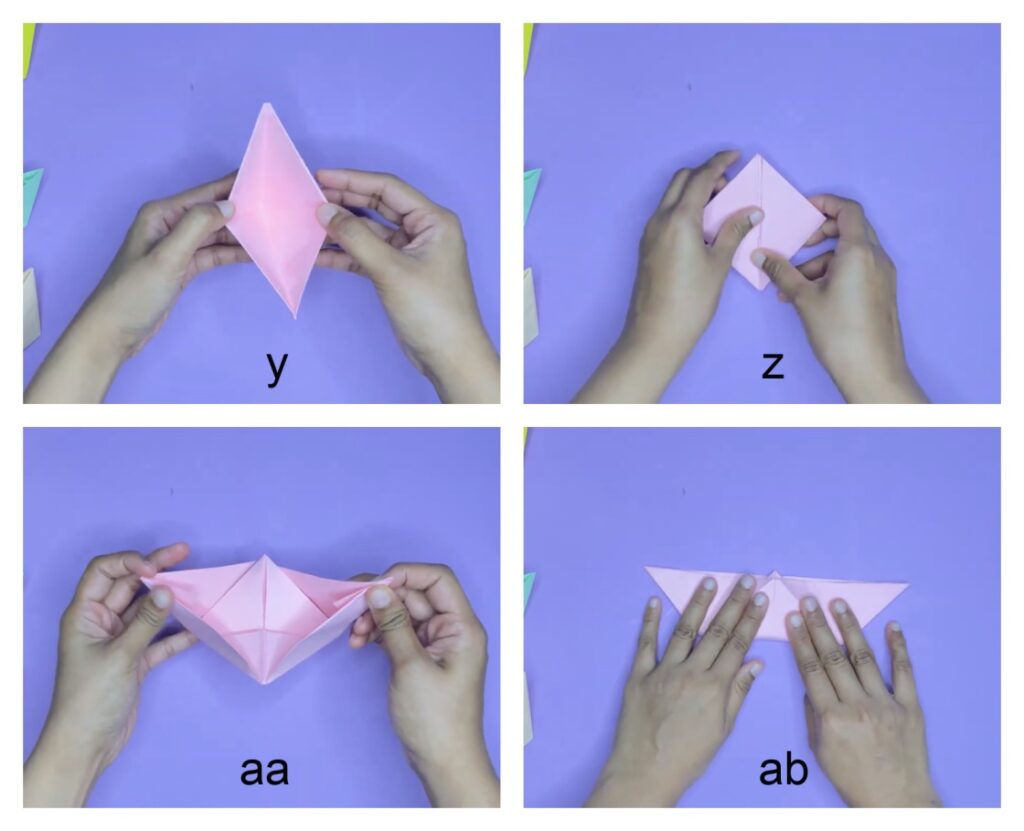
y. Open the bottom of the figure again by pulling the flaps apart.
z. Flatten it out and you will get a diamond shape now.
aa. Open the figure by pulling the sides apart from the top to get the shape of the boat.
ab. Flatten it out an open again and your paper boat is ready.

In case you have any doubt regarding any step, feel free to watch the step-by-step video tutorial below. Please make sure you also subscribe to our Youtube channel to get more craft ideas for kids every week.
Never miss new craft ideas!
Subscribe to get our latest content by email.
Video tutorial to make a paper boat
More paper crafts for kids
- How to make a paper airplane step-by-step
- How to make an easy and beautiful paper flower
- How to make an Origami jumping frog step-by-step
Similar Posts

St. Patrick’s Day shamrock craft for kids
Easy paper shamrock garland craft idea for kids The shamrock is a symbol of St. Patrick’s Day. The three leaves of the shamrock denote faith, hope, and love. Saint Patrick used the shamrock to teach people about the concepts of Christianity. And later it became a symbol that represents Ireland itself. In Ireland, many believe…

How to make a paper sunflower (step-by-step tutorial)
Sunflowers are one of the easiest papercraft items you can help your kids make with just simple paper available at home. They are simple to make, yet they always look bright and elegant brightening up any dull space. Do you have color paper at home? Then let’s get started on making this simple paper sunflower….

Valentine’s Day Envelope Craft idea for kids
Valentine’s Day Envelope Garland Craft Valentine’s Day is just around the corner, and what better way to celebrate than with an adorable and heartfelt love letter garland? This Valentine’s Day craft is perfect for older kids, be it age 7 or 10, and is a great way to get them involved in the holiday festivities….

Suncatcher craft for kids with tissue paper (free template available)
Simple suncatcher crafts for kids Suncatchers add colorful brightness to any room. They are a visual treat to look at. Especially, if it’s made by kids, the display of their creativity helps them admire their own skills. Here, we have an easy suncatcher craft idea for kids using tissue paper. You can download the template…

Paper Cup House Craft
Paper cups are so flexible. We can do so many crafts using paper cups that the list is endless. All you need are some paper cups, a few craft materials and some creativity. But if you don’t want to be creative, let US do that part and you can enjoy your idea. So today, we…

Easy Ramadan Lantern Craft for kids
The Holy month of Ramadan is here. During the month of Ramadan, Muslims all over the world observe fasting and engage in other spiritual activities. This is a great time to teach your kids more about the importance of this month. So let’s do a craft that can double up as a Ramadan decor while…
Leave a Reply Cancel reply
Your email address will not be published. Required fields are marked *
Save my name, email, and website in this browser for the next time I comment.
Origami Way
Make a paper boat origami boat instructions and diagram.

If you've always wanted to play with boats in the tub, but your parents wouldn't get one for you, don't worry. I will show you how to make an origami boat out of paper, and yes it floats...for a little bit, but it's still fun nonetheless. However, I heard that if you color the bottom of the boat with crayon, then it will float longer. Just be careful not to splash too much water on it!
Before we get into how to make an origami boat, let us first discuss where this paper folding originated and where it first appeared. If you're interested in the history of paper folding, continue reading to learn the fundamentals of origami.
Research studies say that origami was first invented about a thousand years ago by the Japanese, but its roots may well be in China. The term refers to the craft of paper folding. The word "origami" is an inclusive term for the folding process of paper. "Ori" means "folding," and "gami" means "paper." The objective of origami is to transform a flat square sheet of paper into a fully completed piece of art through folding techniques and cutting methods.
How to Make a Paper Boat Float Longer?
If you're ready to make your paper boat origami, keep these tips in mind to ensure it will last a long time on the water. The most common is that if you color the bottom of the origami boat with crayons, it will float longer but not long enough to reach the finish line. Some people also say that to make the boat last longer when it is on water, try using foil paper or grease-proof paper.
How to Make a Paper Boat?
The origami boat is actually very simple to make. All you need is a rectangular piece of paper, so any 8.5x11 copy or lined paper will do. Then follow the instructions and pictures carefully and you'll be able to make your own origami boat that floats.
With the help of this simple step-by-step lesson, you can quickly and easily create the most well-known origami paper boat.
| Step 1: Start with an 8.5x11 sheet of rectangular paper. | |
| Step 2: Fold the paper in half left to right, then unfold. | |
| Step 3: Fold in half again, this time folding top to bottom. | |
| Step 4: Fold the upper left and right corners to the middle. | |
| Step 5: Fold the bottom strip up. | |
| Step 6: Do the same to the strip on the other side. | |
| Step 7: Open up the paper all the way to collapse it into a diamond shaped figure. Go to Next page to continue with the origami boat instructions. |

- © Origamiway.com

How to make a Paper Boat – Easy Kids Origami
I LOVE paper craft, as you can do it whenever wherever with whatever piece of paper you have! Get the hang of it and you can entertain your kids on a bus, a plane or in the car. Making these easy origami paper boats is such a wonderful “childhood classic activity”. Let’s learn how to make a boat !

Make these paper boats out of any piece of paper any place at any time (I remember making these origami boats out of my bus ticket, whilst waiting to arrive at my destination)!
Make them HUGE or make them small. All you need is a sheet of paper of ANY size.
Not only only are the paper boats a fun craft, but they are also a great introduction to origami and following instructions! We love Easy Origami for Kids and this is a great one to get kids interested!
One Easy Boat Origami.. so many options!
No kits needed. Just one sheet of paper! Construction paper works too, but if you want to float these, “printer” paper or a magazine paper better, as they slightly less water absorbant, so will last longer!

Yes that is right.. learn how to make the one boat.. and you can decorate and use it in so many different ways. Here we simply too colourful paper and created an army of RAINBOW Paper Boats. They make great little canoes for playmobil mean and small toys too (squish down the middle to make space for sitting).

Next. We took plain white paper, and turned it into a pirate ship, with the quick addition of a Skull and Crossbones Toothpick Flag. Harr. Harr. Gotta love a Pirate Craft!
The great thing is, that these Paper Boats, also float. Kids can colour it in and take it in the bath or play with it on a small river (it will dissolve, should it float away). I have also used it to make a cute Father’s Day card!

My neighbours boys (5yrs & 7yrs) saw my draft video and after that they couldn’t stop – we made about 20 paper boats over the weekend – including to two MASSIVE ones. The 7yrs REALLY impressed me with his Pirate Ship and Island. This is what “How to..” is all about – getting stuck in and having fun with crafts! So chuffed!
Just check out their Giant Paper Boats How to:

Aren’t they simply fun?! (My Paper Boat Craft Models are in disguise)
Teaching Friends How To Make Paper Boats

Then it got better, they then went to a party… and ended up TEACHING their friends how to make boats. Here they are teaching each other to make their paper boats. **Bless**.
This is a little trickier than the paper cup craft from a couple of weeks ago, but once you know how to make one, you can make it anywhere out of any scarp paper (even a bus ticket!!). Keep your kids entertained on the go! Make one!!!
Origami Paper Boat – supplies
- a sheet of paper – it needs to be a rectangle!
Any size goes. It really doesn’t matter!
Easy Origami Paper Boat How To Video:
Though paper boats are super easy to learn how to make, it is great to watch this How to make a Paper Boat video. Seeing really is the quickest and easiest way to learn this wonderful Origami for Kids!
Step by step origami boat – written folding instructions
An A4 sheet of paper is ideal – you do need a rectangular sheet of paper… and most sheets of paper work. But we like the dimensions of an A4 or A5 sheet of paper. They are the perfect rectangle for a paper boat.
Start off making what is the classic origami hat (don’t worry the boat bit is coming)
The first fold follows the basic pattern for an origami hat.
Fold your sheet of paper in half. Make a neat crease. (So if using an A4 sheet of paper, you now have an A5 sized paper infront of you – like a card that opens and shuts).
Turn the paper round, so the closed edge is along the top. And the open edges along the bottom.
Fold the paper in half again and make a middle crease. Open back up. You just wanted to create a perpendicular guide line.
Now you need to work on both top corners: Fold the top right corner down, to meet this middle crease and create a triangle flap.
Repeat with the top left corner. Now you have two triangle shape flaps that meet in the middle.
You should now have two triangles with a banner along the bottom made of two sheets of paper.
Take the bottom of the paper and fold up. Two small triangles will overlap. Fold these down to make another eat edge.
Flip the origami over and repeat for the other side.
You should now have what looks like a “classic paper hat”.
Turning the classic paper hat into a boat that floats
Take the two points one either side and bring to the centre and flatten.
You should have a diamond with equal sides in front of you (or a square shape on it’s side).
Take the bottom corner and fold up. Flip over.
Repeat for the other side. You should now have a traingle again.
Take the point on the left and right and again, bring them together to meet in the middle.
And flattern. You should have another diamond.
This time, you can pull it appart and make our final boat shape.
And finished! Now decorate it in any way you wish! And as we have shown you above you can have lots of fun with this basic paper boat.
The paper boat does float – it is perfect for the sink or puddles, but will eventually get soggy. If you want to play with it for longer, you may want to make it from waxed paper. Or maybe add some clear tape to the bottom of the boat to water proof it a little.
More Easy Origami for Kids here:

See all our fun DIY Boat Crafts here, incluing other fun boat crafts that float:

This video tutorial is also available on my YouTube channel
How to Make a Paper Boat – Origami for Kids
We love doing simple origami and this time we’re going to learn how to make a paper boat – a summer favorite!
We’ve done quite a few awesome origami tutorials for kids and each of them is a must make!

I loved to make these as a kid (the exact same ones) and I loved to play with them even more – we would sail them in the bathtub, puddles and lakes and when possible even have boat races with other neighbourhood kids.

This time though we took it a step further too see who can make the smallest origami boat – each time working with a smaller piece of paper (cutting the size of the paper to half each time) and I was genuinely surprised with the size of paper we have come down to – and too be honest we could probably do one even smaller if I’d have some tweezers at hand.
How to Make a Paper Boat
All you need is a sheet of paper letter sized or A4. Regular print paper is perfect for this project. Use as many colors as possible.

Start off with a sheet of paper and fold it in half downwards.
Fold in half again as shown on the second image (you don’t need to make the crease from top to bottom – you just need to mark the center).
Bring corners to the center so that you get a triangle shape with a rectangle under it.
Fold the rectangle part under the triangle upwards (as shown with the purple spots) – flip your origami and do the same on the other side.

Grab the center of the triangle shape as indicated on the first image above with the red spot and pull both sides (holding the red spot) out. Flatten.
You’ll get the shape as shown on the second image above (ignore that red spot in the left bottom corner – I have no idea how that one came there haha).
Fold the front layer up (as shown with the green spot) flip the origami boat to be and do the same with the back layer. You’ll get a triangle shape.

Slowly pull the top parts outwards and you have your paper boat!

More cool origami for kids you can try:

We’ve had a lot of fun creating this shark fortune teller – it’s fun to make and even more fun to play with. You should also give these origami frogs a try!

Want instant access to all of our printable crafts, activities, and resources?

With thousands of crafts, activities, worksheets, coloring pages, and drawing tutorials to print, you will always have just the resource you need at your disposal. Perfect for parents and teachers alike!
Sign Up Now and Start Printing!
Related posts.

Let's take a walk into the forest and learn about the animals there by making…

And here's something for the origami lovers! I've rounded up some of the most fun…

Time for another origami! This time we're making an easy origami hedgehog perfect for kids…

If your kids are into origami, or are just getting started this super simple origami…

Hedgehog crafts are usually "reserved" for fall but I do love this animal so much…

Why not use fun origami to encourage reading? This cute chick corner bookmark is an…
How to Make PAPER BOAT

Introduction: How to Make PAPER BOAT

How to MAKE A PAPER BOAT as a professional with clear ORIGAMI instructions. ENJOY!
WATCH THE VIDEO FOR MORE DETAILS
Step 1: Use Rectangle Paper

Any size as you need
Step 2: Fold the Rectangle Sheet of Paper in Half Along Its Short Side

Step 3: Fold It in Half From Bottom to Top Along Its Long Side

Fold it in half from bottom to top along its long side
Flip the paper so that the fold opens toward you
Step 4: Fold Down the Top Corners

fold down the top corners while leaving of space at the bottom. Grab the two top corners, and fold down so that they line up with the centre crease.
Step 5: Fold the Bottom of the Paper Up Against Both Sides

Step 6: Fold the Bottom Corners In

Step 7: Make the Triangle Into a Square

Pick up the triangle, then use your fingers to open up the bottom of the triangle. It should naturally start to pop into a square shape
Step 8: Fold Up the Bottom Flaps

Arrange your paper so that the bottom points of the diamond can fold upward.
Step 9: Fold Up the Bottom Flaps Other Side

Flip the paper over, and do the same thing to the other side
Step 10: Make the Triangle Into a Square Again

Just like last time, open up the bottom of your new triangle with your fingers. The bottom corners will line up to become the bottom point of a square
Step 11: Pull Out the Triangles on the Side of the Square

Start at the top of the diamond
Step 12: Final

Now you have your paper boat
Make a paper boat
Explore a creek or stream by setting sail! With nothing more than some paper and a few folding tricks you can make your own vessel to investigate the water's currents. Text adapted from the Nat Geo Kids book Get Outside Guide by Nancy Honovich and Julie Beer.
Take a piece of paper and place it in front of you with the shorter side at the top. Fold the paper in half from top to bottom.
Fold left to right to find the center and reopen. Bring the top two corners together to the middle, forming a point, and crease.
Fold the top flap at the bottom of the paper up; turn over and fold the other flap up. Fold the triangle tabs in over each other so you have a triangle.
Pop open the center like a hat, push the pointed sides to meet, and crease down so that you now have a square.
With the opening facing you, fold the top layer up to meet the other point. Turn the paper over and repeat.
Gently pull apart the top two points while pushing out with your fingers to form the bottom of the boat. Reinforce corners with clear tape, and also tape around the bottom to keep your boat dry. Now you're ready to launch your craft!
Read this next!
Craft corner, (ad) make this, (ad) get outside guide, (ad) nat geo kids cookbook: a year-round fun food adventure.
- Terms of Use
- Privacy Policy
- Your California Privacy Rights
- Children's Online Privacy Policy
- Interest-Based Ads
- About Nielsen Measurement
- Do Not Sell My Info
- National Geographic
- National Geographic Education
- Shop Nat Geo
- Customer Service
- Manage Your Subscription
Copyright © 1996-2015 National Geographic Society Copyright © 2015-2024 National Geographic Partners, LLC. All rights reserved
COMMENTS
1. Make the triangle into a square. Pick up the triangle, rotate it 45 degrees, then use your fingers to open up the bottom of the triangle. Pull the paper apart gently until it pops into a square shape. Make sure the bottom corners of the triangle fold over each other and become the bottom corner of a diamond.
Learn how to make a paper boat with easy steps and video tutorial. Have fun with this simple origami project for kids and adults.
Press along the edge to make a fold. Pick up the folded paper and place your thumbs into the opening at the bottom. Again, slowly pull your thumbs apart from one another, pulling apart the paper as you go.When you finish pulling, the paper should be flat again, as shown in the photo below. Once again, run your fingers along all of the folds ...
2D Paper Sailboat Making Out of Color Paper for makers. Its a DIY origami sailing boat making video tutorial where I've shown how to make a paper boat that h...
3. Use the other sheet of paper to make the Big Sail. 4. Take the top-left corner of the paper and fold it down to the exact bottom point. 5. Then fold the top-right corner to the exact previous fold point, then do the same with the bottom-right corner. 6. Fold the right side to the fold point you made at Step 4. 7.
Folding the Paper Square to Make a Triangle. Have your paper boat-side up. If you want your sails to be white, have the color-side facing up. Now fold the paper diagonally. Bring the bottom corner of the paper up to the top and unfold. Next, fold the right corner over to the left and unfold.
To make a paper boat using square paper, begin by folding the paper diagonally in half to form a triangle. Then, fold the bottom corners towards the center to create a diamond shape. Open the bottom of the diamond and re-shape it into a square. Gently pull the top flaps apart to form the boat shape.
Watch this video to learn how to make a paper sailboat easy. To make this origami sailboat watch full video and follow the instructions step by step. Beginne...
Obtain a piece of 8 1/2 x 11 inch computer paper. 2. Fold it in half. 3. Fold down the corners to make a triangle. 4. Fold the bottom flaps over the edge of the triangle on both sides to form an origami hat. 5. Flatten by opening the figure and folding the right and left corners together.
Fold the bottom point up to the top point on one side. Flip the paper over. Fold the bottom point up to the top point. Pick up the piece of paper by the flat edge, with the pointed end facing down. Push the left and right ends of the paper together as before, to make a diamond shape. Press flat. Pinch the top two points of the diamond and ...
Here is a fun, quick and easy paper sail boat that can be made in no longer than 5 minutes. Step 1: Materials. Get one piece of a simple sheet of paper. It can be out of a notebook or even just regular printer paper. Colors to draw stuff with. Step 2: Decorate Both Sides of the Paper.
How To Make an Origami Boat. Step 1: Start with a rectangular sheet of craft paper. If the paper has a colored side, make sure it is facing down. Step 2: Fold the paper in half horizontally to create a crease in the center of the paper. Step 3: Fold the paper in half vertically to create another crease in the center.
Finalize the Folds. Pull apart the left and right flaps. Flatten your paper sculpture in the shape of a boat. Open it slightly. The triangle in the middle resembles a sail. Make the most well-known origami boat at home. This paper boat can float in water and is a perfect project for kids.
Here is the step-by-step way to make a boat out of paper. Materials required. A4 sheet / Letter size paper/Any rectangular paper. Step-by-step tutorial to make an easy paper boat for kids. a. Take an A4 sheet paper. Hold it horizontally as shown in the picture. b. Fold it from left to right. c. Make a crease. d. Now, fold the paper from bottom ...
How To Make a Paper Boat That Floats - Origami Boatsheet: А4A classic boat made of paper that is easy to make. It is beautiful and long floats.Please like, c...
With the help of this simple step-by-step lesson, you can quickly and easily create the most well-known origami paper boat. Step 1: Start with an 8.5x11 sheet of rectangular paper. Step 2: Fold the paper in half left to right, then unfold. Step 3: Fold in half again, this time folding top to bottom. Step 4: Fold the upper left and right corners ...
Turning the classic paper hat into a boat that floats. Take the two points one either side and bring to the centre and flatten. You should have a diamond with equal sides in front of you (or a square shape on it's side). Take the bottom corner and fold up. Flip over.
Start off with a sheet of paper and fold it in half downwards. Fold in half again as shown on the second image (you don't need to make the crease from top to bottom - you just need to mark the center). Bring corners to the center so that you get a triangle shape with a rectangle under it. Fold the rectangle part under the triangle upwards ...
Difficulty: ★ ☆ ☆ ☆ ☆ (Simple)In this video, you will learn how to make a paper boat. This is an easy traditional design that is perfect for beginners!This v...
Step 4: Fold Down the Top Corners. fold down the top corners while leaving of space at the bottom. Grab the two top corners, and fold down so that they line up with the centre crease.
Step 6. Gently pull apart the top two points while pushing out with your fingers to form the bottom of the boat. Reinforce corners with clear tape, and also tape around the bottom to keep your boat dry. Now you're ready to launch your craft! Get outside with this cool paper boat you can make and race yourself!
Origami Boat 🛥 How to Make a Paper Boat that Floats - Paper Speed BoatSubscribe to channel: http://bit.ly/2vxE4Wu#origami #easyorigami #papercraft #PaperCra...
How to fold Paper Sailing Ship. Origami for kids. Learn to make origami paper items. Click on the link below to more origami art crafts for children: https:...