
- Building a Skerry
- Building a Tender
- Points of Sail
- Making Sails
- Boat types, terminology

Nautical Terms Relating to Sails, Rigs and Sailing.
Nautical terminology is confusing for not-so-salty boatbuilders and sailors. Here is the result of my research on sail terminology
If you plan to do any reading on sails and sailing you will need to know these sail terms or at least where to find the meanings. HERE!
If you want me to add another word, just send me an email and I'll add it. I'm hoping here to include the most important terms used to describe sails and sailing and to make it easier for folks who are trying to read and are getting bogged down with the terminology.
The drawings are mine, I'm not a terrific illustrator. Add a new word.
Many beginning boat builders and not so novice find sail terminology confusing, you are not alone.
Test your knowledge with my Sail Quiz
Sail words defined.
I try to be accurate and check my information, but mistakes happen. I don't pretend to be complete either.

Boatbuilding

Small Print
This information is for general knowledge.
Raising and Lowering the Sails
Published by admin on may 27, 2019 may 27, 2019.
On a cruiser, the sails are typically down at the dock and they stay down until the boat is at sea. Of course, if you have no motor, the sails must be used to cast off, but we’ll discuss that later. For now, we’ll assume that the boat is out at sea with the sails tied down.
Raising the Main
The mainsail is raised first, and this can be done with the motor idling. The boat should be pointed with the bow facing into the wind. This alignment means the sail will be luffing when raised, making it easier to bring in the halyard and less likely that the sail will fill unexpectedly and knock the boat around.
The boom vang should be loose so that it does not resist the tension you’ll put on the main halyard. The mainsheet should also be somewhat loose for the same reason, but it shouldn’t be completely free since you don’t want the boom swinging around in an uncontrolled manner.
When the boat is pointing into the wind and the boom vang and mainsheet are loose, the cover and ties can be removed from the main and the halyard brought in to raise the mainsail. The halyard should be able to be pulled in most of the way by hand – if not, there may be something resisting it, such as the boom vang, or it may be caught – and then brought the final one or two feet by using a winch.
Once the sail is fully raised and the halyard cleated, the topping lift should be let out, which will cause the boom to drop slightly, which will flatten out the sail. The boom vang and mainsheet can be tightened again.
Since the boat is pointing into the wind, it’s easiest to start sailing on a close hauled tack. You can use the motor to turn out of irons and then it should be cut off. You’re sailing!
Raising the Jib
The jib should be deployed only after the main is up and the boat is sailing, and the process is fairly simple, whether for a furling or non-furling jib. We’ll assume that the jib shackles are hooked to the forestay if the jib is non-furling. Also it is assumed that the jib sheets are already rigged to run through the fairlead and back to the cockpit.
For a non-furling jib, the sail is simply raised using the jib halyard. The wind fills the sails and the leeward jib sheet is used to set the sail. To prevent the sail from flapping uncontrollably and pulling the jib sheet out of the blocks, the leeward jib sheet can be pulled in slightly prior to raising the jib.
To unfurl a furling jib, the process is even simpler. The furling line is uncleated, but kept taught, and the leeward jib sheet is taken in as the furling line is slowly released. This action unfurls the jib, which immediately fills with wind.
Lowering the sails
Lowering the sails basically involves carrying out the sail hoisting procedure in reverse order. First the jib is lowered or furled, then the main.
The jib can be furled anytime. The boat does not necessarily need to be pointed into the wind, but heading on an upwind tack or being in irons will help the jib furl tighter and more neatly. Keep tension on the active jib sheet, slowly releasing it while brining in the furling line. When the jib is completely furled, the furling line can be cleated.
To bring down a non-furling jib, a crew member needs to go to the bow and pull the jib down by hand, bunching it up. Another crew member should uncleat the jib halyard and release it slowly as the jib is brought down. Also, the jib sheet should be let out slowly, but this can be done after the sail is down if there aren’t enough crew hands to let out the halyard and the jib sheet at the same time. Once the jib is down, it can be held in place temporarily using bungees, to be stowed below deck upon return to the dock.
When lowering the main, it helps to point the boat into the wind, and in some cases the boat can be positioned so that a hill or tall building on shore blocks the wind to make things easier. Similarly to the jib, one crew member slowly lets down the halyard while another pulls the sail down by hand. As the sail is lowered, the bungees or straps used to hold it to the boom are replaced.
This process is best done with one crew standing forward of the mast, bringing down the sail, one crew lowering the halyard, and another wrapping bungees around the sail as it comes down. Obviously, when fewer crew are available, it’s a bit more hectic.
Related Content
Related posts.

Cruising Education
Troubleshooting marine outboard engines.
We've all been there. Eager to jump in the dinghy and land on shore after laying anchor on the mothership. Just one problem, the dinghy outboard wort start.

Education Safety Sailing Basics
Servicing type v personal flotation devices (pfds).
If you're like a lot of recreational boaters, you may not pay a much attention to your life vest. You might not even know what PFD stands for - Personal Floatation Device. You may have even purchased a type V PFD with your #1 criteria being comfort. You throw it on each time you go out, mainly just to make a show of it, and take it off as soon as you're outside the marina - confident that you'll remember to put it back on if the weather picks up.

Best Coffee Brewing Methods for Cruising Sailors
Coffee is life. If you’re like me, you need your cup of joe first thing every morning. There is nothing quite like a great cup of coffee onboard as the sun comes up over your Read more…

Berthon Winter Collection

Latest issue

August 2024
In the August 2024 issue of Yachting World magazine: News Few finish a tempestuous Round The Island Race European rules are eased for cruising to France and Greece Olympic sailing…

Yachting World
- Digital Edition
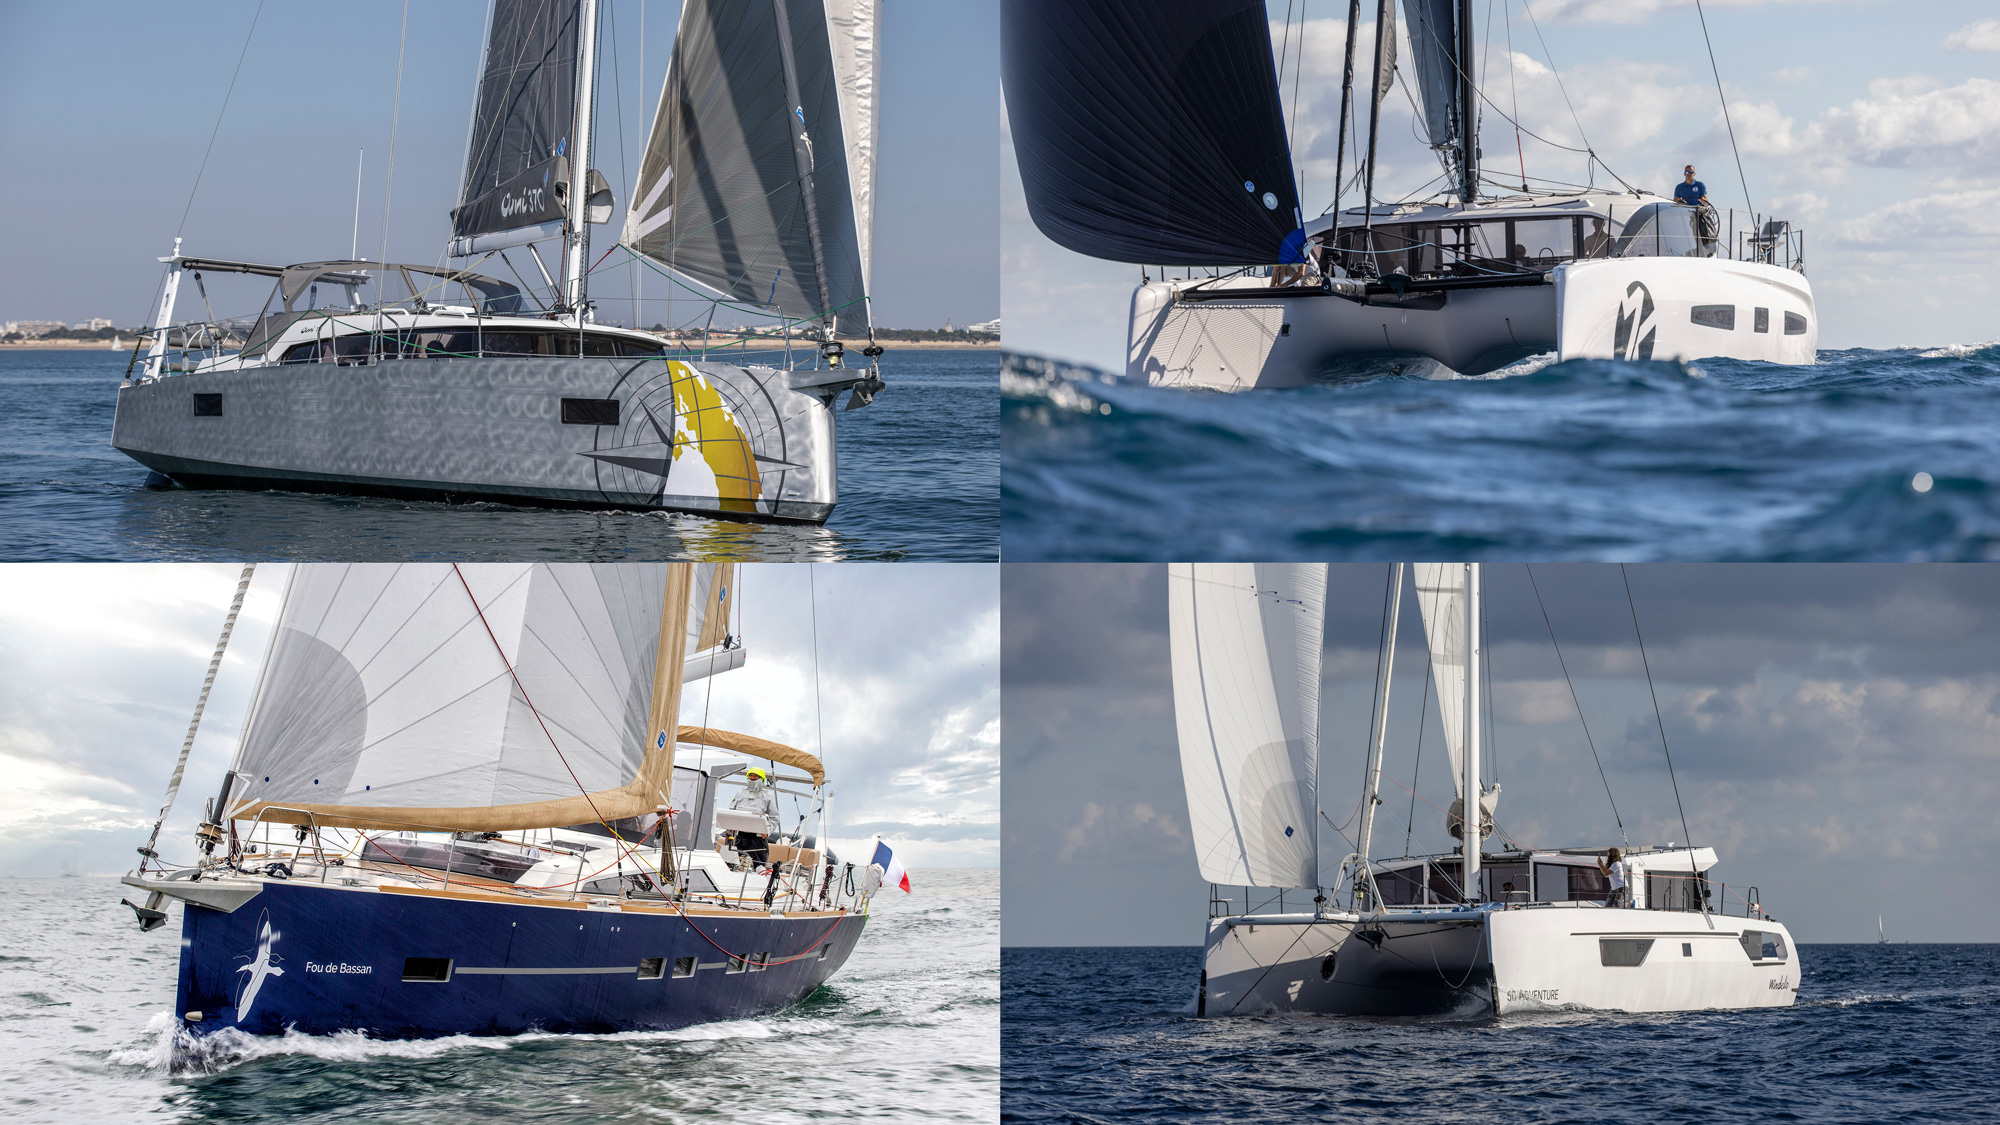
The best downwind sails: Options explained by over 200 experienced sailors
- Toby Hodges
- June 18, 2024
Which downwind sails are the right choice for you? and how do you take the stress out of sail handling on a tradewind passage? Toby Hodges quizzed more than 240 skippers in last year’s ARC to find out

Downwind sailing is any cruising sailor’s dream. The thought of days, or even weeks, of reliable following tradewind pushing you across an ocean with just a warm apparent breeze over the deck seems particularly far-fetched for those of us who have just suffered the wettest winter imaginable.
We all need a reliable downwind setup, whether coastal cruising or passagemaking. But those planning an Atlantic crossing or Pacific crossing will want to give this aspect particular attention, perhaps adding some tweaks or sail wardrobe investments to help ensure that dream adventure is as comfortable as possible for your crew and your yacht.
While there’s certainly no one-fits-all answer, we can learn a lot from those who have done a crossing. Last year we used our annual ARC Gear Survey to focus on the topic of downwind sails and handling and have since analysed the responses to our detailed questionnaire, from over 240 skippers on the ARC and ARC+ rallies.
The reason why there’s no optimum solution for all is multifaceted. Sure, the shape of your hull and keel type can help narrow down options. Unless you have a sportier design, then sailing the downwind rhumbline should equate to least stress and gybes and therefore potential problems. Those with newer hull shapes may want to calculate their polars and work with sailmakers to evaluate which angles and sails best suit their hulls.
How about your rig – is it easy to use a pole? Is there a track to fit one… or two even? Can you square the boom or do you have swept-back spreaders? Do you sail short-handed or with plenty of crew to help pull strings and get poles down? The answers can lead to yet more considerations, including chafe points, how to avoid rolling, and how to easily depower or reef.
Does your mainsail help and does it fill the slot better when reefed? What’s your best setup for short-handed or at night? What are your backup systems (notably for torn sails or a broken halyard or pole)?
A lot can be answered in advance by considering such questions. The weather, however, cannot. We can only hope for reliable trades and the sort of downwind crossing conditions last year’s ARC crews gratefully experienced.

Photo: Tony Gratton/Niord/WCC
Weighing the options
Spinnakers can be ideal if you have the experience and crew to handle them, their numerous associated lines, and can get them down easily. Asymmetric spinnakers or gennakers can make this handling much easier, as they don’t require a pole. They were carried by over 40% of the fleet last year, making these the most popular offwind option in terms of numbers carried (an indication of a modern fleet), but they don’t suit true downwind sailing, meaning extra miles to sail.
Aero-style vented spinnakers, aka parasailers, can seem like the holy grail for many on a downwind crossing as they can be set from the bow or in front of the boat and are capable of reaching and running. However, these are among the costliest sail options/upgrades and there’s a range of different brands now which all claim the optimum design.
That said, perhaps the clearest message from 2023’s ARC skippers was the real love of – or wish for – a parasailer. Over 40 yachts carried one, yet so many more commented that they would have wanted one. This is perhaps a reflection of last year’s consistent tradewind conditions – “The parasailer was perfect for the conditions we had” said the skipper of German Catana 47 Aquila .
Other downwind sail setups include twin headsails, or the specialist Bluewater Runners and TradeWinds, versatile sails which share a single luff.
However, a poled-out genoa, where the headsail is typically flown wing-on-wing/goosewinged with the mainsail, is still considered the most reliable method for downwinding.
Carrying a range of options is ideal, but remember you also need the space to stow them!

Grand Soleil 46LC Flying into the sunset poled-out. Their twin headsails were “a dream”. Photo: Peter Blackadder/Flying/WCC
Pole-out – belt and braces
Around 60 yachts used a poled-out headsail, with over 40 of these skippers still rating it the most reliable method. It uses your heavier-grade white sails, the mainsail can be securely prevented, and both can be easily reefed.
Asante , a 2007-built Oyster 56, has a gennaker aboard but found: “Best setup when windy is two reefs in main, poled-out headsail – easy solution and fast going at 8-10 knots (we covered 205 miles in 24 hours)”. Serenity , a French HR40, said it “allows for a good wind angle in tradewinds and is easy to reef single-handedly if needed”, while German Bavaria 51 Mola adds this setup is “extremely resistant to squalls”.
A poled-out genoa worked best aboard the Moody 54 Dilema , albeit making for a ‘rolly’ experience: “Simple and effective. We used centred staysail as well to reduce roll.” UK-flagged Rustler 42 Carrik also remarked on the rolling but was otherwise in praise: “sailing goosewinged spared us the drama of the spinnaker when winds were 20-plus knots (which was most of the time) and allowed us to sail the rhumbline”.
The Swedish-flagged Hallberg-Rassy 48 MkII Sally was sailed double-handed so kept it straightforward with main and poled-out headsail, sailing wing-on-wing for two weeks. “Our simple sail approach worked well for us, fast enough and easy.”
Article continues below…
43 of the best bluewater sailboat designs of all time
Which yacht is the best for bluewater boating? This question generates even more debate among sailors than questions about what’s…

10 practical tips for perfect downwind sailing in the Tropics
Between the tropics of Cancer and Capricorn lie the tradewind belts, separated by the Intertropical Convergence Zone (ITCZ) known to…
Also sailing double-handed was Fisk , a 2007 Oyster 46: “Our poled-out genoa (130%) proved to be a very useful all-round tool, goosewinging with the main when feasible.” They bought these sails new before the ARC but think a light wind sail could have been useful too.
Jeanneau Sunshine 38 Cloud Jumper points out that “goosewinging is less weight on the bow than twin headsails.” They sailed like this for 22 days. And 20-year-old Oyster 53 Jarina had another reason for the ease of this setup: “a foredeck crew with the combined age of 200! Poled-out headsail plus main and preventer equals ease of handling. Stable and controllable.”
Experimenting and enjoying the process should be encouraged. Ipanema developed a motto by doing this: “poled-out genoa if wind greater than 18 knots; gennaker if wind less than 20 knots”. Bestevaer 53ST Aegle thinks having a good solution for various apparent wind angles is key: “goosewing is very effective; a furling spinnaker makes life much easier”.

Twin headsails (one flown free) on Island Packet 380 Niord. Photo: Tor Johnson
Twins – twice as good?
Some bluewater yachts install their own systems as standard, including a pole or twin poles, knowing twin headsails are ideal for tradewind cruising. The Barters on their 20-year old Super Maramu Nunky hail the Amel twin headsail system as “superb: great downwind and they can be furled together in a moment”. Equally, Oyster 54 Ostara says: “the Dolphin twin headsails performed very well – very versatile and fast passagemaking in tradewinds”.
Other skippers might choose to fit or retrofit two forestays or twin luff grooves. “Twin headsails on the same furler worked really well,” is the verdict from Rival 36 Topaz Rival. They sailed like this for 17 days, including at night, so it didn’t affect their watch pattern.
Norwegian Sun Odyssey 44 Moyfrid used genoa and jib poled-out for 15 days, as it’s “easy to adjust, gave us flexibility and safety of handling quickly in squalls”. The same reasoning was given by Discovery 58 Aqualuna, who found twin headsails excellent for double-handing. “It meant we could do three hours on, three hours off”. The summary from Oyster 53 Distraction : “Twin headsails is easy but not fast, asymmetric is fast but not easy.”
The Blackadders’ Grand Soleil 46 Flying has twin headsails, a gennaker and a Code 0, “and trapped the edge of the tradewinds to use them all”. They found “our twin headsails/twin poles worked a dream – easy to fly single-handed and not too rolly.” They also found them easy to adjust and reef, and adaptable to different conditions including winds up to 35° off the quarter.

US-flagged Ovni 450 Reverie running west to the sunset under gennaker. Photo: Tony Martin/Reverie/WCC
Spinnakers – Going deep
Anyone in a hurry, racing or wanting some sport for an active crew would probably choose a spinnaker (or several, space and budget willing). While capable of harnessing those tradewinds most efficiently, a big free-flying sail can be tricky to gybe and get back on deck. A popular ARC solution is to fly a spinnaker during the day and poled-out headsail at night as the latter is easier to manage/reef without affecting the watch system.
Oyster 406 Penny Oyster : “We used the spinnaker during the day (weather permitting) which increased speed and was less rolly. Poled-out jib overnight felt very stable and safe. Easy to manage solo.” It was the same for Grand Soleil 50 Sidney II and 20-year old Sweden Yachts 42 Freedom , the latter promoting: “full main and spinnaker when 15 knots or less (sailed on a dead run for 90% of trip); main and genoa goosewinged if 15 knots or more”.
Symmetrical kites (and parasailers) are often a popular choice for catamarans as they can be set off each bow. Sailing double-handed on their Aussie flagged Outremer 51 Spirit , the McMasters bought a symmetric kite for the crossing to supplement their gennaker, flew it with the mainsail and considered it “easy gybing and conservative for double-handing”. Fellow Outremer Madeleine (a 45) carried Code, A-sails and a symmetric spinnaker and found a “half-reefed main and spinnaker stable and easy”.

Foredeck crew of Estonian Oyster 565 Larimar stow the furled gennaker while under TradeWind. Photo: Magnus Harjak/Larimar/WCC
Asymmetric/Gennaker – working the angles
Despite gennakers being the most popular offwind sail option carried (90 yachts), only around 20 skippers found this to be their most successful sailplan for the crossing, with many frustrated by not having a kite with enough belly to sail the deep downwind angles experienced last year. (While deeper cut asymmetrics are available, many, especially furling types, have a flatter shape and suit reaching more). Grand Soleil 46LC Mandalay reckons their inability to sail deep cost them two days.
Grand Soleil 50 Mr Twister found that flying their gennaker with a double reefed main “allowed for a more downwind course”. This was backed up by the Peckhams on their Hanse 455 Infinity of Yar : “Two reefs in the main allows wind over the top of mainsail so 165-170º TWA is possible”. At night they resorted to the boat’s standard white sails but as this involves a self-tacking jib, they’d want to fit a poled-out genoa or yankee if doing it again.
Handling an A-sail and whether to use a furler or snuffer, also needs due consideration. Najad 490 Adastrina cautions that a “top-down furler with its torsion rope is difficult to stow due to bulk”, while Oyster 47 Aequitas also warns: “Don’t sail too deep as the snuffer jams.”
Code 0s have transformed cruising for many production yachts, particularly those which typically day sail in light winds and want an easily furled fetching or reaching option. However, they are not deemed so useful for tradewind passages as they lack the deeper shape for downwind conditions. “Code 0 was excellent, but could not run deeper than 155°,” confirms new Canadian-flagged X46 Imi Makani .
An exception was perhaps the Oyster 745 Mexican Wave : “We loved both our Elvstrom Code 0, which we flew 10 days and nights, and our Bluewater Runner which was great in light wind. Both on hydraulic furlers – easy.”

Birds-eye view of the deep bellied Bluewater Runner on Hanse 505 Mojito. Photo: David Anning/Mojito/WCC
Specialist sails – Bluewater Runner & TradeWinds
Elvstrom’s Bluewater Runner (BWR) and North Sails’ TradeWind (TW) were purposefully designed for downwind events such as the ARC. They take some of the twin headsail concept, but use lighter fabric and modern furling technology for a versatile multi-use sail.
The twin headsails are joined at the luff and can be flown together on the leeward side to act as a light wind genoa/Code sail equivalent, or peeled apart when running to be flown wing-on-wing, independent of the fixed forestay and headsail. And in principle, they can be easily furled from the cockpit.
Hallberg Rassy 40 Northern Light purchased a BWR for the crossing, used it for 16 days during daylight hours, and found it “very effective when running dead downwind.” The Hanse 505 Mojito agrees: “Worked really well, easy to handle, and doubles up as a Code 0. It gave the best downwind performance and can be managed from the cockpit.” That said, they consider their BWR “too powerful for the rig even in 20 knots of wind – we snapped one halyard and broke the bobstay and bowsprit padeye.”
HR57 Saltair advises it needs lots of halyard tension, while Lagoon 410 Newbee agrees that less than 20 knots wind suits the BWR – they resorted to a triple-reefed main and genoa when things got livelier.

Pinnacle before chafe issues with its TradeWind sail. Photo: Stephanie Stevens/Pinnacle/WCC
North Sails’ latest offerings are popular on modern luxury cruisers. Rock Lobster IV is a new Oyster 565 with a wardrobe of North Sails including a TradeWind and a Helix structural luff gennaker. “Helix is very easy (little point using the G2); TradeWind is great in moderate wind, and poled-out yankee gives good flexibility”. They wisely “adapted sails to crew ability”.
Fellow Oyster Ri-Ra , a 675, also with a new North suit, had “lots of difficulties with TradeWind sails,” however, and blamed a poor setup and “inadequate halyard casting”. Meanwhile Mastegot, a new Oyster 595, found their poled-out jib and main more successful than the TW, and if doing again they’d instead consider twin headsails, “because they can be reefed”.
But there were words of praise from Amel 60 Mrs G who found their TradeWind most reliable with a reefed main, and the Swedish Passad 38 Lulu : “very good lift and speed, much better than wing-on-wing”.

Parasailor – fast, stable and no rolling,” says Contest 50CS Athena. PHoto: Philip Mrosk/Athena/WCC
Parasailers – the vented kite
For want of a generic term ‘parasailers’ are specialist cruising spinnakers with a pressure relief valve. This vented part diffuses gusts while the paraglider-style wing creates lift and provides support to the sail (they don’t require a pole, but can be used with one).
It’s a forgiving, versatile option that can be used for running and reaching, but it’s an expensive investment and one that pays to learn how to handle properly. They work well without needing a mainsail set and are increasingly popular with multihull owners.
How they work and the different types available – Istec’s Parasail and Parasailor, Wingaker and Oxley – is another whole article.
Lagoon 450F Marlove was one of 44 parasailer users last ARC, flying theirs for 13 days and nights: “made our life easy, perfect sail to cross the Atlantic”. Another Lagoon, Rockhopper of London , agreed, calling it a ‘hoist and forget’ sail: “no trimming – the sail coped well with wind shifts”. And Ovni 385 Contigo reports: “Parasail is amazing up to 20 knots and easy to snuff if the wind got too high.”
The Harpers on their two-year-old Jeanneau Yachts 51 Blue Pepper spent a season using their parasailer to prepare: “We practiced all the configurations we used several times as a crew before we got to the Canaries – it paid off. The Parasailor was excellent, stable, including in gusts, and very easy to manage. Twin headsails also worked well and were surprisingly powerful, but Parasailor is faster, easier, with less wear and tear on running rigging.”

Fountaine Pajot Saba 50 Lady Roslyn exhibits all 190m2 of her bright red P16 model Wingaker. Photo: Wingaker
Those with parasailers seemed happier to keep them up at night. The skipper of Lagoon Cosi mentioned how he would sleep in the cockpit for this. However, several others added caution about getting a parasailer down – the wing element can makes snuffing tricky, confirmed by the double-handed crew on Broadblue Rapier 550 Blue Wonder . Hence others promote snuffing parasailers early, including Galatea Of Aune , who tore theirs in a squall.
Of the 44 international skippers who shipped parasailers it’s hard to know exactly which types they had as many just list them as ‘parasailer’, but there were clearly some staunch supporters of both Oxley and Wingaker types. “Oxley is amazing! Very stable, very flexible in terms of wind strengths (gusts and wind direction),” reckon the Dutch crew on their Garcia Exploration 60 Fiore .
The Swiss crew on Moody 54DS Nautilia were equally impressed: “We used it up to gusts until about 24 knots – gives calm downwind sailing with good speed.” The Bösch’s on Jeanneau 51 Wolkenschlosschen said their Levante “worked really well,” using it 90% of the time, adding “take Oxley down below 20 knots TWS and use it in gennaker mode”.
Aussie-flagged Fountaine Pajot 40 Cat’s Pajamas flew their 130m2 Oxley for 16 days and, other than advising to get it down early for squalls, the only thing they’d change is to get a larger version.
Oxley offers the Levante (for up to 20 knots) and the flatter Bora with an inflatable double-layer wing for higher winds, seas and gust damping.

More Oxley fans on the Garcia Exploration 60 Fiore. Photo: Harmen-Jan Geerts/Fiore
“The new Bora was excellent,” reports Oyster 55 Valent, although they still found it difficult to snuff once the wind was over 14 knots.
The main difference the Wingaker has over other parasailers is that it is a single construction including the vent and wing, which it claims produces a more stable performance and is easier to handle and crucially to snuff. The feedback for it was equally praiseworthy, particularly from catamaran owners.
The new Seawind 1600 cat Pure Joy thought it just that: “Wingaker very easy to handle and gybe as well as sail completely downwind.” The American crew on FP Aura 51 Darla J left a strong testament: “2,142 miles without taking the Wingaker down”. And the Kiwi FP Elba 45 Aratui simply stated: “Take a Wingaker” after flying theirs for 90% of the voyage including at night.
More multihull solutions
Multihulls offer great platforms for experimenting with downwind setups. While it’s easy to picture a cat flying along on a flat reach under screecher or A-sail, running downwind brings questions on how best to fill the slots in different wind strengths. Indeed the Canadians on their new Nautitech 44 Open June asked for “more detail on catamaran downwind strategy in the ARC’s downwind seminar”. They found “full main and gennaker faster than Oxley but poor below 150° TWA – Oxley backs wind behind main”. They wished for a better solution for between 18-24 knots wind.

The family dream? Letting the parasailer do the work on June, a Canadian Nautitech 44 Open. Photo: Peter Hunt/June/WCC
Portuguese FP Tanna 47 Portlish found a good combination between gennaker (with furler) and parasailer. “Gennaker was used for 110°-160° AWA and also during the night, parasailer for 160°-180°.” However, they advised it’s not easy without a pole: “We would add a spinnaker pole to be able to use a poled-out genoa for downwind sailing in above 25 knots of wind.”
The 53ft bluewater catamaran Lost Abbey favoured goosewinging either their spinnaker, asymmetrical or screecher with the genoa, but still would have liked a parasailer. Norwegian RCC Majestic 530 Tempus seconded this: “If money were no object I’d buy a parasailer.” Instead, they mostly used “the asymmetric spinnaker on either bow plus one to two reefs in main”.
FP Lucia 40 Wanderlust used a Code 0 and asymmetric the most: “both behaved well downwind and sometimes we flew both side-by-side”. They caution: “big mainsails and booms are a pain downwind!” While the new Excess 15 Vida Loca adds: “as the rig required the mainsail to be flown with the gennaker, our sailing angles in decent wind were 160° AWA”.
Nautitech 46 Open Pinnacle found their most effective sailplan to be: “TradeWind with third reef, next asymmetric with third reef – downwind sails need less mainsail in the less wind,” they warn after they had problems with their snuffer twisting. The sail lashing at the head of the TradeWind also chafed through, tearing the sail as it came down. Which leads us to other sail handling problems…

Sewing sail repairs on the Contest 50CS Athena. Photo: Philip Mrosk/Athena/WCC
Problems & repairs
Having your ideal sailplan is one thing, but what do you do when that breaks? The majority of ARC skippers experienced failures with sails and their handling, mostly with tears they needed to repair, and the overriding advice is to carry plenty of tape and patches, a sewing machine if possible, an extensive sewing kit if not.
“With a good sail repair kit a sail can always be repaired,” the crew on Penny Oyster advise. Grand Soleil 46LC Mandalay suffered a torn clew and luff in their headsail and a torn batten pocket in the main, but report all were “hand stitched or taped and held OK”. After the A-sail “ripped from leech to luff” on the new Oyster 595 JaZoFi, the crew stitched and taped the 12.5m tear, “but only had a 25m roll of 50mm tape”. Frustratingly, the repair only lasted an hour.
Chafe to sheets and halyards is the other biggest issue on long downwind passages. “We had chafing on pole ends caused by metal eyes on sheets,” Jeanneau Sunshine 38 Cloud Jumper warns. “We failed to use plastic balls to prevent damage until too late.”
There were also a large number of halyard failures last year, including two spinnaker halyards and the genoa halyard on the Alloy Yachts Irelanda alone.
Amel 60 Mrs G and Jeanneau Sun Odyssey 44 Moyfrid both snapped gennaker halyards: “the halyard fell down inside the mast – unable to retrieve it while underway,” Moyfrid bemoans. “Carry spare halyards to replace any that chafe or break,” is Hermione III’s advice.

Final thoughts
Having compiled this survey for over 15 years, it’s clear to see that ARC yachts are getting newer and larger and their owners are increasingly happy to spend that bit extra to get the best out of their yachts or find their ideal sailplan.
Today’s easily set and handled Code sails and asymmetrics offer a completely transformative experience during most of the test sails I do on these new boats. But for a tradewind passage I’d choose a specialist downwind sail, budget and space willing, and/or make sure I had a pole and headsail large enough to goosewing effectively.
Know your sails’ limits (in wind and waves) and what you would default to over certain strengths, remembering that tradewinds can be strong for days and nights at a time.
Then get comfortable with your downwind setup so all crew can safely manage and ideally reef it short-handed, identify chafe points in advance, and have a backup plan including spares and repairs.
Your dream crossing should be just that, so take the stress out in advance if you can – and enjoy the ride!
If you enjoyed this….
Yachting World is the world’s leading magazine for bluewater cruisers and offshore sailors. Every month we have inspirational adventures and practical features to help you realise your sailing dreams. Build your knowledge with a subscription delivered to your door. See our latest offers and save at least 30% off the cover price.
Sailing Terms: A Complete Guide

Last Updated by
June 15, 2022
Learning sailing terms when you first get into boating can be a daunting task.
Some sailing terms are logical, like 'fore' means forward or front of the boat, while others might as well be in a different language. Athwartship, for example. Nothing in our daily lexicon gives any clues as to what that might mean. Like it or not, it's time to dust off the old noodle and get to memorizing some new vocab words!
Knowing the difference between a clew and a tack, a luff and a leech, will help you communicate with your sail maker regarding which part of your sail needs resewn. If you need to have your rigging adjusted, you must know the difference between your shrouds and your stays, your standing rigging vs. your running rigging.
By educating yourself in the correct names of all parts of your sailboat, you can avoid situations in which you may need to use terms such as ‘thingy’ or ‘that round part at the end of that thing’. While even the most seasoned sailor occasionally troops over the vernacular, it is always beneficial to have as wide a nautical vocabulary as possible. Many in the sailing community get by without knowing the entire sailing dictionary, but if you’re interested in avoiding vocabulary embarrassment, check out the list I’ve compiled of sailing terms that every sailor ought to know.
I’ve been sailing on and off throughout my life and I know from experience that it is incredibly helpful to know the correct terms for each part of your sails, rigging, and boat.
Sailors are among the kindest, most helpful people you’ll ever meet. But, if you’re looking for help on why you’re not getting the most speed out of your mainsail and you know don’t know the correct terms for each part of the sail, it may be hard to get advice from you fellow sailor on why ‘the back of the mainsail is flappy’. They would be more likely to give useful advice if you’re able to tell them that you’re struggling to keep wind in the roach of your mainsail. Check out my list of sailing terms and see if a few don’t stick. I’ve done my best to include pictures when possible.
Table of contents
Sailing Terms
Abeam : When an object, craft or island is abeam your vessel, that means that it is off the side of your boat. It is 90 degrees from the centerline of your boat.
Abaft : Toward the stern. “Honey, have you seen my boat shoes?” “They’re abaft the navigation table!” This is the opposite of forward.
Aft : In the stern of the boat. For example, the back cabin is referred to as the aft cabin.
Apparent wind : The wind direction and speed which the crew observes to be blowing in combination with the true wind. This is often different from the true wind direction and speed due to the boat's motion.
Astern : The area behind the boat. If you go astern, you are going in reverse.
Athwartship : Directionally perpendicular to the centerline of the boat.
Backing (a sail) : Forcing the sail to take wind into its opposite side by pulling the sail to the opposite side of the boat.
Backstay : The wire that runs from the back of the boat to the mast head. This prevents the mast from falling forward.
Bailer : Any scoop-like container that is used to remove water from within a vessel’s hull.
Ballast : Weight which adds stability to the vessel. The weight usually is composed of lead or iron and placed low in the boat's hull, such as within the keel.
Batten : a thin, flexible strip (often fiberglass) that is inserted into the main sail to help it stay open to the wind. The batten runs from the back edge of the sail (leech) toward the front edge (luff).
Beam : The width of the vessel at its widest point.
Beam reach : Sailing with the wind blowing perpendicular to the direction the boat is traveling.
Bearing off or Bearing away : Steering the boat away from the direction in which the wind is blowing.
Bend : a knot which connects two ropes.
Berth : A slip, a mooring, or a bed within the boat.
Bight : A bend or loop in a rope. When a rope forms a bight, it has changed direction 180 degrees.
Bilge : The lowest area within a boats hull. This area collects water which is then pumped overboard by a bilge pump.
Bimini : The covering over the cockpit. Usually constructed from a stainless steel frame covered with canvas or fiberglass. It provides protection from sun and rain, but not wind.
Binnacle : The pedestal centrally located in the cockpit that generally holds the steering wheel and navigational instruments.
Block : A pulley.
Boom : This pole runs perpendicular to the mast and holds the bottom of the mainsail in place. Its position is adjustable side to side as needed for the wind direction.
Boom vang : A tackle which ensures that the boom does not lift upward from wind pressure in the mainsail.
Boot Top or Boot Stripe : The stripe of tape or paint between the boat's underwater (bottom) paint and it’s above water (topside) paint.
Bow : Front end of the boat
Bowsprit : The forward most protruding pole or platform which some boats possess. This spar allows for the sails and rigging to be attached further forward.
Broach : When a boat sailing downwind accidentally ends up sideways to the waves and heels over dangerously. This can be caused by large seas or poor steering.
Broad reach : Sailing with the wind coming off your stern quarter. If you’re standing at the helm facing the bow, the wind is blowing halfway between the side and the back of the boat.
Bulkhead : The walls in a boat which run athwartship, or perpendicular to the centerline of the vessel.
Capsize : When a vessel tips over past 90 degrees.
Catamaran : A vessel with two hulls.
Centerboard : A retractable keel which helps the sailboat maintain course and stability underway. When raised, the vessel is able to enter shallow waters.
Centerline : An imaginary line that runs from the center of the bow to the center of the stern.
Chainplate : A metal plate that is secured to the boat's hull to which wires supporting the mast are attached. The chainplates may be exterior or interior, visible or hidden.
Chandlery : A store that sells boat supplies and parts.
Cleats : The wooden or metal piece to which ropes are secured.
Chock : A fitting that a line passes through to change direction without chafing.
Clew : The lower back corner of a sail. This is where the foot and leech of the sail meet.
Close-hauled : Sailing as close to the direction the wind is coming from as possible with the sails pulled in tight. (See Points of Sail for infographic.)
Close Reach : Sailing between close hauled and beam reach. (See Points of Sail for infographic.)
Coamings : The lip around a hatch or window which stops water from entering. Also the raised area around the cockpit to keep out water.
Cockpit : The area from which steering occurs. This can be in the center of the boat or in the back of the boat.
Companionway : The doorway into the cabin.
Cotter pin : a bendable metal pin which is inserted into a metal rod then bent to lock it in place.
Daybeacons : Markers for navigation which are on posts. These are red or green.
Dead run : Sailing with the wind coming from directly behind the boat. Sails are fully out to catch the wind.
Dead reckoning : Determining a vessel's position by knowing the direction and speed traveled.
Dinghy : A small boat which is used to travel to shore from the main vessel. This can be propelled oars or a motor.
Dodger : The structure at the front of the cockpit which protects the cockpit and companionway from wind and spray. This is generally made of stainless steel frame covered with canvas and plastic windows. It can also be a solid structure with solid windows.
Dismasting : When the mast breaks off the boat. This can occur due to rigging failure or structural failure of the mast.
Displacement : The weight of the water that would otherwise be in the place of the boats hull.
Drogue : A sea anchor which is deployed to help control the drift of a vessel. It can be constructed like a parachute, bucket, or even a rope dragging behind the boat.
Ebb tide : After high tide when the water is receding towards low tide.
EPIRB : Stands for Emergency Position Indicating Radio Beacon. This device transmits a distress signal to emergency services and notifies them of a vessel's location.
Fairlead: A fitting which encloses a line within a smooth ring and helps guide its direction.
Fathom : A measurement of water depth equal to 6 feet.
Fid : A pointed tool used when splicing a line.
Fiddle : The raised edge around a table which prevents objects from falling off as the boat rocks or heels.
Fix : Determining a vessel's location by using the compass bearing of two or more fixed points of reference such as landmarks or buoys.
Fin keel : A fixed, ballasted keel which is centrally located beneath the hull. It does not run the full length of the hull.
Flogging : When a sail flaps noisily because it is not being filled by the wind.
Flood tide : Time period between low tide and high tide when the water is rising.
Foot : The bottom edge of a sail.
Fore : At or near the bow of a vessel.
Forestay : The wire which leads from the bow to the top of the mast. The forward most sail attaches to the forestay either directly or by use of a roller furling system.
Full keel : A fixed, ballasted keel which runs the full length of the hull.
Furling system : A system around which the sail wraps when not in use and is unwrapped for sailing. This may be around the forestay or within the mast.
Freeboard : The distance on a vessel from the waterline to the deck.
Galley : The kitchen on a boat.
Gelcoat : A colored resin which is painted onto the outside surface of a boat and forms a protective glossy layer.
Genoa : A large forward sail which, when fully extended, comes back past the mast. Larger than a jib sail.
Gimbals : Often attached to a boat's stove, it is the fitting which allows an object to maintain an upright position when a vessel heels.
Gooseneck : The point at which the boom attaches to the mast. It allows the boom to move in all directions.
Ground tackle : The anchor, chain, and line used to fix a boat to the bottom when anchoring.
Gunwale : Pronounced “gunnel”. This is the top edge of a boat's hull.
Halyard : The line which attaches to a sail to raise it.
Hanks : The clips that attach the front edge (luff) of a sail to the forestay.
Hatch : An opening window in the cabin roof much like a skylight.
Head : Bathroom on a boat. Also, the uppermost corner on a sail.
Headway : The forward motion of a vessel through the water.
Heave to : A method of controlling a boat’s position to the waves and limiting headway by backwinding the forward sail and keeping the rudder hard over into the wind.
Heel : The tilt that occurs to a boat's hull when the sails are filled with wind.
In-Irons : When a sailboat is bow into the wind with sails flapping. No steerage is possible as the vessel has no forward motion. (See Points of Sail for infographic.)
Jackline or Jackstay : Lines that are run from the bow to the stern. To these safety lines, sailors attach a lanyard connected to their harness so that they may work on deck without fear of being swept overboard in rough seas.
Jib : A triangular forward sail.
Jib sheets : Lines used to control the jib.
Jibing : Pronounced with a long i sound. Steering the boat from one downwind direction to another downwind direction by turning the stern of the boat through the wind. This will cause the sails to move across the boat to the other side, i.e. from port to starboard.
Kedge anchor : A small, lighter second anchor.
Keel : The bottom most part of a boat's structure. This part provides ballast and stability.
Ketch : A sailboat with two masts. The forward mast is the taller mast.
Knot : Regarding speed, one knot is equal to one nautical mile per hour.
Lazyjacks : Light lines that run from the boom to the mast and help contain the mainsail while it’s being lowered to the boom.
Leech : The back edge of a sail. If the sail is square, then this term refers to the outside edges of the sail.
Lee shore : The shore onto which the wind is blowing. On an island, the side of the island facing into the wind is the lee shore.
Leeward : The direction to which the wind is blowing. If the wind is coming from the north, then south is leeward.
Luff : The forward edge of the sail.
Lying a-hull : When a vessel is drifting with all of it’s sails down.
Mainsail : Pronounce main’sil. The primary sail of a boat that is hoisted up or unfurled from the mast.
Mayday : An emergency call put out over a marine radio when there is clear and present danger to the crew of the vessel.
Mizzen : The shorter mast behind the main mast on a ketch.
Monohull : A vessel with a single hull.
Mooring field : An anchorage in which permanently anchored buoys are present to which vessels may be secured.
Multihull : A vessel with more than one hull such as a catamaran or trimaran.
No-sail zone : This is an area 45 degrees to either side of directly into the wind. It is not possible for a boat to sail in this zone as the sails cannot fill with wind. Tacking is necessary. (See Points of Sail for infographic.)
On the hard : When a vessel is out of the water and being stored on land.
Painter : The line which secures the bow of a dinghy to the main boat.
Pan Pan : Pronounced pon-pon. This is an urgent distress radio call which is used when a vessel needs assistance. It is one step below Mayday.
Points of sail : The vessels course in relation to the direction of the wind.
Port : The left side of the boat when facing forward.
Port tack : Sailing with the wind hitting the port side of the vessel and the sails are out on the starboard side.
Pulpit : The metal rails at the bow of the boat which protect the crew from going overboard.
Pushpit : The metal rails at the back of the boat to protect the crew from going overboard.
Quarter : The back corner area of the boat. This area is 45 degrees behind, or abaft, the beam of the vessel.
Reef : reducing the size of the sail in high winds for the safety of the crew and equipment. This is done by either tying or rolling the sail to the boom or forestay.
Rigging : All the wires and ropes used to hold the mast in place and adjust the sails.
Roach : The outer back edge area of the mainsail. If you were to draw a diagonal line from the head of the sail to the clew (back corner), the roach would be outside this diagonal line.
Roller furling : A system which rolls the sail up when not in use. The sail is stored on the roller either at the mast or boom for the mainsail, and at the forestay for the jib or genoa.
Rudder : Steering fin at the back of the boat. Controlled by a steering wheel or tiller from the cockpit.
Running : Sailing in a downwind direction.
Running rigging : The lines, such as sheets and halyards, which control the sails.
Schooner : A sailing vessel with two or more masts. The mainmast is at the back.
Seacock : a valve which can be open or closed to allow water to flow in or out of a through hull fitting.
Scope : The length of chain and line that is between the anchor and the boat.
Scuppers : Deck drains which allow water to flow overboard.
Securite : Pronounced securi-tay. This is a radio call to provide mariners with local marine safety information.
Shackle : A metal U or D shaped link which has a removable pin through the ends.
Sheet : A line or rope which connects to the clew (back corner) of a sail. It is used to control or trim the sail.
Shrouds : Wires or ropes which run from the deck chainplates to the mast. The shrouds prevent the mast from moving side to side.
Skeg : A section of the hull from which the rudder hangs. It provides a variable amount of protection to the rudder depending on its size.
Sloop : A single masted sailboat with a mainsail and a foresail.
Slugs : Fittings on the front edge (luff) of the mainsail that slide into the mast track for hoisting the sail.
Spinnaker : A large, light, often colorful sail that is used off the bow of the boat for sailing downwind (running).
Splice : Connecting two lines together by weaving their strands together.
Spreaders : The horizontal arms extending out from the sides of the mast.
Spring line : Dock lines positioned from the bow to a midship point on the dock or from the stern to a midship point on the dock. This line configuration helps decrease forward and backward motion of the boat while docked.
Stanchions : The metal posts along the outside edge of the deck through which the lifelines run.
Standing rigging : The wires and ropes, such as the shrouds and stays, that are permanently in place and hold up the mast.
Starboard : The right side of the boat when facing forward.
Starboard tack : Sailing with the wind hitting the starboard side of the boat and the sails out on the port side.
Stays : The wires or ropes which run from the bow and stern to the mast top to keep the mast from moving forward or backward.
Steerage way : When a vessel is moving through the water with enough speed to allow the rudder to steer the boat.
Stern : The back end of a boat.
Storm jib : A small, strong forward sail used in heavy winds.
Swing : The circular motion of an anchored boat around it’s anchor due to wind and water movement.
Tack : The forward lower corner of a sail.
Tacking : Turning the boat across the direction the wind is coming from to change course direction. This causes the sails to travel to the other side of the boat.
Tender : Small boat used to transport from shore to the main boat.
Tiller : A bar which controls the rudder and is used to steer the boat from the cockpit. It is used in place of a steering wheel.
Toe rail : The raised lip around the edge of the deck. This can be constructed of wood, fiberglass, or aluminum. It helps prevent items from rolling overboard.
Topping lift : A wire or rope which runs from the back end of the boom to the mast top. This line controls the height of the boom.
Trysail : A small, strong storm sail that is used in place of the mainsail in high winds.
Trim : To adjust the sails.
Winch : A round, drum-like mechanical device used to pull on a line to raise or adjust sails.
Windlass : A winch used to raise and lower the anchor.
Windward : The direction from which the wind is blowing.
Wing on wing : Sailing downwind with the mainsail out on one side and the foresail on the opposite side.
Related Articles
Beth lives on board her 1983 30ft S2 sailboat with her husband, 6 year-old son, and her two fur babies. She has been sailing and boating for most of her life. Beth has been blessed to experience cruising in the Great Lakes, the Bahamas, and in Alaska. She loves to travel and adores living on her tiny boat with her family.
by this author
Most Recent

What Does "Sailing By The Lee" Mean?
Daniel Wade
October 3, 2023

The Best Sailing Schools And Programs: Reviews & Ratings
September 26, 2023
Important Legal Info
Lifeofsailing.com is a participant in the Amazon Services LLC Associates Program, an affiliate advertising program designed to provide a means for sites to earn advertising fees by advertising and linking to Amazon. This site also participates in other affiliate programs and is compensated for referring traffic and business to these companies.
Similar Posts

How To Choose The Right Sailing Instructor
August 16, 2023

Cost To Sail Around The World
May 16, 2023

Small Sailboat Sizes: A Complete Guide
October 30, 2022
Popular Posts

Best Liveaboard Catamaran Sailboats
December 28, 2023

Can a Novice Sail Around the World?
Elizabeth O'Malley

4 Best Electric Outboard Motors

How Long Did It Take The Vikings To Sail To England?

10 Best Sailboat Brands (And Why)
December 20, 2023

7 Best Places To Liveaboard A Sailboat
Get the best sailing content.
Top Rated Posts
Lifeofsailing.com is a participant in the Amazon Services LLC Associates Program, an affiliate advertising program designed to provide a means for sites to earn advertising fees by advertising and linking to Amazon. This site also participates in other affiliate programs and is compensated for referring traffic and business to these companies. (866) 342-SAIL
© 2024 Life of Sailing Email: [email protected] Address: 11816 Inwood Rd #3024 Dallas, TX 75244 Disclaimer Privacy Policy
Everything you need to know about Changing Sails on your Sailboat

Table of Contents
Step by Step Guide on How to Change Sails on a Sailboat
Changing damaged sails on a sailboat can be a daunting task, but with the right tools and knowledge, it can be done quickly and efficiently. In this blog post, we will go over the step-by-step process of changing damaged sails on a sailboat.
Step 1: Gather the necessary tools and materials Before you begin, make sure you have all the necessary tools and materials. This includes a new sail, sail repair tape, scissors, a needle and thread, and a sail repair manual.
Step 2: Remove the damaged sail To remove the damaged sail, first, lower the sail using the halyard and then remove the sail from the sailboat. Take care to fold the sail properly to prevent further damage.
Step 3: Inspect the sail Once the sail is removed, lay it out flat on a clean surface and inspect it for any tears or holes. Mark the damaged areas with a pen or marker.
Step 4: Repair the sail Using the sail repair tape, patch up any small holes or tears in the sail. For larger holes or tears, use a needle and thread to sew the sail back together. Make sure to use a strong thread that is the same color as the sail.
Step 5: Reinforce the sail To reinforce the sail and prevent future damage, use sail repair tape to create a patch around the area that was repaired. This will provide extra support and make the sail stronger.
Step 6: Reinstall the sail Once the sail has been repaired, it’s time to reinstall it on the sailboat. Start by attaching the sail to the mast using the halyard. Next, attach the sail to the boom using the outhaul and the downhaul. Finally, adjust the sail to the proper shape and tension.
Step 7: Test the sail Once the sail is installed, take the sailboat out for a test sail. Make sure the sail is properly adjusted and that there are no further issues.
Changing damaged sails on a sailboat can be a time-consuming task, but with the right tools and knowledge, it can be done quickly and efficiently. By following these steps, you can ensure that your sailboat is ready to hit the water again in no time.
Note: This is a general guidance and it’s always best to consult the manufacturer’s manual and/or consult a professional sailor or sail repair specialist if you are not sure of something.
Is it time to replace/maintain my sails?
One of the most important parts of maintaining your boat is keeping an eye on your sails and knowing when it’s time to replace or repair them.
One of the first signs that your sails may need to be replaced or repaired is if they begin to show signs of wear and tear, such as frayed edges, holes, or tears. These signs can be caused by a variety of factors, including exposure to the sun, wind, and water, as well as improper use or storage. It is important to inspect your sails regularly and address any issues as soon as they arise to prevent further damage.
Another sign that your sails may need to be replaced or repaired is if they are no longer able to hold their shape or maintain proper tension. This can be caused by a variety of factors, including stretching, shrinkage, or damage to the material. If your sails are no longer able to hold their shape, it can make it difficult to control your boat and can also increase the risk of capsizing.
If you notice any signs of wear and tear or damage to your sails, it’s important to address the issue as soon as possible. This may involve repairing or patching small holes or tears, or replacing your sails entirely. It is also important to take proper care of your sails by storing them in a dry, cool place and making sure that they are properly cleaned and maintained.
In summary, the key to maintaining your sails and ensuring that your boat is in good condition is to keep an eye on the condition of your sails and address any issues as soon as they arise.
Pros and Cons of Repairing/Replacing Damages Sails
| – Cost-effective | – Can provide a new and improved sail with updated materials and technology |
| – Can be done quickly and easily with the right tools and knowledge | – Can improve overall performance and efficiency of the sailboat |
| – Saves the environment by not disposing of the sail | – Can provide a fresh and new look to the sailboat |
| – May not be as strong or durable as a new sail | – Can be expensive |
| – May not provide the same level of performance as a new sail | – May not be the most environmentally friendly option |
| – Repaired areas may be visible | – May require more time and effort to install |
Please note that this is a general table and the pros and cons may vary depending on the specific situation and the type of sail.
Where to buy new sails
There are a variety of places where you can buy new sails for a sailboat. Some options include:
- Sailmakers and sail lofts: Many sailmakers and sail lofts specialize in creating custom sails for sailboats. They can create sails tailored to your specific needs and preferences.
- Marine supply stores: Many marine supply stores carry a wide range of sails, including replacement sails for specific sailboat models.
- Online retailers: You can also purchase new sails online from a variety of retailers. Some popular online sail retailers include Sailrite, US Sailmakers, and North Sails.
- Sailboat manufacturers: Many sailboat manufacturers also sell replacement sails for their specific models.
- Sailboat dealers: Some sailboat dealers also carry replacement sails for the sailboats they sell.
When buying a new sail, it’s important to consider factors such as size, material, and intended use. It’s also a good idea to consult with a professional sailor or sail repair specialist to ensure that you get the right sail for your sailboat.
Tips of how to choose which sail to buy
When choosing a new sail for your sailboat, there are a few key factors to consider:
- Size: Make sure the sail you choose is the right size for your sailboat. The size of the sail is determined by its luff, leech, and foot measurements.
- Material: The choice of material for your sail will depend on the intended use of the sailboat. Dacron is a popular and durable material for cruising sails, while laminate materials like Mylar or Kevlar are used for racing sails because they are lightweight and strong.
- Shape: The shape of the sail will also affect its performance. Full-batten mainsails and roller furling headsails are popular options for cruising sailboats, while racing sailboats often use a square-top main and a jib with a smaller roach.
- Intended use: Consider the type of sailing you will be doing and choose a sail that is suitable for that purpose. For example, if you will be doing a lot of racing, a high-performance racing sail would be a good choice.
- Brand reputation : Look for sailmakers that have a good reputation and a track record of producing high-quality sails.
- Price: Finally, consider the cost of the sail, and compare it to the other options available.
It’s always a good idea to consult with a professional sailors or sail repair specialist to ensure that you get the right sail for your sailboat. They can provide expert advice and help you choose the best sail for your specific needs and preferences.
How important is a Sail on a Sailboat
Sails are extremely important on a sailboat as they are the primary means of propulsion. A sailboat’s ability to move through the water is dependent on the wind and the sails’ ability to harness that wind energy and convert it into forward motion. Sails are also an important safety feature as they can be used to control the direction and speed of the boat, which can be crucial in emergency situations.
A well-designed and properly maintained sail can also greatly affect the performance and efficiency of a sailboat. The right sail can help a sailboat reach its maximum speed and maneuverability, making sailing more enjoyable and efficient.
Additionally, sails are an important part of the aesthetics of a sailboat, and a new or well-maintained sail can give a sailboat a sleek and polished look.
In summary, sails are crucial for the propulsion, safety, performance, and aesthetics of a sailboat. Proper maintenance and care of the sails are crucial for the sailboat to function properly and safely.
Are there designer brands of sails?
Yes, there are designer brands of sails available. These are typically high-end sail manufacturers that are known for producing high-quality and innovative sails for sailboats. These brands are often associated with performance, technology, and design and have a reputation for producing top-performing sails that are made with the latest materials and manufacturing techniques.
Examples of designer sail brands include:
North Sails
Doyle sails, quantum sails, uk sailmakers.
Ullman Sails
These brands have a reputation for producing high-quality and high-performing sails that are made with the latest materials and manufacturing techniques. They can be more expensive than other sails, but they offer many advantages, such as better performance, longer lifespan, and a unique look. It’s always a good idea to consult with a professional sailors or sail repair specialist to ensure that you get the right sail for your sailboat.
Do you need necessarily a specialist to change a sail for you?
You do not necessarily need a specialist to change a sail on your sailboat. However, it can be helpful to have the assistance of someone who has experience in working with sails, as they will have the knowledge and skills needed to properly measure and install the new sail. Changing a sail can be a complex task that involves working with ropes, pulleys, and other hardware, as well as dealing with wind and weather conditions. Additionally, it’s a task that requires attention to detail and the ability to work in confined spaces.
If you are not familiar with sail handling, rigging and maintenance, it is recommended to seek the help of a professional sail maker or sail repair specialist. They can also help you to choose the right sail for your boat and your needs, and will be able to repair or replace your sails with the right technique and materials.
If you choose to change the sail yourself, make sure to read the instructions carefully and practice safety precautions. Always wear protective gear, such as gloves and goggles, and never work alone. If you are not confident in your abilities, it’s best to seek the help of a professional.
Which type of sails are the most difficult to change
Some types of sails are more difficult to change than others, depending on the design and construction of the sail, as well as the type of boat it is used on. Some of the most difficult sails to change include:
- Mainsails: The mainsail is the largest sail on a sailboat and is typically the most difficult sail to change. It is attached to the mast and boom, and can be difficult to remove and replace due to its size and weight. Additionally, the mainsail is often used to control the speed and direction of the boat, so it is important to ensure that it is properly adjusted and tensioned.
- Spinnakers: Spinnakers are large, balloon-shaped sails that are typically used for downwind sailing. They can be difficult to change because they are often used in conjunction with other sails, such as the jib or genoa, and require coordination between the crew. Additionally, spinnakers are typically made of lightweight and delicate materials, which can be easily damaged if not handled properly.
- Gennakers: Gennakers are similar to spinnakers and are used for downwind sailing, but are more user-friendly and are typically easier to handle and change.
- Square-rigged sails: Square-rigged sails are typically used on larger, traditional sailing vessels and can be difficult to change due to their size and complexity. They are typically made of heavy materials and require a large crew to handle them.
It’s important to note that changing any sail requires a certain level of skill and experience, and it’s always best to consult with a sail repair specialist or professional sailors to ensure that you get the right sail for your sailboat.
Which type of sails are the easiest to change?
Some types of sails are generally considered to be easier to change than others, depending on the design and construction of the sail, as well as the type of boat it is used on. Some of the easiest sails to change include:
- Jibs: Jibs are triangular sails that are located at the front of a sailboat and are typically the easiest sail to change. They are smaller in size compared to other sails and are relatively easy to handle and replace.
- Genoas: Genoas are similar to jibs but are larger and are typically used in conjunction with the main sail. They are also relatively easy to change, but may require more skill and experience than a jib.
- Roller-furling sails: Roller-furling sails are sails that are designed to be easily rolled up and unrolled, making them easy to change. They are typically used on smaller sailboats and are a popular option for sailors who are looking for a more user-friendly sail.
- Dacron sails: Dacron is a type of synthetic fabric that is commonly used in sailmaking. Sails made of Dacron are relatively easy to change, as they are strong and durable, but not as expensive as other types of sails.
In conclusion, changing sails on your sailboat can seem like a daunting task, but with the right knowledge and preparation, it can be a smooth and enjoyable process. Remember to assess the damage on your current sail, consider the pros and cons of repairing versus buying a new one, choose the right replacement sail, and consult with a sail repair specialist or professional sailor for guidance. Additionally, be aware of different sail manufacturer brands, the average prices and durability estimation.
In this blog post, we’ve provided you with a step-by-step guide on how to change sails on your sailboat, as well as tips on choosing the right sail and information on popular sail manufacturers. By following the information provided in this post, you’ll be able to change your sails with confidence and get back to enjoying your time on the water.
Steven T. Anderson
Steven Taylor Anderson is an experienced sailor and author who writes for sailingbetter.com. He has been sailing for over 20 years across the USA and has taken several courses to improve his skills. He has also navigated throughout the world on various boats and yachts. His passion for sailing and knowledge of the sport shines through in his writing, making him a respected authority on the subject.
Recent Posts
Lagoon vs Leopard Catamaran: Which Sailboat Is Right for You?
Introduction When it comes to cruising on the open waters, catamarans have gained immense popularity for their stability, space, and comfort. Two of the leading catamaran manufacturers, Lagoon and...
How to Determine Sailboat Weight: A Comprehensive Guide
Introduction Sailing is a thrilling and adventurous activity that has captivated humans for centuries. Whether you are a seasoned sailor or a novice looking to set sail for the first time,...
The 6 Points of Sail: An Illustrated Guide

Depending on the direction of the wind and where you’d like to take your sailboat, you’ll need to consider which point of sail to be in. Whether you’re sailing upwind (windward) or sailing downwind (leeward), your sails will either take on the characteristics of an airplane wing or a parachute.
So what are the points of sail on a sailboat? The points of sail include into the wind (in irons), close hauled, close reach, beam reach, broad reach, and running, which go from windward to leeward and are all symmetric from port to starboard.

Knowing the points of sail on a sailboat is important in terms of being knowledgeable about how your sailboat generates wind power while also being able to properly communicate with your crew.
It’s also important to understand the difference between upwind sailing and downwind sailing.
There’s a lot of sailing terminology to hash out here as well, so let’s dive into all the different points of sail and learn what they all really mean.
Points of Sail
A point of sail is the direction of a sailboat’s journey while taking into consideration the direction of the true wind as opposed to apparent wind.
The difference between true wind and apparent wind is that true wind is the wind that’s felt by something or someone in one place (like on land) while apparent wind is the wind felt when on the move (like on a sailboat).
The points of sail, when combined, complete a full 360 degrees. Starting from the top (0 degrees) all the way to the bottom (180 degrees), we’ll now explore the different points of sails.
1. Into the Wind (In Irons)
Being into the wind or in irons means your sailboat is going straight into the wind (plus or minus 45 degrees from 0), which will prevent your sailboat from… sailing!
Being into the wind can’t be 100% avoided, and it shouldn’t be, but it’s generally not where you want to be if you plan on moving.
The into the wind point of sail is more often a pivot point for when performing other sailing actions including tacking as well as raising and lowering the mast.
When tacking, your point of sail will change from one side of the sailboat to another while crossing the into the wind point of sail. If you’re not able to cross this point of sail fast enough and get stuck, this is called being “taken aback”.
This is also considered the “no-go zone” or “no sail zone” because, you guessed it, you won’t be going anywhere fast when in this space for too long.
If your sailboat’s in the into the wind point of sail for a long enough time, your sailboat will lose all forward momentum and end up sitting around.
2. Close Hauled
The close hauled point of sail is a tad bit greater than the 45-degree mark on either side of the sailboat.
When at this point of sail, you’ll sail upwind and is often called “beating” as well as “working windward” since your boat is moving toward the wind. Sailing close hauled means you’ll be feeling the wind much more as a captain and crew member!
While sailing close hauled, your sail will be functioning as similar as it can to a wing on an airplane due to it cutting the wind dead on resulting in generating a lot of life.
As a matter of fact, this is when you’ll have the tightest sail trim. The closer you are to the wind (or the “no-go zone”), the more to “point” your sailboat will be.
3. Close Reach
As your sailboat “bears away” (moves away from the wind), it’ll enter the close reach point of sail. This point of sail sits right in between the close hauled and beam reach points of sail on either the port or starboard side of a sailboat. Close reach is a fun and fast point of sail for many sailors!
Close reach is the closest point of sail to the “no-go zone” as any other point of sail, so it’s important to pay attention to the wind and your boat sails.
Since sail trim is so important when it comes to your sailboats speed, it’s important in a close haul to keep your sail tight (similar to a close hauled point of sail) but loose enough so it’s just on the verge of luffing.
4. Beam Reach
When entering a beam reach point of sail, your sailboat will be perpendicular to the wind either on the starboard or port side.
Being in beam reach means you’ll be letting your sails halfway out and you’ll be moving relatively faster than other points of sail. As a matter of fact, it’s known to be the fastest point of sail when on a sailboat!
Not only is beam reach the fastest point of sail on a sailboat, but it’s also the most comfortable due to having more control.
The way in which the wind hits your sails at this point of sail means your boat will be transferring energy more efficiently from the sideways force of the wind to the propelling motion forward.
5. Broad Reach
Moving away from a beam reach and into a broad reach point of sail results in letting your sails out about 2/3 of the way.
At this point of sail, the wind is not coming astern from your sailboat and your sail will act more like a parachute than a wing. Now that you’re sailboat’s heading downwind, you’ll also feel a little less of a windy feel but still should be chugging right along.
Since a sail will be out almost the entire way when in a broad reach point of sail, it’ll start to feel like you’re going downhill when it comes to the wind.
While your sailboat won’t yet be truly going entirely downwind, you’ll be on the verge of entering it.
While not the fastest point of sail, I’m a personal fan of broad reach since we’re going at a decent speed and it feels much calmer (in terms of the wind speed) than more windward points of sail.
When you let your sails out the most they can go and the wind is coming directly behind your sailboat, you’ll sail downwind and you’re definitely on a running point of sail.
This point of sail can truly feel like you’re running downhill since you have the force of the wind directly propelling you and your sailboat forward. As a matter of fact, it acts a lot like a parachute and really feels great!
Also known as a “dead run”, the running point of sail doesn’t require critical attention to be made on the sail trim.
Depending on the strength of the wind speed, this means you can consider putting up a genoa or spinnaker sail to really get your sailboat moving when sailing directly downwind.
If you feel that the wind is fairly constant in terms of direction and intensity, this is a great time to put those massive colorful sails up!
How a Sail Works
When I first learned how to sail, I thought the sail was always acting kind of like a kite and simply floating across the water. Well, it turns out that it’s a little more complicated and interesting than that!
As I mentioned before, the sail can act in two different ways: as a wing and as a parachute.
When in the close hauled, close reach, and partially the beam reach points of sail your sailboat’s sail is acting a lot like a wing .
Based on the magnitude and angle at which the true wind and sailboat are traveling, the combination of the two will produce an apparent wind force.

The transfer of energy to produce a forward moving force is mainly due to the sail, keel, and hull .
Essentially, the sail catches the wind’s energy forcing the sailboat to tilt to the side followed by resistance to this tilting from the keel allowing the hull to effectively cut through the water with the remaining force.
When in the broad reach and running points of sail, these forces are still at play resulting in a wing-like action, however, in these points of sail the true wind and sailboat forces are much more aligned.
Essentially, this produces more of a parachute effect as opposed to a wing since the apparent wind force is indistinguishable from the other forces.
Related Questions
What is the best point of sail? The best point of sail is based on personal preference, but the fastest and most comfortable point of sail is beam reach. The combination of the lateral force from the wind onto the sail and the resisting force from the keel produces the strongest forward-moving force on a sailboat.
What is the difference between a jib and genoa sail? Both a jib and genoa sail are sails hoisted at the fore of a sailboat with the genoa being larger in size. The genoa sail oftentimes overlaps the mast due to its size and is mainly used when in a running point of sail.
How do you turn a sailboat? Turning a sailboat occurs when performing a tack or jibe (gybe). Tacking happens when a sailboat is turning into the wind, which requires a traversal through the “no-go zone”. Conversely, jibing happens when traversing through the running point of sail.
Get the very best sailing stuff straight to your inbox
Nomadic sailing.
At Nomadic Sailing, we're all about helping the community learn all there is to know about sailing. From learning how to sail to popular and lesser-known destinations to essential sailing gear and more.
Quick Links
Business address.
1200 Fourth Street #1141 Key West, FL 33040 United States
Copyright © 2024 Nomadic Sailing. All rights reserved. Nomadic Sailing is a participant in the Amazon Services LLC Associates Program, an affiliate advertising program designed to provide a means to earn fees by linking to Amazon.com and affiliated sites.

How Sails Work: Understanding the Basics
Table of Contents
Last Updated on September 1, 2023 by Boatsetter Team
Sailing is all about physics and geometry but don’t worry, it’s not too hard to learn. Once the theory is down, it’s all a matter of practice. Let’s look at what sails are and how they work.
Book a sailboat rental & set out on your next expedition
Aerodynamics, hydrodynamics & modern sails
Sails work like airplane wings, except they’re vertical rather than horizontal. As the wind hits the front of a curved sail, it splits, passing on both the downwind (leeward) side and upwind (windward) side.
The leeward wind travels farther due to the curvature of the sail and creates a low-pressure area while the windward wind travels a shorter distance and reaches the aft end faster – together, they create aerodynamic lift that “pulls” the boat forward .
The keel or centerboard in the water below the hull prevents the boat from being pushed sideways. With the lift of the sails and the lateral push or hydrodynamics of the keel, the boat is propelled forward. Where the wind concentrates force in the sails is called the center of effort, while the keel below is called the center of lateral resistance.
Most modern sailboats have a forward (or headsail) and a mainsail. The headsail may be called a genoa, jib, or staysail (different sizes) and is attached at the top of the mast and leads down at an angle to the bow . It’s controlled by lines called sheets. The mainsail is supported by the mast and is attached at the bottom to a lateral spar called the boom.

Parts of a sail
Sails come in various shapes, but for our purposes, we will focus on modern, triangular sails. The top of the sail is called the head , and the bottom is the foot. The forward end of the foot is the tack, and the aft end is the clew. The forward edge of the sail is the luff, and the aft end is the leach.
Telltales or short strands of yarn are often attached near the leading edge of a sail to help with sail trim. The shape of the sail is ideal when the strands on both sides are streaming back at the same level, which indicates that wind is moving evenly along both sides of the sail.
READ MORE: Parts of a Sailboat
Points of sail
A boat cannot sail directly into the wind– instead, it sails at an angle to the true breeze. Close hauled is roughly 45 degrees off the wind, close reach is 60 degrees, beam reach is at 90 degrees, and a broad reach is approximately 150 degrees off the wind.
When moving directly or dead downwind, a boat is said to be running, and when the bow is pointed into the wind, that’s called being in irons. A boat cannot sail in irons and can be hard to control when running. When sails begin to luff at the leading edge, the boat is trying to sail too close to the wind and will stall.

Tacking and jibing (gybing)
A boat changes direction by either tacking or jibing. Sailing upwind, a boat tacks when the bow passes through the eye of the wind until the boat is sailing on the opposite side or “tack” creating a zig-zag course. When sailing downwind, the boat jibes when passing the stern through the wind.
Turning upwind is called heading up and turning away, or downwind is falling off. When the wind passes over the starboard rail first, you’re on a starboard tack and vice versa.
Pro Tip: You can learn how to sail without owning a sailboat. Find a sailboat rental near you , then book! You can save that boat listing and book again to continue practicing.
Sail shape & angle
Boats sail in true wind (the wind that is actually blowing at a given speed and angle) by they’re actually responding to the apparent wind (the angle and speed of the breeze that is felt once the boat is moving). The wind always changes speed and angle, so sails must be adjusted or trimmed in response to the boat to maintain optimal speed.
When sailing upwind, the sails are sheeted in (made flatter by pulling in the sheet lines) to create better foils and greater lift or pull. When sailing downwind, sails are usually loosened or let out to create a “belly” and adjusted to be as perpendicular to the angle of the wind as possible.
Sheeting in (bringing the sails closer to the centerline) enables the boat to point higher (sail closer to the true wind) while easing out (loosening the aft end of the sail) creates more power when the wind is aft like around the beam or broad reach.
A boat is more likely to heel when sheeted in and sailing upwind. Excessive healing doesn’t mean the boat is traveling faster. In fact, it may just be getting overpowered and becoming less efficient than if the sails were trimmed properly.

In high winds, shorten or reef sails so the boat doesn’t become overpowered and potentially dangerous. Reefing is done at the tack and clue or the forward and aft parts of the foot of the sail. There may be 1-3 pre-rigged reefing points controlled by reefing lines, so the sails can be made as small as necessary to keep the boat from heeling too far.
Easy to learn
Trimming sails takes time to master; let sails out until they luff or flap, and then sheet in until you feel the boat pick up speed. Smaller boats react quickly to each adjustment and are better for new sailors to learn on than large boats that take a minute to speed up or slow down. Once you’ve mastered the theory, you may spend years perfecting your sailing skills.
Boatsetter is a unique boat-sharing platform that gives everyone— whether you own a boat or you’re just renting — the chance to experience life on the water. You can list a boat , book a boat , or make money as a captain .
List. Rent. Earn— Only at Boatsetter
Zuzana Prochazka is an award-winning freelance journalist and photographer with regular contributions to more than a dozen sailing and powerboating magazines and online publications including Southern Boating, SEA, Latitudes & Attitudes and SAIL. She is SAIL magazines Charter Editor and the Executive Director of Boating Writers International. Zuzana serves as judge for SAIL’s Best Boats awards and for Europe’s Best of Boats in Berlin.
A USCG 100 Ton Master, Zuzana founded and manages a flotilla charter organization called Zescapes that takes guests adventure sailing at destinations worldwide.
Zuzana has lived in Europe, Africa and the United States and has traveled extensively in South America, the islands of the South Pacific and Mexico.
Browse by experience

Explore articles
Video - Former Miami Dolphin, Jason Taylor shares his top boating tips

Melbourne, Florida Boating Guide

7 Things NOT to Bring on a Boat

7 Tips for Boating With Cats
Better Sailing

How to Repair Sails On Your Sailboat
Even if you try to avoid any sail damage to your sailboat, there will be a time, unfortunately, when they get damaged at sea. So, what happens in the event of sail damage? Of course, the fact is that you’ll have to repair them while at sea and then quickly do a damage assessment. For that, you will probably need someone to lend you a hand and a flat surface to place the sail open. But before we get to the details on how to DIY repair a sail tear on your sailboat remember to be prepared for any unexpected scenario. In other words, having the right tools and supplies onboard gives you a huge advantage in dealing with the problem. Some of the basic tools include a waxed twine, a selection of sail needles, sharp scissors, spare webbing, and a sticky-back Dacron. Let’s move on and see the details!
Stitching your Sails
It is of great importance for a sailor to be able to stitch a sail by hand. If you know how to do this, it’s really practical in case of a chafe or of any other torn seams. The process is really simple. Firstly, make one pass to stitch on one set of diagonals as well as to the opposite direction and then fill in the other set. This can be applied in case you are following an existing zigzag stitch. Moreover, the sailor’s palm will facilitate you in order to force the needle through the fabric, and pliers will help you pull the needle through it. Remember to melt the ends of each knot with a lighter to prevent any loosening, as well as try to make tight stitches to ensure a strong repair. Buy a Sail Repair Kit From Amazon
Patch Repairs
For repairs that are not on a seam, a patch fix is necessary. You can use a Dacron patch for almost everything except spinnakers. Dacron can even stick to many laminate sails on the film side, but not on some resin-based and silicone-covered sails. In addition, dacron tapes come in different forms of thickness rolls and you can also buy larger sheets. Naturally, sails are not flat and they’re made up of panels that create depth. However, due to its design, when the surface you lay it on is flat it might pose you a problem. So do some temporary tucks and folds in the cloth, but away from the rip, and try to keep it flat. So, be patient and follow the below-mentioned procedure:
- The space you’re going to “work” is essential. Find a dry and safe place with a flat surface like below the saloon table or even on a chopping board.
- Always clean your fabric of salt with a freshwater rinse. Then allow a few moments for the fabric to dry. Continue by removing any residues with rubbing alcohol. This tip facilitates the drying process, as the alcohol evaporates.
- Most of the time, some sails (mostly white), tear in lines. For that reason, they shouldn’t be pulled too close together or overlap each other. Otherwise, their shape will change, and thus loading will be created. In case the tear has gone off in different directions repair the longest first.
>>Also Read: Best Sail Repair Tape
Seam Repairs
In order to make sure that no seams are starting to appear, try to check your sails daily. It’s not particularly hard for a seam to be unstitched, right in the middle of your voyage. So, if you see any loose stitching, put the sail down immediately, if possible, in order to get it fixed. Stitching a seam back together is a task that requires some time and attention. However, it’s much easier than dealing with ripped fabric. When you stitch seam you just work your way methodically back through all the holes. Try finding a comfy place on deck to work because it might be difficult to move a large sail down below. And remember that “a stitch in time saves nine”!
Patch and Glue
Sail damage can be also caused by a tear to the sun protection on roller-furling headsails. If that happens don’t put new holes in your sail in order to stitch up the tear. This will be really time consuming. Use instead some sticky-back which definitely is an efficient and fast solution. Although you have to take the sail down and put it back up to do that, sticky-back is the answer to this problem.
The first step is to cut the corners of the patch round in order to keep them from peeling off the sail. Then clean the whole area from the repair with acetone, and once the patch is ready, rub from the center to the edge with a scissor handle in order to make sure that it’s totally adhered. Furthermore, sticky-back patches work efficiently for small holes in the actual fabric of the sail. If any holes appear in the fabric then use patches on both sides of the sail, an inch or two larger than the rip in all directions. Keep in mind to slightly counterbalance the two patches so that the load won’t spread out around the repair. Also, take with you ripstop sticky-back to match the colors on any downwind sails, as well as small, pre-cut round patches, which can be practical for small holes in nylon sails.
A lot of spinnakers are no longer stitched and are put together just with tape, so if you need to make a repair it’s a particularly easy task. For most repairs a sticky back spinnaker repair tape is fine. Try not to change the panel’s shape and don’t use too much cloth for the patch. This way you’ll avoid generating unnecessary loads and stress lines. Instead, use the same amount of cloth for the patch so it moves and stretches simultaneously. Also, in case that a tear passes through the panels, repair one panel at a time and not all together. This way each panel is going to move and stretch as it was designed to.
One of the things that need occasional repairs on your sails is fabric. Fabric is one of the most vulnerable parts of your sails. Most of the time, when a sailboat uses its slab reefing it will subsequently wear out the webbing attachments to the tack rings. Therefore a failure of the webbing connection to the mainsail luff slides will be caused. As I’ve mentioned before, the most practical and easy solution to this is to be equipped with twine, a webbing, a needle, and a sailor’s palm . In case you don’t have the correct size of webbing, then Spectra cord can attach a slide fairly well.
These repairs are permanent and won’t take you more than an hour. Another sail damage for many sailboats with full-length battens might be caused by the connection point between the batten and the luff track on the mast. The best thing to do if that happens is to apply West System epoxy along with 3M adhesive sealant 5200 fast cure . This will untie your hands and is also an easy task to perform.
Common Damage Areas
- Spinnakers : Anything sharp can damage the spinnakers. Especially near the boom, so check that everything is taped up. Also, spinnakers tend to get caught between the shrouds and above the spreaders so consider closing off this gap with a bungee.
- Spreader and Rig Chafe : When you’re sailing downwind the mainsail spends a lot of time relaxing on the rig. Keep in mind to fill your spreaders with pipe insulation. Moreover, consider having extra reinforcement patches for the spreaders on the batten pockets and at each reef point.
- Spreader Ends : Always reinforce the sail and put smooth cages around protrusions. In addition, wrap foam around your spreader caps on long voyages.
- Bottom of the Headsail : Try to lower the halyard enough in order to reach the damaged section. Then reinforce with a sail repair tape . In case the conditions don’t favor you to do so, keep a wrap in the sail to take the pressure off the damage.
Summary – How to Repair the Sails
All this is much easier if your sails aren’t damaged in the first place. But, I know for a fact that sometimes you can’t prevent it from happening. In any case, always be alert to what is going on with the rags. Moreover, always carry a sail repair kit (link to Amazon) on board especially for long-distance cruising. Before leaving for any long trip have also a sailmaker service to check your sails for any weak points. Last but not least, in case that your sails are damaged at sea reinforce any loose stitching immediately and tape both sides of repairs to ensure extra strength.

Peter is the editor of Better Sailing. He has sailed for countless hours and has maintained his own boats and sailboats for years. After years of trial and error, he decided to start this website to share the knowledge.
Related Posts

How Does a Boat Sail Upwind? Unveiling the Mechanics of Against the Wind Sailing

How Does Sailing Work? The Physics of Sailing

Best Non Skid Boat Deck Paints

How to Restore Teak on a Boat
- Buyer's Guide
- Destinations
- Maintenance
- Sailing Info
Hit enter to search or ESC to close.
How Sails Really Work

Sails work by “catching the wind” only when the boat is sailing downwind. The rest of the time, a sail is essentially an airplane wing standing on end, and works the same way.
Sailing for Beginners
- When properly trimmed (adjusted or positioned), the sail’s leading edge—the luff—points into the wind, creating higher pressure on the windward side (the side facing the wind) and lower pressure on the leeward side (the side away from the wind)."
- The sail “lifts,” or moves, toward the lower-pressure side causing the boat to move. This happens because the sail isn’t a flat sheet of cloth, it’s curved, like a wing and the air traveling over the topside of the curved portion travels faster than that traveling on the underside. (The curvature, or “draft,” is built-in by the sailmaker, through careful cutting and sewing of the narrow panels that make up the sail.)
- Not all of the lift developed by a sail moves the boat ahead. Since the direction of lift is roughly at right angles to the sail, some of it tries to pull the boat sideways, too—but the shape of the hull and keel combined with the rudder creates a high resistance to the sideways force, "driving" the boat ahead.
- How much of the total lift acts to pull the boat forward and how much sideways depends on the “point of sail,” the angle between the boat and the wind: Closer to the wind = more sideways component, because the sail is trimmed in closer to the centerline of the boat.
Because of this, when “beating” into the wind, most sailboats move a little bit sideways as well as ahead. Sailors call this “making leeway,” and always take it into account when navigating or sailing in close quarters.
To learn more, check out Beginner Sailing Tips , and to get hands-on sailing instructions, visit a sailing school near you!
Explore Sailboat Types & Manufacturers

Join Our Newsletter!
Get community news, buying bargains, and how-to guides at your fingertips.
- PRO Courses Guides New Tech Help Pro Expert Videos About wikiHow Pro Upgrade Sign In
- EDIT Edit this Article
- EXPLORE Tech Help Pro About Us Random Article Quizzes Request a New Article Community Dashboard This Or That Game Happiness Hub Popular Categories Arts and Entertainment Artwork Books Movies Computers and Electronics Computers Phone Skills Technology Hacks Health Men's Health Mental Health Women's Health Relationships Dating Love Relationship Issues Hobbies and Crafts Crafts Drawing Games Education & Communication Communication Skills Personal Development Studying Personal Care and Style Fashion Hair Care Personal Hygiene Youth Personal Care School Stuff Dating All Categories Arts and Entertainment Finance and Business Home and Garden Relationship Quizzes Cars & Other Vehicles Food and Entertaining Personal Care and Style Sports and Fitness Computers and Electronics Health Pets and Animals Travel Education & Communication Hobbies and Crafts Philosophy and Religion Work World Family Life Holidays and Traditions Relationships Youth
- Browse Articles
- Learn Something New
- Quizzes Hot
- Happiness Hub
- This Or That Game
- Train Your Brain
- Explore More
- Support wikiHow
- About wikiHow
- Log in / Sign up
- Cars & Other Vehicles
How to Sail a Boat
Last Updated: May 13, 2022 Approved
This article was co-authored by Nitzan Levy . Captain Nitzan Levy is a Sailor, Social Entrepreneur, and the Founder of Sailors NYC, a recreational sailors’ club based in Jersey City, New Jersey that specializes in cruising boats and a variety of community programs. Capt. Levy has over 20 years of sailing experience and has sailed in many places around the world including: the Atlantic Ocean, the Mediterranean Sea, The Caribbean, and the Indian Ocean. Capt. Levy is a U.S. Coast Guard Licensed Master of vessels up to 50 Tons with Auxiliary Sail and Assistance Towing Endorsements. Capt. Levy is also a NauticEd Level V Captain Rank Chief Instructor, an American National Standards Assessor, an SLC instructor, an ASA (American Sailing Association) Certified Instructor Bareboat Chartering, and an Israeli licensed skipper on Boats for International Voyages. There are 9 references cited in this article, which can be found at the bottom of the page. wikiHow marks an article as reader-approved once it receives enough positive feedback. This article received 25 testimonials and 92% of readers who voted found it helpful, earning it our reader-approved status. This article has been viewed 975,930 times.
For centuries, the sea has captured the spirits of sailors and adventurers all over the world. In his poem "Sea Fever", John Masefield claimed that all he needed was "a tall ship and a star to steer her by" to feel complete. Breaking into the sailing world can be challenging, but this article will help guide you through the ebb and flood of the nautical world. As a note, this article will help get you started, but it cannot be overstated that before you begin, have an experienced sailor show you the standing and running rigging on your boat and their functions before you venture out on the water on your own.
Gaining a Basic Knowledge of Sailing

- Block: This is the nautical term for a pulley.
- Boom: The horizontal support for the foot of the mainsail which extends aft of the mast. This is what you want to watch out for when changing directions in a sailboat. It can give you quite a wallop on the head if it hits you.
- Bow: This is what the front of the boat is called.
- Centerboard: This is a (usually fiberglass) plate that pivots from the bottom of the keel in some boats and is used to balance the boat when under sail.
- Cleat: Cleats are what lines (or ropes) get fastened to when they need to be kept tight.
- Halyard: Lines that raise or lower the sails. (Along with the sheets, aka running rigging.)
- Hull: The hull is the body of the boat and consists of everything below the deck.
- Jib: This is the sail at the bow of the boat. The jib helps propel the boat forward.
- Genoa: A foresail which is larger than a jib.
- Keel: The keel is what prevents a boat from sliding sideways ("making leeway") in whatever way the wind is blowing and stabilizes the boat.
- Line: Lines are ropes. They are everywhere on boats. There is only one "rope" on a sailboat, the bolt rope which runs along the foot of the mainsail.
- Mainsail: As the name implies, this is the mainsail of the boat. It is the sail attached to the back of the mast.
- Mast: The mast is a large, vertical pole that holds the sails up. Some boats have more than one mast.
- Painter: This is a line positioned at the front of small boats. It is used to tie the boat to a dock or another boat.
- Rudder: The rudder is how the boat is steered. It is movable so that when you turn the wheel or tiller, the rudder directs the boat in the direction you would like the boat to go.
- Sheets: The lines that control the sails. (aka running rigging.)
- Spinnaker: The usually brightly colored sail used when sailing downwind or across the wind.
- Stays and Shrouds: Some wires make sure the mast stays upright, even in very heavy winds. (aka standing rigging.)
- Stern: This is the term for the back of the boat.
- Tiller: The tiller is a stick attached to the rudder and is used to control the rudder.
- Transom: This is what we would call the butt of the boat. It is the back part of the boat that is perpendicular to its centerline.
- Wheel: The wheel works the rudder, steering the boat.
- Winch: Winches help tighten the sheets and halyards. When these lines are wrapped around a winch (in a clockwise direction), a sailor can turn the winch with a winch handle, providing mechanical advantage which makes it easier to bring in the lines.

- Sloop : Sloops are the most common type of sailboat (when you think of a sailboat this is probably the one you picture in your mind.) It has a single mast and is rigged up with a jib in the front and a mainsail attached to the back of the mast. They can range in size and are ideal for sailing upwind.
- Catboat : A Catboat has a mast set up near the front of the boat and is a single-sail boat. They are small (or large, for that matter) and easily operated by one or two people.
- Cutter : Cutters have one mast with two sails in the front and a mainsail on the back of the mast. These boats are meant for small crews or groups of people and can be handled relatively easily.
- Ketch : A Ketch has two masts, with the second mast called the mizzen mast. The mizzen is shorter than the mainmast and is in front of the rudder.
- Yawl : Yawls are similar to ketches with the difference being that their mizzen masts are located behind the rudder. The reason for this placement is that the mizzen on yawls is for keeping balance, rather than for moving the boat forward.
- Schooner : Schooners are large sailboats with two or more masts. The mast in the back of the boat is either taller or equal in height to the mast at the front of the ship. Schooners have been used to commercially fish, transport goods and as warships.

- Port: When you are facing the bow (the front of the boat) the side to your left is the port side.
- Starboard: Starboard is the right side of the boat when facing the bow.
- Windward: As the name might imply, windward is the direction from which the wind is blowing, upwind.
- Leeward: This is also called ‘Lee’. This is the direction to which the wind is blowing, downwind.
- Tacking: Tacking is when you turn the bow of the boat through the wind so that the wind switches from one side of the boat to the other. This is when you most need to be mindful of the boom, as the boom will swing from one side of the boat to the other when you tack (you don’t want to be in its way when it does that.)
- Gybing (Jibing): This is the opposite of tacking, which means that it is when you turn the stern (or back) of the boat through the wind so that wind shifts to the other side of the boat. This is a more dangerous maneuver in a strong breeze than tacking since the boat's sails are always fully powered by the wind, and may react violently to the change in the orientation of the boat to the wind. Care must be exercised to control the boom during this maneuver as serious injury is a possibility if the boom travels across the cockpit uncontrolled.
- Luffing: This is when the sails begin to flap and lose drive caused by steering the boat into wind or easing (loosening) sheets.

Preparing The Boat

- Check the lines ( running rigging ) that raise and control the sails ( halyards and sheets respectively). Make sure that they are separated, not wrapped around each other or fouled on anything else, and that they all have a figure-eight knot or other stopper knot on the free ( bitter ) end so they cannot pull through the mast or sheaves.
- Pull all lines out of their cleats and off their winches. There should be nothing binding any line; all should be free to move and be clear at this point.
- If you have a topping lift—a small line that holds the back of the boom up and out of the way when the sail isn't in use—let it out until the boom sags downward freely, then re-tie or re-cleat it. Watch out for the boom; it's just swinging around at this point; it will cause a painful "clunk" if it happens to hit you or your crew. The boom will return to its normal, horizontal position when you hoist the mainsail completely.
- If so equipped, be sure that the tiller is properly attached to and controls the rudder. Your sailboat is now prepared for you to hoist the sails!

- If your boat doesn't have a windex, tie a couple of nine-inch pieces of old cassette tape, VHS tape, or oiled yarn to the shrouds—the rigging cables that hold up the mast. Place them on each side, about four feet up from the sides of the boat. These will show you from which direction the wind is blowing, although some sailors find cassette tape to be just too sensitive for this purpose.

- If your boat has a motor, use the motor to keep the boat pointed into the wind while you hoist sail.
- Here's a handy tip: if the water is not deep at your dock, or if you have no side pier, walk the boat out away from the dock and anchor it into the sand, and the boat will automatically point itself into the direction of the wind!
Hoisting The Sails

- There will be a small line ( outhaul ) attaching the rear corner of the mainsail ( clew ) to the end of the boom. Pull it so the foot of the main is taut, and cleat. This helps the mainsail have a smooth shape for the air flowing over it.
- Hoist the mainsail by pulling down on its halyard until it stops. It will be flapping around ( luffing ) like crazy, but that's OK for a short period of time. (Excessive luffing will drastically reduce the life and durability of the sail).
- The leading edge of the sail ( luff ) must be tight enough to remove folds, but not so tight as to create vertical creases in the sail.
- There will be a cleat in the vicinity of the halyard where it comes down from the top of the mast. Cleat the halyard. Using the jib halyard, raise the front sail ( jib , genoa or simply the headsail ), and cleat the halyard off. Both sails will be luffing freely now. Sails are always raised mainsail first, then the jib, because it's easier to point the boat into the wind using the main.

- Turn the boat to the left ( port ) or right ( starboard ) so it's about 90 degrees off the wind. This is known as a beam reach .
- Pull on the main sheet ( trimming ) until the sail is around 45 degrees away from straight back ( aft ). This is a safe place for the main while you trim the jib.
- You will start moving and tilting ( heeling ) away from the wind. A heel of more than 20 degrees usually indicates that you're being overpowered. Releasing the mainsheet momentarily ( breaking the main ) will lessen the amount of heel, and you will return to a more comfortable sailing angle of 10 to 15 degrees.

- The jib will form a curve or pocket; trim the sail until the front edge just stops luffing. Keep your hand on the tiller (or helm ) and stay on course!

- If you or the wind hasn't changed direction, this is the most efficient place to set the sails. If anything changes, you have to adjust them in response.
- You have just entered the world of the sailor, and you will have to learn to do many things at once, or suffer the consequences.
Sailing Your Boat

- When the wind is at your back and side ( aft quarter ), it's called a broad reach . This is the most efficient point of sail as both sails are full of wind and pushing the boat at full force.
- When the wind is at your back, you are running with the wind . This is not as efficient as reaching, because air moving over the sail generates lift and more force than just the wind pushing the boat.
- When running with the wind, you can pull the jib over to the other side of the boat where it will fill. This is called wing-on-wing , and you have to maintain a steady hand on the tiller to keep this sail configuration. Some boats have a "whisker pole" which attaches to the front of the mast and the clew of the jib which makes the jib much easier to control and keep full of wind. Be sure to be vigilant of obstacles and other vessels, as having both sails in front of you blocks a significant portion of your view.
- Be careful —when the boat is running, the sails will be way off to the side, and because the wind is basically behind you the boom can change sides suddenly ( jibe or gybe ), coming across the cockpit with quite a bit of force.
- If you have a wind direction indicator at the top of your mast, do not sail downwind (run) so that the wind indicator points toward the mainsail. If it does, you are sailing with the boom on the windward side ( sailing by the lee ) and are at high risk of an accidental jibe. When this happens the boom can hit you with enough force to knock you unconscious and out of the boat ( overboard ).
- It's a good practice to rig a preventer (a line from the boom to the toe rail or any available cleat) to limit the travel of the boom across the cockpit in case of an accidental gybe.

- On most sailboats this will be about 45 degrees from the wind direction.
- When you've gone as far as you can on this tack, turn the boat through the wind (or changing direction by tacking ), releasing the jib sheet out of its cleat or off the winch drum as the front of the boat ( bow ) turns through the wind.
- The main and boom will come across the boat. The mainsail will self-set on the other side, but you will have to quickly pull in the jib sheet on the now downwind side to its cleat or winch, while steering the boat so the mainsail fills and begins to draw again.
- If you do this correctly, the boat won't slow down much and you will be sailing to windward in the other direction. If you're too slow tightening the jibsheet again and the boat bears off the wind too much, don't panic. The boat will be pushed sideways a little until it gains speed.
- Another scenario would be to fail to put the bow of your boat through the wind quickly enough and the boat comes to a complete stop. This is known as being in irons , which is embarrassing, but every sailor has experienced it, whether or not they'll admit it is another story. Being in irons is easily remedied: when the boat is blown backwards you will be able to steer, and as the bow is pushed off the wind you will achieve an appropriate angle to the wind to sail.
- Point the tiller in the direction you wish to go and tighten the jib sheet to windward, ( backwinding the sail ). The wind will push the bow through the wind. Once you've completed your tack, release the sheet from the winch on the windward side and pull in the sheet to leeward and you'll be on your way again.
- Because speed is so easily lost when tacking, you'll want to perform this maneuver as smoothly and quickly as possible. Keep tacking back and forth until you get to your destination.

- Reefing almost always needs to be done before you think you need to!
- It's also a good idea to practice capsize procedures on a calm day too. Knowing how to right your boat is a necessary skill.

Storing the Sails

Community Q&A
- Try learning to determine the wind direction using your ears. Let the wind blow onto your back, then slowly turn your head left to right and back until you feel it "equalize" over your ears. Once you find that point, you now know the wind direction, and using this method, you can understand the wind more without having to use your eyes. [7] X Research source Thanks Helpful 2 Not Helpful 0
- Know how to read clouds and the weather they may bring. [8] X Research source Thanks Helpful 2 Not Helpful 2
- If something bad happens—too much wind, man overboard, etc.—remember that you can bring the whole thing to a halt simply by pulling all three sheets out of their cleats or off their winches. The boat will (mostly) stop. Thanks Helpful 3 Not Helpful 0
- Going overboard is a serious matter, especially if you are alone. Cold water, currents, and other boats all can account for serious dangers, and if the sails are up, the boat will take off much faster than you might expect. Additionally, many boats float so high on the water ( freeboard ) that it is difficult to climb in or haul people in without assistance. When sailing at night, always wear a shoulder-mounted flashlight and strobe emergency signaling device, which makes it much easier for a SAR (Search And Rescue) crew to spot you in the water. Thanks Helpful 36 Not Helpful 4
- In sailing, your very life may depend on doing things before they need to be done, when they first cross your mind. If you wait until it needs to be done, it may be too late or very difficult. Follow your instincts. Thanks Helpful 30 Not Helpful 5
- Remember the old maxim "It's better to be on the dock, wishing you were on the lake, than to be on the lake, wishing you were on the dock". Don't let enthusiasm overcome your good judgement on a day you should not go out. The apparent wind while tied alongside at the dock may be very different out on the water. Many novices (and experienced sailors, for that matter) get into trouble venturing out when there is too much wind to sail safely. Thanks Helpful 4 Not Helpful 0
- It is highly recommended that you at least have working knowledge of the nomenclature of the boat and have done some reading of in-depth material before attempting this sport yourself. Some highly recommended reads are: The Complete Idiot's Guide to Sailing , Sailing for Dummies , and Sailing the Annapolis Way by Captain Ernie Barta. Thanks Helpful 2 Not Helpful 1
- Know how how to use VHF radio to make a Mayday call from a Marine Vessel . In an emergency, it is usually the quickest way to summon help. Cell phones may be used, but VHF will be able to contact a nearby vessel much more quickly should you need assistance or be able to render same. [9] X Research source Thanks Helpful 2 Not Helpful 0
Things You'll Need
- A life vest (Personal Flotation Device) is mandatory on all boats for all passengers. (A pealess whistle attached to the PFD is an excellent idea!) You should wear one at all times. If you have children with you, they should wear one even when you are at the dock.
- Every vessel, regardless of length is required to have a certain amount of safety gear aboard. This ranges from an anchor with sufficient rode, flares, and other equipment as may be mandated by the Government. These regulations are for your safety and should be adhered to.
You Might Also Like

- ↑ http://www.lovesailing.net/sailing-theory/sailing-basics/parts-of-a-boat/parts-of-a-boat.php
- ↑ https://www.boats.com/resources/sailing-101-sailboat-types-rigs-and-definitions/
- ↑ http://www.discoverboating.com/resources/article.aspx?id=243
- ↑ https://www.uscgboating.org/images/486.PDF
- ↑ https://www.cruisingworld.com/learn-to-sail-101#page-2
- ↑ https://www.discoverboating.com/resources/how-does-a-boat-sail-upwind
- ↑ https://www.dummies.com/sports/sailing/finding-the-winds-direction/
- ↑ https://weather.com/news/news/read-clouds-meteorologist-20130826
- ↑ https://www.boatus.org/marine-communications/basics/
About This Article

To sail a boat, start by performing a detailed visual check of the cables and ropes that support the mast. Next, determine the wind direction by referring to the wind direction indicator at the top of the mast, then point the boat into the wind. Secure the bottom front of the mainsail and jib to the shackles on the boom and bow of the boat, then trim the jib sheets and mainsail before letting out the main sheet! For tips on monitoring wind indicators, read on! Did this summary help you? Yes No
- Send fan mail to authors
Reader Success Stories
Sep 13, 2017
Did this article help you?

Tobias Tanti
Dec 25, 2020
Nov 19, 2017
Mar 30, 2016
Nov 22, 2016

Featured Articles

Trending Articles

Watch Articles

- Terms of Use
- Privacy Policy
- Do Not Sell or Share My Info
- Not Selling Info
wikiHow Tech Help Pro:
Level up your tech skills and stay ahead of the curve
Search form
Sailing with lazy jacks and stack packs.

What are lazy jacks and stack packs?
Lazy jacks are networks of lines that are rigged along each side of the mainsail from multiple points on the boom or a stack pack to a point on the mast just above the spreaders, at about 60% the mast's height. Their purpose is to hold the mainsail on top of the boom when it is lowered.
Typically, lines called "legs" are joined with single lines called "risers" to form two upside-down Y shapes. However, lazy jack legs and risers can be rigged in a variety of configurations. Also, the legs can be joined to the risers with blocks, rings, or even tied together. The space between the two sets of lazy jacks on either side of the sail is known as the "pocket."
The stack pack (sometimes called a lazy pack or lazy bag) is a modern type of a sail cover. It is secured to the boom and zips closed at the top to protect the sail from sun damage when it's not in use.
Lazy jacks can be set up with or without a stack pack. When a stack pack is present, the lazy jacks are tied to the stack pack to support it. With no stack pack, the lazy jacks are rigged directly to the boom.
lazy jacks and stack pack system image.jpg

Nine yachts in the Modern Sailing School & Club fleet are equipped with lazy jack systems. Only one of these has lazy jacks with no stack pack.
- Fiore Italia (Beneteau Oceanis 31)
- Kokomo (Catalina 320) - lazy jacks only, no stack pack
- Traharta (Beneteau Oceanis 35)
- Auriah (Beneteau Oceanis 37)
- Sijambo (Beneteau Oceanis 423)
- Ry Whitt (Jeanneau 409)
- Coho II (Spencer 1330)
- Vela Mare (Seawind 1160 Catamaran)
- Kanaloa (Fontaine Pajot Lavezzi 40 Catamaran)
Advantages
- On larger boats, a mainsail can be very heavy and unweildy to handle, especially in high winds. When dousing, lazy jacks guide the mainsail into the stack pack and keep it neatly flaked on top of the boom - instead of flopping all over the deck. In San Francisco Bay, lazy jacks and stack packs are particularly useful, even on smaller boats.
- Since a stack pack remains on the boom even while sailing, there's no separate sail cover to wrestle with and no need to fiddle with snaps or clasps at the bottom. After dousing the mainsail, simply zip up the stack pack and you're done!
- When hoisting the mainsail, batten ends can get snagged on the lazy jacks. It takes a bit of caution and precision steering to raise the main without snagging it.
- A stack pack adds windage that can detrimentally affect sailing performance to some degree. For many leisure sailors and cruisers, this is not a major concern.
- Lazy jacks are not intended to replace the topping lift as support for the boom. Never loosen the topping lift to the point that the lazy jacks bear the boom's weight.
How To Hoist a Mainsail with Lazy Jacks
Your goal is raise the mainsail without snagging the battens on the lazy jacks. The trick is for the helmsman to watch the sail as it goes up, steer carefully, and use the breeze to help keep the mainsail in the pocket between the lazy jacks.
- Steer the boat to head the bow into the wind. Keep the boat pointed as straight into the wind as possible.
- Loosen the mainsheet and begin hoisting the mainsail.
- As the mainsail approaches the point where the legs join the risers, keep a close eye on the sail. If the wind is pushing the sail into one of the legs, steer towards the wind until the sail is luffing evenly between the lazy jacks (in the pocket) on both sides again.
- If a batten gets snagged on the lazy jack, immediately instruct your crew to stop hoisting, then lower the sail until the batten is clear of the line. Steer the boat towards the wind just until the wind pushes the sail back into the pocket.
Additional Tips
- In "Hurricane Alley" (the entrance to Richardson Bay, the Sausalito arm of San Francisco Bay), winds often blow in a circular or erratic pattern, which can complicate hoisting a mainsail with battens and lazy jacks. Before hoisting the mainsail, check the masthead windex frequently to determine if wind direction is steady. If not, consider motoring to a location such as Racoon Straights or The Slot where the wind direction may be more steady. Note that heavy winds will luff the mainsail more vigorously, increasing the odds that you'll experience a snag. (Wind conditions and directions on the Bay may vary by season and weather.)
- Never force a stuck sail by grinding hard on a winch. Excessive force could damage the sail, lazy jacks, or other components.
How To Douse the Mainsail
Hoisting the mainsail may require attention and skill, but dousing is a breeze - and the best part of sailing with lazy jacks!
- If conditions and crew size permit, send a crew member forward to stand in front of the mast and evenly flake the luff of the sail as it comes down.
- Steer to point the boat's bow into the wind and loosen the mainsheet.
- If a crew member is at the mast to flake the sail, ease the main halyard in a controlled manner to facilitate flaking. Otherwise, simply douse the sail and let it fall into the stack pack.
- Zip the stack pack closed. That's it!
Additional Tip
If the mainsail didn't flake evenly into the stack pack as it was doused, the stack pack may be difficult (or impossible) to zip closed. If conditions at the dock permit, hoist and douse the sail again and stand at the mast to flake it evenly as it comes down. Also, it helps to tug the leech to straighten out the sail, if necessary.
Coho II mainsail lazy jacks and stack pack.jpg

Article by Mary Elkins on February 6, 2020
Share This Page
Testimonials.
The meeting room was quite adequate and the location most convenient, but the course outline and instruction were outstanding. Modern Sailing is fortunate to have such a well organized instructor in Mr. Stan Lander who teaches very well from a rich professional background. Mr. Lander was generous with his time and patiently in helping students who needed more attention or time in understanding various aspects of the curriculum.
I would like to compliment Stan Lander for his coaching, counseling and teaching Heavy Weather Offshore Sailing. Stan was very accommodating to all of the student's interests and shared his many years of insight on handling the boat in heavy seas. I would certainly recommend Stan and this course to sheltered waters sailors. My confidence in handling a boat of this size was certainly enhanced by the experience.
Since many, many years, I had the dream to sail underneath the Golden Gate bridge. On October 14th last year, my dream became true. Thanks to our dear friend Aaron Fritz who made it possible and organized this cruise for us. With this adventure I was able to achieve one more milestone on my sailing career.
Finally on the water, it was great! Full moon made the flows even stronger and it was like sailing in a washing machine.
I did my sailing education in the English Channel, where the situation with the wind and flows is comparable to the San Francisco Bay. So I felt pretty much "at home" being on the helm in the Bay.
I hope our skipper Stan Lander enjoyed this day cruise too. We, definitely did! It was an unforgettable experience for all of us.
A very big thank you to all of you who made it possible, that my dream became reality! Also thank you for the MSC flag I got at the end of the day. It found it's place in my study, where I can see it daily.

View All Testimonials
Follow us on Social Media

Modern Sailing School & Club
Sausalito Location 2310 Marinship Way, Sausalito, CA 94965 (415) 331-8250 (800) 995-1668
Berkeley Location 1 Spinnaker Way, Berkeley, CA 94710 (415) 331-8250 (800) 995-1668
Map / Directions
You are here.

No products in the cart.
Sailing Ellidah is supported by our readers. Buying through our links may earn us an affiliate commission at no extra cost to you.
The Most Popular Types Of Sails On A Sailboat

A sloop-rigged sailboat typically features a mainsail, a headsail, and an additional light-wind sail, such as a spinnaker or Gennaker. The mainsail is rigged aft of the mast, while the headsail is attached to the forestay. The two most commonly used headsails are the Genoa and Jib.
The sails are vital parts of a sailboat since you obviously couldn’t sail without them! There are many different sails depending on the type of sailboat and its rig configuration, and we’ll walk through them together in this article.
The different types of sails on a sailboat
We can divide the selection of sails on a sailboat into three categories:
- Standard sails
Light-wind sails
- Storm sails
Each category serves different purposes depending on the vessel’s rig configuration and the sail’s functionality.
The standard sails
The standard sails usually form a sailboat’s basic sail plan and include :
- The Mainsail
- The Staysail
- The Mizzen sail
These sails are the ones that are used most frequently on sloop, ketch, and cutter-rigged sailboats and are usually set up to be ready to use quickly.

Headsails are often rolled up on a furler, while the main and mizzen sail are stored on the boom or furled into the mast.
The halyards and sheets are kept within easy reach, making these sails the primary choice in most situations. Let’s dive further into each of them.
The mainsail is a triangular sail that flies behind the mast on top of the boom . Although it may not always be the largest sail on the vessel, we commonly refer to it as “the main.”
It is a vital sail, and keeping the sail shape trimmed properly on every point of sail is crucial for the stability and performance of the boat.
A Jib sail is a headsail that does not overlap the mainsail. It is typically between 100% and 115% of the foretriangle but can also be smaller. The foretriangle is the triangular area formed by the mast, deck, and forestay. The Jib is often used with a self-tacking system involving a sheet traveler in front of the mast.
This sail is often seen on newer boats with fractional rigs, which typically have a larger mainsail area than the headsail area. However, the Jib is versatile and also used in other configurations.
People often mix the terms Genoa and Jib. Many refer to any headsail as a Jib, which is incorrect. I personally prefer to use the correct terms to avoid confusion .
A Genoa sail resembles a large Jib but extends past the mast and overlaps the mainsail. Genoas are usually larger than 115% of the foretriangle , with sizes ranging from 120% to 150%. They are often used on vessels with masthead rigs and smaller mainsails but are also common on fractional rigs.
The Staysail is typically found on cutter rigs and is set on the inner forestay or cutter stay. It can be combined with other sails, such as a Jib, Genoa, or Yankee, or on its own in stronger winds.
The Staysail is also useful when sailing downwind, as it can be paired with a headsail and extended to opposite sides of the boat using a pole.
The Yankee sail resembles a Genoa and Jib but has a high-cut clew. This shape allows for improved airflow when used with another headsail. The Yankee is often used on cutter-rigged boats in combination with a staysail and is known for its versatility in different wind conditions.
Mizzen Sail
A mizzen sail is similar to the mainsail, only smaller . It is set on the aft mast of a boat with multiple masts, such as a ketch rig. The mizzen sail is usually used to provide balance and stability to the vessel and provides additional power when sailing downwind.
Another handy usage is to fly the mizzen at anchor to keep the bow up against waves and swell.
The light-wind sails are large, made of thin nylon, and typically shaped like a half-balloon. They are a type of headsails that are great when the winds are too light to fill the standard headsail and are often used when sailing downwind.
The four most commonly used light-wind sails are:
- The Spinnaker
- The Gennaker
- The Code Zero
- The Parasailor

They all provide excellent forward propulsion on a sailboat but usually require some extra rigging to be set.
Experienced cruisers love to use light-wind sails in nice weather, but they have a critical weakness to be aware of. These sails easily get overpowered when the wind increases, and I strongly advise being careful and observant of the wind conditions when flying them.
(Yes, I have managed to rip mine on one occasion due to getting overpowered, but that’s a different story…)
Let’s continue and take a closer look at each of the light wind sails.
A Spinnaker sail is a large, lightweight downwind sail used at deep angles between 120 and 180 degrees. It is symmetrical in shape with two clews and is often brightly colored.
The Spinnaker is set by using a pole to extend the sail’s clew to the vessel’s side. Then, a sheet is attached to the other clew and led back to the stern of the boat.
A Gennaker sail combines the characteristics of the Genoa and Spinnaker. It is made of nylon like the Spinnaker but is asymmetrical like a Genoa and rigged slightly differently. The tack is attached to the bow, and the clew has a sheet led aft to the cockpit. The Gennaker can be equipped with a snuffer to make it even easier to set up and take down.
It is popular among cruisers because it is simpler to use than a spinnaker and it doesn’t require a pole. The sail is effective at angles between 90 degrees and almost all the way down to 180 degrees, making it versatile for various light-wind conditions.
A Parasailor is similar to the Spinnaker in many aspects but has some distinct differences. It has a double-layer wing that inflates as the sail is filled with air, creating a batten-like effect pushing the leech out while providing lift to the bow.
The wing also helps to prevent the rolling movements you get with a Spinnaker and the collapsing of the leech that can occur with a Gennaker at deep angles.
This makes the parasailor effective at sailing angles between 70 and 180 degrees dead downwind. Parasailors can be set like a Gennaker when reaching or with a pole like the Spinnaker for running downwind.
A Code Zero sail combines some elements of the Genoa and Gennaker. Unlike the Gennaker, the Code Zero has a different shape, allowing it to be used while sailing upwind.
Another benefit is that it can be used with a furler which makes it easy to roll in and out. However, it can’t replace the Gennaker or Spinnaker entirely, as it is not effective at sailing angles deeper than 120 degrees.
If you see a big yacht with three forestay’s, the forward one probably holds a code zero sail. A bow spirit allows the ability to fly additional light wind sails as well!
Storm Sails
The storm sails consist of a small Mainsail and Jib in heavy-duty materials designed for rough conditions. These sails enable us to maintain speed and stability in the boat in severe weather too strong for the standard sails.
Storm sails are often brightly colored , such as red, orange, or yellow, to make them more visible at sea.

Storm Mainsail
A storm mainsail is used when the reefing setup doesn’t allow the standard mainsail area to be reduced enough to prevent overpowering. The sail can handle rough conditions and is excellent for maintaining stability.
A storm Jib is used when the headsail has been furled to the point where it is no longer effective. It is especially useful for sailboats rigged with a Genoa, as the Genoa gets inefficient when heavily reefed. As the storm Jib is smaller than the standard headsail, it also lowers the center of gravity, making the vessel heel less and become more stable.
Explaining the terms for the parts of a sail
Let us talk some more about sails. The goal is to go sailing, right?
Identifying the different parts of the sails is crucial to understanding which lines go where.
Let’s zoom in on a sail and break down the terms :

The head is the top corner of the sail . Most mainsails have a headboard or plate where the halyard is connected, while headsails use a metal ring. A halyard is a line we use to raise and lower sails with.
The leech is the aft part of a sail , located between the clew and head. We use a combination of the outhaul, main sheet, and traveler to trim and adjust the leech on the mainsail.
The headsail’s leech is trimmed by adjusting sheet tension and angle according to the wind speed and direction. A traveler is a track with a movable car or pulley system for adjusting the position and angle of a sheet, and most sailboats have one main traveler for the mainsail and car tracks along the side decks for the headsail.
The luff of a sail is the front part of the sail between the tack and head. On a mainsail, the luff runs vertically along the mast and along or close to the forestay on a headsail. Headsails are often equipped with luff foam to help maintain their shape when partially reefed on a furler.
Battens are slats or tubes inserted into pockets on the mainsail to help the sail maintain its shape and increase its lifespan . A traditional sail hoisted and lowered on the boom typically has horizontal battens. Vessels with in-mast furling can use vertical battens instead of horizontal ones.
- A fully battened Mainsail has the battens run through the entire sail length from the luff to the leech.
- A standard battened main sail has the battens along the sail’s leech.
Telltales are small ropes, bands, or flags attached to a sail to give an indication of the airflow around the sail. They help us understand how the wind affects the sail and allow us to fine-tune the trim for optimal performance. Telltales are usually found on the mainsail’s leech and in the front of the headsail’s leech.
The clew of a sail is the lower aft corner and where the outhaul is connected on a mainsail. Headsails have sheets attached to their clew for controlling and trimming the shape and tension.
The tack is the lower, forward corner of a sail. On a traditional Mainsail, the tack is attached to the Gooseneck, a hinge in front of the boom attached to the mast.
With in-mast furling, the tack is connected to the furling mechanism. This mechanism is used to roll the sail into the mast.
The headsails tack is connected to a furler drum on the forestay on most sailboats. Vessels using traditional hank-on headsails connect the tack to a fixed point on the bow.
The foot of the mainsail is the bottom portion of the sail between the clew and the tack. It is trimmed using the outhaul, a line attached to the clew, and used to adjust the tension on the foot of the sail. Some mainsail are configured loose-footed, and others are attach-footed.
The foot of the headsail is trimmed by adjusting the tension and angle of the sheets, which are the lines used to control the headsail’s clew. We use cars, or pulleys, to adjust the angle of the sheets and thus the trim of the headsail.
Traditional and less commonly seen sails
We’ve now looked at the most commonly used sails and walked through the different parts of them. But what about the less common ones? The art of sailing has a rich history, with some unique sail designs that we rarely see today.
Read on if you want to peek into some traditional sails, or skip straight to popular sail and mast configurations here.
Square sails
Square sails are rectangular and usually set across a ship’s mast, mostly seen on traditional square-rigged sailing ships and Viking ships. These sails are efficient for downwind sailing and are hung from horizontal spars called yards. Though not as agile as modern fore-and-aft sails when sailing upwind, they were central to naval exploration for centuries. Today, they’re mainly seen on traditional vessels and tall ships, symbolizing maritime heritage.
If you’ve been to Martinique in the summer, you may also have noticed the round skiff sailboats the local fishermen traditionally used for fishing in the Atlantic Ocean with their distinctive big squared sails. Tour de Martinique des Yoles Rondes is a popular yearly event where the locals race and show off these beautiful old boats with colorful sails!
A gaff sail is a traditional four-sided sail held up by a horizontal spar called the “gaff.” They are used on classic gaff-rigged sailboats and allow for a larger sail area with a shorter mast. Gaff-rigged boats were traditionally popular and usually carried 25% more sail area than the equivalent Bermudan rig, making them fast on a downwind run. The Gaff rig could also carry a topsail between the gaff and the mast.
However, they don’t sail well to windward, and modern designs have shifted towards triangular sails for better upwind performance.
Jib-headed topsail
The Jib-headed topsail is a small triangular sail used on gaff rigs and is set between the gaff and the top of the mast.
A lug sail is an angled, four-sided sail that attaches at a point on its top side, making it hang tilted. The sail is simple to use and often found on smaller or older boats. There are different types, like standing, dipping, and balance lugs, each hanging differently around the mast.
The lug sail evolved from the square sail to improve how close the vessels could sail into the wind. Because of their upwind performance, fishermen used them widely in Europe from the seventeenth through the nineteenth centuries.
Sprit sails
The spritsail, with its unique four-sided design, stands out thanks to a diagonal support called the “sprit.” It was traditionally popular in Thames sailing barges due to its ability to accommodate high-deck cargo. These days, it’s primarily found in smaller boats like the Optimist dinghy in a variant called “leg of mutton spritsail.”
The spritsail was also used in traditional wooden boats like the fearing version of the Oselvar wooden boat traditionally used in western Norway.
It is also commonly used by the indigenous Guna Yala tribes in Panama in their dugout Ulu’s up to this day. We saw plenty of them when we cruised along the coast, and some of them approached us to sell us their delicious catch of the day!
Lateen sails
A lateen sail is a triangular sail set on a long spar angled on the mast. It was originally popular in the Mediterranean and on Arab shows, and its design enhanced maneuverability and played a crucial role in historic sea exploration.
The lateen sail was used on lateen rigs, the predecessor to the Bermuda rig – one of today’s most commonly used rigs!
Which brings us to the following topic:
Popular sail and mast configurations
There are many different rigs and sail configurations between sailing vessels. From the old-school square rigs to schooners, gaff rigs, and more. However, this article will focus on the three most popular rigs seen on modern sailboats:
- The Bermuda Sloop Rig
- The Cutter Rig
- The Ketch Rig
The three rigs have similarities and differences between their sail and mast configurations. We’ll walk through each of them to understand how they utilize their different types of sail.
If you want to learn more about other rigs, take a look here .
Bermuda Sloop Rig
The Bermuda sloop rig is the most common rig on modern vessels. It is characterized by a single mast, a triangular mainsail, and a headsail. This rig is named after the Bermuda Islands, where it was developed in the 17th century.

Some of the key features of the Bermuda sloop rig:
- The mast is typically tall and raked, which allows for a large sail area and excellent stabilit y.
- The mainsail is attached to the mast and boom. It is usually combined with a single headsail at the front of the boat, making it powerful and easy to sail.
- The Sloop is usually equipped with a masthead or fractional rig and flies a Jib or Genoa as its primary headsail.
The Bermuda Sloop rig is known for its simplicity, is often used for racing and cruising, and is popular among sailors worldwide.
The cutter rig is very similar to the sloop rig. The significant difference is that it has a single mast and two headsails – a Staysail and a Yankee. The cutter rig is known for its versatility due to the multiple options in sail plans and the double headsail setup.
Some key aspects that separate the Cutter from the Sloop:
- The rig is often more robust than its Sloop sister because of the additional cutter stay and running backstays.
- The mast is located closer to the center of the boat.
- The Cutter has a staysail on the inner forestay and a Yankee sail on the outer. The sails can be used in combination with each other or independently.
- Tacking the headsail between the forestay and cutter stay is more involved than on a sloop.
- The Cutter rig has two similar variations: the Slutter rig and the Solent rig.
Like the Sloop, the Cutter rig is relatively easy to operate. Still, the additional headsail and rigging make it costlier to maintain. It is also less suitable for racing than the Sloop, but the added versatility helps in different weather conditions and makes it an excellent choice for cruisers.
The ketch rig is also similar to the Sloop but has an additional mizzen mast placed further aft of the main mast. Another mast gives it the advantage of even higher versatility in sail plans. The ketch typically uses three sails. The mizzen sail, a mainsail, and a headsail. The mizzen mast also allows it to fly a second light-wind sail.
Here are a few more distinctions of the ketch rig:
- The ketch typically carries a smaller mainsail than a similarly sized sloop and a smaller mizzen sail.
- A small mizzen and a medium mainsail are easier to handle than one large mainsail.
- The additional mizzen sail makes the vessel easy to balance and gives extra stability downwind.
- The ketch usually doesn’t point as close to the wind as the Sloop and Cutter.
The headsail setup on a ketch is generally the same as for the Sloop. But the ketch can also be rigged as a cutter ketch, which gives it the benefits of the cutter rig! The tradeoff with a cutter-rigged ketch is the higher complexity and additional rigging, hardware, and sails required.
Final words
Well done, you now have a good grasp of the most common sails and their strengths. We have discussed a few rigs and how they utilize different kinds of sails in various sail plans. Remember that more sail types, other rigs, and even more variations are available. It is a complex topic, but this guide covers the basics and gives you a great starting point.
If you still have questions, look below at the FAQ, or leave me a comment. I’m more than happy to help you out!
A sailboat is only as good as its sails, and sails need wind to work. The next logical step is learning how the wind works when we sail and practicing some wind awareness! Head to the following guide to continue your research: Learn The Difference Between True And Apparent Wind Speed.
FAQ: The Different Types of Sails On A Sailboat
What is the foretriangle on a sailboat.
The foretriangle on a sailboat refers to the triangular area formed between the mast, forestay, and deck. If you want to order a new headsail, for example, you’ll have to measure and supply the sailmaker with these details.
What is the difference between a loose-footed and attached-footed mainsail?
A loose-footed mainsail is attached to the boom only at its corners, leaving the rest of the sail’s bottom edge free. An attached-footed mainsail, on the other hand, is secured to the boom along its entire length. The main difference lies in how the bottom of the sail connects to the boom, with the loose-footed design offering more adjustability in the sail shape.
What is a high-cut clew on a sail?
A high-cut clew refers to the design of a foresail, such as a jib or genoa, where the back lower corner (the clew) is raised or “cut” higher above the deck compared to standard designs. This design allows for better visibility beneath the sail and makes it easier to sail over waves without the sail touching the water, which is especially beneficial for offshore or blue-water cruising. Very high-cut clews are commonly seen on yankee sails on cutter-rigged sailboats.
What is luff foam on a sail?
Luff foam is a padded strip sewn into the forward edge of roller furling sails. It ensures the sail is appropriately shaped when partially rolled up, especially in strong winds. This foam not only helps with sail performance but also protects the sail when it’s furled.
What are the most common sails?
The sloop rig sailboat is the most common and usually features a mainsail, a headsail, and an additional light-wind sail, such as a spinnaker or Gennaker.
What are the different types of sails?
There are several different types of sails, and we can divide the most common into three categories:
The standard sails:
- Mizzen sail
The light-wind sails
The storm sails:
- Storm mainsail
- Storm jib
What is a spinnaker sail?
A Spinnaker sail is a large, lightweight downwind sail used at deep angles between 120 and 180 degrees.
What is a Jib sail?
A Jib sail is a headsail that does not overlap the mainsail and is set on the forestay. The Jib can also be set up with a self-tacking system, making it very effective when sailing into the wind.
Is Genoa sail the same as a jib?
People often mix the terms Genoa and Jib. The Genoa is different from a Jib sail as it is larger and overlaps the mainsail, whereas the Jib is smaller and does not overlap the mainsail.
What is a Genoa sail?
A Genoa is a headsail larger than the Jib extending past the mast and overlapping the mainsail. The advantage over the Jib is the larger sail area, making it more effective when sailing off the wind.
How many types of sail plans are there?
Sail plans refer to the configuration and arrangement of sails on a boat or ship. While there are countless customizations and variations, the three most common sail plans are:
Sloop: Characterized by a single mast, a triangular mainsail, and a headsail.
Cutter: Similar to a sloop but has a single mast and carries two or more headsails.
Ketch: Features two masts, with the aft mast (called the mizzen) shorter than the main mast.
What is a Mainsail?
The mainsail is a triangular sail that flies behind the mast on top of the boom.
What is a Gennaker?
A gennaker is basically an asymmetrical spinnaker. A hybrid sail that combines the characteristics of a Genoa and a Spinnaker, designed for sailing off the wind and often used in light to moderate wind conditions.
What is a Storm Jib?
A storm jib is a small, heavy-duty sail used in strong winds or stormy conditions. It is commonly used when the headsail has been furled to the point where it is no longer effective.
What factors determine the type of sail to be used?
The type of sail to be used depends on various factors such as wind conditions, points of sail, sailboat size , and sailing experience. It’s smart to choose the appropriate sail for optimal performance. A Jib, for example, will be more effective than a Genoa while sailing to windward, and vice versa.
How do sails affect the performance of a sailboat?
Sails are the engine of a sailboat. Their design, size, and trim influence the boat’s speed, direction, and stability. Properly adjusted sails capture wind efficiently, allowing the boat to move faster and in the desired direction.
The balance and condition of the sails also impact comfort and safety, with well-maintained sails ensuring optimal performance. The sails are essential in determining how a sailboat performs in various wind conditions.
Sharing is caring!
Skipper, Electrician and ROV Pilot
Robin is the founder and owner of Sailing Ellidah and has been living on his sailboat since 2019. He is currently on a journey to sail around the world and is passionate about writing his story and helpful content to inspire others who share his interest in sailing.
Your article gave me a lot of inspiration, I hope you can explain your point of view in more detail, because I have some doubts, thank you.
What specifically do you want my point of view on?
Leave a Reply Cancel reply
Your email address will not be published. Required fields are marked *

- Repeated Customers
- Booking Request
Beginner Nautical terms
In this section we will talk about parts of the boat that are used to move it along.
Let' s start at the bottom and work up:
The heavy wing at the bottom of the boat in the middle is called the keel .
This prevents the boat from falling over when the wind pushes on the sail, and also helps the boat go forward with the sails set.
The wing at the back of the bottom of the boat is called the rudder .
This directs the flow of the water and steers the boat.

FRONT / BACK / LEFT / RIGHT
The front of the boat is known as the bow . The back of the boat of the boat is called the stern . The left of the boat is called port while the right is starboard.
Relative locations on the boat
If something is behind another object it is aft of it while if it is in front of something it is forward .
Consequently the keel is'forward of the rudder' while the rudder is 'aft of the keel'.

This is why you put special airbags on the side of the boat called fenders between you and the other object.
Right at the stern of the cockpit you will see a life ring . It will be attached to some rope.
If someone falls over the side you throw the life ring towards them and turn the boat to get them out as quickly as possible.
The cockpit
The space in the stern where everything happens is known as the cockpit .
Here you have the steering wheel (the 'wheel" ), the winches to tighten or loosen the sails, and most of the sail control ropes will lead into there too.
At the bow...
At the bow you will also find a hole where the anchor chain goes (the anchor will generally be hanging off the bow). This is called the chain locker.
Finally, on the diagram you will see that the boat has two night lights on the bow : red on the port side and green on the starboard side.
When sailing or motoring at night you need to turn these on so other water users can get an idea of what sort of boat you are and your direction of travel. This is so they can avoid hitting you.

MAST AND SAILS
When you are sailing, the sails are the engine of the boat. As with the engine for motoring, they are quite complicated but once you know what is what you can set them better and go more efficiently.
THE JIB SAIL
Let's start with the jib sail , the sail at the front of the boat. The tack is attached to the bow. The clew is attached to the jib sheets that control the shape of then when you set the sail. To get the sail up, you haul on the jib halyard that is attached to the head of the sail.
The front edge of the sail is called the luff. By tightening the jib halyard you tighten the luff.
Generally speaking you want all the edges of the sail to be tight when the sail is set (not flapping about) so you always want the jib halyard to be as tight as you can manage.
Between the tack and the clew is the foot of the sail, and this is tightened by the jib sheets. When sailing you want the jib sheets just tight enough to keep the sail firm, yet by letting it out just a little bit it will flap. In setting it just right you get the most efficiency of the sail.
If the sail is flapping then it isn't pulling the boat forward, so to stop the boat you let your sheets go and they will stop the boat.
The mast is where the halyards are led through. As well as the jib halyard you also have the main halyard that pulls the mainsail up and down.
Attached to the mast at right angles to it is a straight piece of metal called the boom .
This is where the foot of the mainsail goes, with the tack attached to the cunningham and the clew attached to the outhaull .

These tighten the foot of the mainsail.
Again, for good sailing you want the foot tight so at the mast you will tighten the Cunningham and at the end of the boom you will tighten the outhaul.
THE MAINSHEET
At the cockpit end of the boom you will see the mainsheet.
This is led into the cockpit and as with the jib sheet pulls the sail in or lets it out according to the wind direction.
Going down wind you will want to let it out, while sailing close to the wind you will tighten it. To stop the boat you let go of it and steer into the wind.
The Cunningham also keeps the sail tight from top to bottom.
The main halyard pulls the sail up while the Cunningham pulls it down.
SAILING IN STRONG WIND
If the wind gets too strong, you sometimes want less sail up .
Sailing can be fun in stronger winds!
That's why you have the reefing cringles that are part way up the sail to 'reef the sail'.
You would attach the Cunningham and the Outhaul to the Reefing cringles , and re set the sail.
With less sail area you will be more comfortable in bigger winds and still enjoy you time on the water.
WINDWARD AND LEEWARD SIDE
The side of the boat facing the wind is the windward side and the side facing away is the leeward side.

Generally speaking the boat will lean away from the wind, so the leeward side will be the lower side of the boat when sailing.
THE TELLTALES
Finally, on both sails in the picture you will see the 'telltales' . These give you an idea as to how well the sail is set. When sailing on an upwind leg - the telltales on both the windward and leeward side of the jib should point aft.
If the leeward telltales twirl, the helm should steer closer to the wind.
If the windward telltales lift and twirl, the helm should head slightly downwind.
THE WINCH AND WINCH HANDLE
Winches are used to pull ropes (also known as lines) when manpower alone can’t pull them.

On big racing yachts you will see the biggest guys on the boat on the ‘grinder’ that is just turning the winch. On smaller boats like yours you will only need a winch handle to turn it.
Winches are most used to tighten and loosen the jib sheet.
SOME NOTES ON USING THE WINCH
Firstly turn the line around it in a clockwise direction for one turn.
Make sure that the end of the line with you are pulling from is at the bottom while the end of the line you are pulling is above.
NEVER put your fingers between the line and the winch barrel . If there was a sudden gust on the sail it is trimming your fingers could be broken or even removed.
ALWAYS use the flat of your hand on top of the line when on the winch.
Usually before there is any tension on it you only put one full turn on it and then pull like crazy until there is tension on it.
At this stage put two more turns on the winch. Make sure the turns don’t overlap as that could trap the jib sheet and this in turn could mean the boat end up flat on its side in an emergency situation.
When you have the turns on the winch immediately put the winch handle on and turn clockwise until you cannot turn any more at a decent speed. If you are quick enough with the winch this might be all you need to do.
Once it is too much for your arms alone, turn the winch handle anticlockwise and this will use the mechanics inside the winch to help you tighten it the rest of the way.
To loosen rope on the winch, hold the line taught with both hands and ease off the tension gently. One common time you’ll need to do this is when you are tacking the boat. Read our explanation about tacking and gybing later in this manual.
On most days tacking and gybing are the most exercise you will get while sailing. There will be lots of noises and dashing about the winches for about a minute and then you can return to your gin and tonics!


Home » Blog » Sail » Downwind sailing: 3 strategies for sailing downwind in comfort and style
Downwind sailing: 3 strategies for sailing downwind in comfort and style
By Author Fiona McGlynn
Posted on Last updated: February 7, 2023
Some of my happiest sailing memories involve downwind sailing: coasting along with the spinnaker up, blissfully basking in the afternoon sun. I’ve also had some uncomfortable downwind rides, like sailing along the Washington-Oregon Coast with a cross swell and gusts of 40 knots.

Sailing downwind can vary a lot, depending on the conditions, but having the right sail configuration and trim is key and can make all the difference to your comfort and safety.
Robin and I spent the better part of three years sailing (mostly downwind), but it wasn’t until we made a 26-day Pacific crossing to the Marquesas that we really refined our techniques—with none of modern life’s distractions we had a lot of time to think about it!
Below I’ll share the three downwind sailing configurations we used but first let’s quickly talk about the risks of downwind sailing (and how to minimize them).
What is downwind sailing?
Sailing downwind is sailing with the wind behind you. This includes broad reaching and running points of sail.

Risks of downwind sailing
Accidental jibes.
“Dead down, heads up” is an old piece of sailboat racing advice. When sailing downwind (especially dead downwind) you should be constantly aware of the potential for an accidental jibe—nobody wants to catch a boom in the face!
Accidental jibes happen fast, can cause severe injuries, and can even send you overboard. The substantial force also puts stress on the boat’s hardware, lines, and the boom itself and can result in broken equipment.
You can reduce the chance of an accidental jibe by not sailing on a dead run . Give yourself a margin for error, staying 5 to 10 degrees off dead downwind, in case the wind changes.
There are also a couple of systems that can reduce the risks associated with uncontrolled jibes.

Preventers and boom brakes
Preventers work by “preventing” the boom from swinging at break-neck speeds across the boat’s centerline.
Preventers range from simple to complex and can get pretty expensive. However, you can rig a DIY boom preventer for next to nothing.
The simplest preventer setup is a line that runs from the end of the boom to a point on deck forward of the mast.
A boom brake is a more elegant solution that slows the boom as it crosses the centerline of the boat during a jibe. The big advantage over a preventer is that the boom isn’t held in a back-winded position if you accidentally jibe.
We were able to buy a second-hand Dutchman Boom Brake and we used it whenever the main was up. They’re expensive but a good investment if you’re planning on doing a lot of downwind sailing.

A broach is when a gust or a wave causes the boat to heel and twist violently into wind such that it can’t be counteracted by steering. In extreme cases, this may cause the boat to capsize.
There are a few strategies for avoiding a broach including not having too much sail area and carefully steering the boat to prevent rolling.
Downwind sailing setups and sail configurations
Over three years of bluewater sailing (almost all of it downwind) these were the configurations that worked best for us. Try these out on a calm day and keep tweaking until you find a balanced system that works for your boat and crew members.

1. Sailing downwind on a headsail only
We’ll start with what is by far the simplest technique: sailing under a genoa or jib alone. Though it’s relatively uncommon to see a boat under headsail alone in your local harbor, we and many other bluewater sailors use this configuration with great success. Some even opt for twin headsails !
The benefits are that it moves your centre of effort forward and reduces weather helm, which can be a real advantage in strong winds. You also don’t have to deal with the mainsail’s wind shadow and it’s very simple to reef single-handed if you have a roller furler.
The drawbacks are a potential loss of speed, though really the genoa is your main engine when sailing downwind. Also, we typically used this configuration in heavy air when we were more concerned with boat stability than speed.
We used this technique for much of our sail down the Washington, Oregon, and California coastlines.
It was also a great technique for night sailing when we prioritized sleep over speed, and whoever was on watch could easily reef the genoa alone.

How to sail under headsail alone:
- Bear off to your desired point of sail.
- Unfurl your headsail (reefing as necessary).
- Trim your sail.
- Reduces weather helm which can be helpful with higher wind speed
- No blanketing from the mainsail
- Easy to set up and reef single-handed
- Potentially slower boat speed

2. Sailing downwind with a mainsail and poled-out headsail
The further you bear off, the more you’ll find it difficult to keep the genoa filled. Eventually, you’ll reach a point where the main entirely blankets the headsail (around 140-220 degrees).
When running dead or near-dead downwind, we’d bring the genoa over to the windward side and go wing on wing. However, ocean swell and wind waves can play havoc with the headsail, especially in lighter winds, causing it to collapse and fill repeatedly, making a disturbing “whump” sound and shaking the mast.
In this scenario, we pole out our genoa. We only use this technique in open areas where we can hold a heading for an hour or more. If you need to jibe every 10 or 15 minutes (or less), most short-handed crews are going to find it’s not worth setting up a pole.

Spinnaker pole vs. a whisker pole
To do this you’ll need a spinnaker or whisker pole that is strong enough to handle the loads of a backwinded sail—check with a reputable source to choose the right whisker pole for your boat . Often, spinnaker poles run a bit short for a 120 to 150 percent genoa in which case a telescopic whisker pole can extend the full sail.

How to pole out a headsail
If you have any experience with poling out a spinnaker, you’ll find that it’s similar with a genoa.
- Start with a fully furled headsail.
- Attach the topping lift to the pole while it’s still on the deck.
- Raise the pole. A crewmate can take up slack as the pole is lifted so that the person on foredeck isn’t taking all the weight of the pole.
- Connect the foreguy, leaving a few feet of slack so that pole can move.
- Connect the outboard end of the pole to the jib sheet.
- Connect the inboard end of the pole to the mast.
- Level the pole (using the topping lift, foreguy, and mast track) with the clew of the sail.
- Adjust your pole to fit the sail. If you’re using a whisker pole, you can extend or shorten the pole. For a spinnaker pole, move the inboard end up and down the mast track to shorten it. Or, keep the pole level to push the sail out to its maximum.
- Tighten up the the foreguy so that the pole can’t make contact with the shrouds when the sail is unfurled.
- Unfurl and trim the headsail.

- Prevents the headsail from continuously collapsing and refilling
- Necessary to carry a whisker or spinnaker pole on deck along with additional lines and rigging
- Takes more time to jibe (not a good idea if you need to maneuver in tight areas)
How to jibe with a poled-out headsail
- Furl the headsail. We don’t recommend gybing with the headsail up. A lot can go wrong with a heavy pole swinging around and several lines on deck.
- Unclip the pole from the genoa sheet
- Rotate the outboard end of the pole to the other side of the boat. If you’re using a spinnaker pole, you’ll likely have to unclip the inboard end as well to bring the pole through before clipping in on the new side.
- Clip to the opposite genoa sheet
- Unfurl the headsail and trim.

3. Downwind sailing with a spinnaker
My happiest days of ocean sailing were when we had light winds, no swell, and could coast all day long on our asymmetric spinnaker. It took us a while to build up the confidence to use ours but it eventually became second nature.
That being said spinnakers are more challenging to use than a furling headsail. They require constant attention to steering and trimming—It’s certainly NOT a case of “set it and forget it”.
It’s also important to have good communication amongst the crew. Discuss your plan (and who’s doing what) for launching, gybing, and dousing before you start.
Spinnakers vs. gennakers
A gennaker (a.k.a asymmetrical spinnaker or cruising chute) is larger than a genoa but smaller than a symmetric spinnaker, and performance-wise you can think of it as a blend between the two.
It does best between 80 and 120 degrees off the apparent wind, from just forward of the beam to a broad reach.
Most bluewater cruisers carry asymmetrical spinnakers because they can be pointed higher and are less work for short-handed crews.
At higher points of sail (e.g., a beam reach) the tack is attached to the foredeck and the gennaker is trimmed like a genoa.
On a run, we would pole our gennaker out to windward like a genoa, but it’s also possible to fly a gennaker like a spinnaker (tack to pole, clew to sheet).
How to rig a gennaker
- Secure the sail bag on the foredeck.
- Attach the tack to the stem head (the most forward point on the boat) with a 2-foot line. You may need a slightly different length depending on the size of your sail and rigging. Another option is to run a tack line from the tack to a block at the forestay fitting and back so that you can adjust the height of the tack above the deck (anywhere from 2 to 6 feet).
- Attach the spinnaker halyard to the head of the sail.
- Attach sheets to the clew, leading the lazy sheet in front of the headstay. Run both sheets back to winches and cleats.
- Head onto a broad reach.
- Hoist the sail quickly while keeping the sheet eased.
- Bring in the spinnaker sheet until the gennaker fills. You may need to head up slightly.
- Trim the sail as needed.

How to jibe the gennaker
When setting up, be sure to lead the windward sheet around the forestay in front of the sail and keep the lazy sheet (whichever one is not being used) out of the water.
- Slowly bear off and ease the sheet, using the wind pressure to get the sail out in front of the boat.
- As the boat passes through dead downwind, release the old sheet and use the new sheet to pull the sail in front of the forestay to the other side.
- Head up and bring in the sheet until the gennaker fills.
How to take down the gennaker
Spinnaker sailing can be so much fun that it’s easy to keep the sail up longer than you should. This is what happened when I blew out our spinnaker on a crossing from New Caledonia to Australia.
Sadly the damage was well beyond anything I could patch up with my onboard sail repair kit . Pay close attention to the wind strength and always douse your spinnaker well before you need to.
We never used a snuffer to help tame our spinnaker but many cruisers swear by them.
Racers have devised a few ways to douse a spinnaker , but we found the following method was the best way for us as cruisers.
- Head onto a broad reach so that the mainsail blankets the gennaker.
- Ease the sheet until the gennaker collapses or has a big curl.
- Release the halyard in a quick but controlled way while simultaneously gathering the spinnaker, hand over hand, keeping it out of the water. I always preferred to do this in a seated position as it feels more stable.
- Stuff the spinnaker into a sail bag on deck.
- When the sail is completely down, release the tack from the bow of the boat

- Best speed in light air
- Lots of fun to sail
- Requires constant, active management (not great for short-handed crews)
- Slow and complex to launch, sail, and douse
- Not appropriate for sailing at night and in variable wind conditions
I hope you’ve enjoyed this post and that it helps you experience the joys of sailing downwind. “May the wind always be at your back.”
If you have any questions, drop us a line in the comment section.

Fiona McGlynn is an award-winning boating writer who created Waterborne as a place to learn about living aboard and traveling the world by sailboat. She has written for boating magazines including BoatUS, SAIL, Cruising World, and Good Old Boat. She’s also a contributing editor at Good Old Boat and BoatUS Magazine. In 2017, Fiona and her husband completed a 3-year, 13,000-mile voyage from Vancouver to Mexico to Australia on their 35-foot sailboat.
Terms and Conditions - Privacy Policy
- BOAT OF THE YEAR
- Newsletters
- Sailboat Reviews
- Boating Safety
- Sails and Rigging
- Maintenance
- Sailing Totem
- Sailor & Galley
- Living Aboard
- Destinations
- Gear & Electronics
- Charter Resources
- Ultimate Boat Giveaway
How to Plan Your Sail South
- By Andrew Burton
- Updated: September 11, 2019

Halfway from Newport, Rhode Island, to Bermuda one recent November, all four crews on the boats in my offshore sailing program listened rapt to the drama unfolding on the VHF radio. We could hear only the U.S. Coast Guard side of the conversation as they rescued the crew of a boat in trouble, but that was enough for all of us.
It was a stinky night, blowing 35 knots and gusting over 40 out of the southeast—our course to Bermuda. The rain was pelting down, and big sloppy seas were coming from three different directions. On our matching 46-foot performance cruisers, all four skippers had independently arrived at the same solution for dealing with the conditions.
Before darkness closed in, we’d doused the main, rolled up the jib and set the hank-on heavy staysail/storm jib on an inner forestay. We jogged along with the wind at about 60 degrees apparent doing 4 or 5 knots of boatspeed, waiting for the wind shift we knew was coming from listening to the high-seas forecast on the single-sideband radio. We knew this gale presaged a cold front and that by sunrise we’d be loving life as we ran toward Bermuda in a clear 25-knot northwesterly.
We later learned that the Coast Guard had pulled all five people off a well-built, 50-foot double-headsail-rigged cruising ketch about 80 nautical miles from our position. Its crew had tried to cope with the deteriorating conditions by dousing all sail and motoring into the wind. In those conditions, they’d ended up rolling the gunwales under. Then the engine quit. As they drifted, the deck was leaking, and every member of the crew was seasick, cold, wet, scared and exhausted. Calling the Coasties for rescue seemed like a no-brainer, and the decision was unanimous. With that call, the owners of the boat gave up on the cruising dream they’d been working toward for many years.
Practicing Patience
Every November, the southbound routes from the East Coast are furrowed with sailboat wakes as cruisers abandon the rapidly approaching icy winter weather and set sail for the tropics. Some head for Florida, others for the Bahamas, and still others for the Caribbean. Some crews prefer to buddy-boat their way, some like to join rallies, and others prefer to sail by themselves. In more than three decades of sailing other people’s yachts (and lately my own boat) south in the fall, if there is one piece of advice I’d give anyone contemplating this voyage it would be: Throw away your calendar. The weather is what it is, and your schedule matters not a whit.

On a recent passage with a couple starting their dream of cruising the world on a well-found heavy-displacement cutter, we ended up stuck in Beaufort, North Carolina, for a full month as one system after another pounded through at 36- to 60-hour intervals. There was just no way we could pick a decent window to get across the Gulf Stream and far enough along the track to Tortola in the British Virgins to make it clear of the storm paths rolling through.
A couple of professional delivery crews passed through town and made a break for it, but they later reported very miserable passages and told me I’d done the right thing in waiting with my inexperienced crew. In the end, we had a delightful passage in near-ideal conditions. After completing that trip, I returned to Beaufort to get my own, much faster boat with a more experienced crew. I ended up waiting for another week for a weather window before we left. The point is you have to be patient. Good—or at least reasonable—conditions will roll around sooner or later. I tell my clients, “You’re cruising; you’re already home, so what’s your rush?”

I usually leave sometime in November from Newport, Rhode Island, bound for Bermuda. If you have a good boat capable of making the 650-mile passage in five days or less, except in rare years, you should be able to pick a good weather window, if you’re patient. Note how many times I qualified that statement. We have much better weather information nowadays than when I started delivering boats, but bear in mind that weather forecasting is not perfect, nor are professional weather routers. You, your crew and your boat should be prepared to get clobbered. Just as important, you should be prepared to motor if your boatspeed drops below about 5 knots; save the purity of sailing for when you’re south of Bermuda. That piece of North Atlantic water on the way to Bermuda bears a justified fierce reputation. It’s not a place to lollygag. For forecasts and Gulf Stream info, I use the excellent GFS forecast models from passageweather.com .
Planning and Preparation
Before I leave on a passage, I have my sails professionally inspected and any defects repaired. I have them pay special attention to batten pockets and sail slides. Sailmakers will do this for you for at a surprisingly reasonable price.
Another thing I do is load up the boat with spare fuel filters. I get a couple of 5-micron elements for the engine and at least half a dozen 30-micron elements for the Racor filter. You might run for years along the coast on the same filter, but once you get offshore and the seas start bouncing the boat around, any crud in the bottom of the fuel tank gets shaken up, and you’ll find yourself having to change filters until your tank is clean.
Along those lines, make sure your engine is happy being run for a long period. Test it by motoring continuously for several hours. Too often engines in sailboats are used simply to leave the mooring and charge the batteries. That’s a rotten thing to do to a diesel.
Your engine manual should tell you what rpm you should achieve running in forward gear. Get clear of other boats one day, and slowly mash the throttle all the way to the limit. Leave it there for five minutes or so. You won’t hurt your engine. Check the engine temperature to make sure it stays under about 180 degrees. If it doesn’t, it’s time to give your cooling system some love. If it revs above the maximum rpm rating, you might be able to add pitch to your propeller; if it comes up short, you might have too much pitch. (Obviously, I’m simplifying, so check with your mechanic before making changes.) Your cruising rpm is 75 to 80 percent of maximum rpm. Top up your diesel tanks and run for several hours at that speed, then fill the tank again to give you an idea of your fuel consumption; this will be an important number to keep in mind when you start thinking about fuel management on passage. Bear in mind that running at 60 percent of max rpm can greatly increase your range when you have to stretch your fuel in a prolonged calm. I always leave my main up for a little extra push and to damp any rolling—unless the sail is slatting hard, which can kill your sail in short order. Bear in mind also that it is not really that hard to make 3 or 4 knots just sailing in light airs.
While you’ve been preparing your boat and stowing spares, you also should have been thinking about crew. I like a three-person crew who can all steer a compass course and know how to sail, including when to trim or ease the sails, and when to call the skipper with questions. A three-person crew allows my favorite watch system: three hours on and six hours off. This allows the skipper and crew almost a full night’s sleep every nine hours, a vital element for keeping everyone safe and happy.
Enticing a good crew to take the time out to sail with you is a conundrum often solved with the promise of good food. My basic rule for provisioning is to never put any food on the boat that you wouldn’t eat at home. So no canned stew and very few tins of tuna, and definitely none of those cups of soup you add boiling water to. Our daily routine is for everyone to help themselves to breakfast cereal (unless someone feels like cooking for the crew); lunch is help-yourself cold- cut sandwiches, though in colder weather we’ll sometimes fall back to tomato soup and grilled-cheese sandwiches. And there is always plenty of peanut butter and jelly aboard.
Except in the roughest weather, we do our evening meal together at the 1800 watch change. Stews, chili and other meals can be premade and frozen before departure. Unless it’s rough, pasta is easy to cook underway and, along with rice, makes easily stowed emergency provisions too. Look at cookbooks and the People & Food column in this magazine and vary the menu, concentrating on stick-to-your-ribs meals up north and lighter, quickly cooked or uncooked fare once you reach the tropics.
All the care you put into provisioning will come to naught if your crewmembers aren’t hungry. Seasickness is the bogeyman for every sailor new to offshore passagemaking, and more than a few experienced sailors too. Experience has shown me that getting your favorite medicine into your system three days before your planned departure will go a long way toward preventing “Gulf Stream gastritis.” It doesn’t seem to matter which medicine you take (I use Bonine, which doesn’t make me as drowsy as some other meds), just get it into your system. During my offshore sailing program one year, I followed this plan when I left Newport for Bermuda with 54 people (aboard 10 boats) who’d never been to sea before. Only one mighty-man-of-the-sea who “never gets seasick” was sick. My wife follows this prescription and has gone from getting seasick on a dewy lawn to running the boat all night on the 200-mile passage across the Gulf of Maine from Cape Cod to Mount Desert Island alone on deck. A last important note: Don’t try a new seasick medicine for the first time right before your passage. A couple hundred miles at sea is not the place to discover you have a nasty or dangerous reaction to whatever you took.

When we left on the passage that caused the crew of the 50-footer to abandon ship, our forecast had called for the southeasterlies to blow at a manageable 25 knots, not the 35 to 40 we got. If that unfortunate crew had known to hoist a staysail and perhaps a reefed mizzen, and then either jogged long as we did or hove to, they might still be living their dream on their boat.
Heaving to is one of the most important of an offshore skipper’s tools. To heave to, you back your jib or staysail—that is, you sheet it hard on the wrong side of the direction the wind is blowing—and sheet in your reefed main enough to keep the wind about 60 degrees off the bow with your helm lashed hard over as if you’re trying to get the boat to tack. Done correctly, the boat will sit quietly through pretty intense conditions. This is a technique worth discussing and practicing before departure.
Though it happens, with modern forecasting and patience, you will rarely encounter storm conditions on the short legs from New England to Bermuda, and from Bermuda south to the islands, but it is best to understand and be prepared should it hit the fan. Fatty Goodlander’s excellent book Storm Proofing is recommended reading before you set sail.

Yes, reading articles like this one is enough to scare anyone into taking up RV’ing, but don’t let it. There is little that is more satisfying than sailing your boat at sea toward a distant horizon. There’s a reason so much has been written about the romance of the ocean. It’s worth the trouble to just get out there. And as Joshua Slocum once wrote, “To any young man contemplating a voyage, I would say go!”
One final word: Cruising sailor Douglas Bernon told me that before he and his wife, former CW editor Bernadette Bernon, left on their multiyear cruise, I had given him the most important of any advice he’d received before they left. “No matter what,” I’d told him, “each day, be sure to stop whatever you’re doing, relax, and watch the sunset.” And so I pass that along now: Don’t get so caught up in the preparation and operation of the boat that you forget to have fun!
As a delivery skipper, Andrew Burton has logged more than 350,000 nautical miles under sail. Aboard his Baltic 47, Masquerade , he also helps those new to passagemaking understand what it takes to cruise offshore successfully under the auspices of his company, Adventure Sailing. Upcoming voyages include passages from Rhode Island to Bermuda and the Caribbean, cruising through the islands, and a celestial-navigation passage from the British Virgin Islands to Key West. For more information, visit his website .

If the weather is bad, and systems keep moving through too often to leave you without a good window to make Bermuda from New England, the best option is to hop down the coast to Beaufort, North Carolina, one of my favorite ports on the East Coast. Typically, from New England, I head west down Long Island Sound to New York City. From Sandy Hook, New Jersey, at the entrance to New York Harbor, it’s a 110-mile hop down the Jersey shore to Cape May. I’ve had easy rides in smooth water half a mile off the beach, though it was blowing 40 knots from the northwest.
If conditions become uncomfortable, you can bail out into Manasquan Inlet or Atlantic City, where you’ll find good year-round marinas. From Cape May, it’s 150 miles across the mouth of Delaware Bay and down the DelMarVa Peninsula into Chesapeake Bay, where you can either head down the Intracoastal Waterway or pop into Hampton or Little Creek, Virginia, while you wait for a perfect weather window to sail the 200 miles around Cape Hatteras to Beaufort. From Beaufort, if you want to carry on to the Caribbean, it’s 850 miles to the important 25 degrees north, 65 degrees west waypoint that lines you up to reach across the trade winds and westerly current the final 400 miles to the Virgin Islands.
If you’re heading to the Bahamas or Florida, and prefer to be on the ocean rather than the Intracoastal, from Beaufort you have the choice of making the 150-mile overnight run to the Winah River or the 200 miles to Charleston, South Carolina. Charleston is a good jumping-off spot for 25N/65W, but it’s no shorter than leaving from Beaufort.
South of Charleston, you have lots of ports to choose from in Georgia, should you want to tuck in, including Port Royal Sound, the Savannah River and Brunswick.
In the 300 miles down the east coast of Florida to Miami, without local knowledge, your ports are limited to Jacksonville, the sometimes-tricky St. Augustine Inlet, Cape Canaveral, Fort Pierce, Lake Worth Inlet, Port Everglades and, finally, Miami. The latter three are good spots from which to jump across the Gulf Stream to the Bahamas.
If you’re heading to the Caribbean, you won’t have done yourself any favors by departing from so far south; it’s still 850 miles to the 25N/65W waypoint, and now you stand a good chance of having to sail upwind a good part of the trip. Your tactic here should be to wait for a cold front to approach. As the wind veers from the prevailing southeast, make your departure when it is out of the south making for Great Isaac Cay at the entrance to Northwest Providence Channel. The wind will continue to veer as the front approaches and moves through. If you can make good speed, you might carry southwest to northwesterly winds most of the way to the waypoint.
An alternative is to island-hop all the way to the Virgin Islands via the “Thorny Path,” about which much has been written.
Hank Schmitt, the founder of the crew-networking service Offshore Passage Opportunities, this year will be running the 20th edition of his North American Rally to the Caribbean (NARC). Starting October 26 from two locations—Newport, Rhode Island, and Little Creek, Virginia—the NARC will call in Bermuda on the opening leg before the second stanza carries on to St. Maarten. The rally is free and includes discount docking space, parties, professional weather routing, and much more. For more information, visit the event website .
- More: Destinations , How To , sailing south , seamanship , voyaging
- More How To

Rigging Redo: A Switch to Synthetic

Top Tools for Sailboat Cruising: Must-Have Gear for 2024

Made for Shade: Cockpit Cover Options

Blackwater Wisdom for Holding Tanks

North Sails Parent Company Buys Doyle, Quantum

For Sale: 1984 Camper & Nicholsons 58

Sailing Avocet : A New Adventure Begins
- Digital Edition
- Customer Service
- Privacy Policy
- Terms of Use
- Email Newsletters
- Cruising World
- Sailing World
- Salt Water Sportsman
- Sport Fishing
- Wakeboarding
Yachting Monthly
- Digital edition

Expert advice: sail handling tips and tricks
- Katy Stickland
- December 28, 2021
Good sail handling can be the difference between a great passage and a frustrating one. Here our experts offer their tips and tricks.

Sail handling is an important skill for any sailor. At its most basic, sail handling merely means sheeting in and out of sails, but there is more to it than just that.
Understanding halyard tensions, leech tension, reefing, backwinding, the list goes on and on. In truth sail handling and the many skills associated with it is something that even the best sailors are continuously learning.
Getting the best out of your sails is one benefit of efficient sail handling but just as important are understanding how to do sail changes in the safest way possible and taking the minimum effort. This will leave you with more time to enjoy your sailing and less worry when you have to take on some of the big tasks.
Our expert panel of sailors have got together to provide their top tips and tricks for sail handling from improving performance to easy reefing and beyond.
Look at your luff – Graham Snook

Both sails here could do with some more halyard tension. Credit: Graham Snook Photography
It’s easy to set and forget your halyards but rarely does the wind stay at a constant strength throughout a sail.
When you first adjust your halyards (this includes the genoa halyard) take up the tension until you see horizontal creases at the front (luff of the sail) disappear, and then ease the tension until just before they appear.
Vertical creases mean you’ve got too much halyard tension.
Get into the habit of checking the luffs of your sails to see whether the halyards need adjusting.
Ease the main sheet – Jonty Pearce

Lower just enough mainstail to get the cringle on to the ram’s horn
On a recent trip with friends the time came when we agreed it would be wise to reef the mainsail .
The yacht was fitted with a self-supporting vang, slab reefing, ram’s horns, a single clew reefing line per reefing point, and a stack-pack with lazy jacks.
The helm indicated that he was going to go head to wind and stop the boat for the procedure. We were close-hauled and the sea state was fair; it is my preference not to stop the boat and wallow around whilst being lashed by the genoa and its sheets, but to keep sailing with the genoa set while depowering the main by easing the mainsheet.
Not all the crew knew this technique; I clipped on and went up the windward side to the mast; the trimmer eased the sheet and the vang, and the main started flapping.
I loosened the main halyard but kept enough tension on it to prevent the sail coming down in a rush, and pulled the reef down so the ring could be slipped over the ram’s horn.
Once the main halyard was re-tensioned and the clew’s reefing line pulled on, the trimmer reset the sail and the vang, and we were done. Simple.
I’m sure this is the procedure followed by most sailors but felt it worth a mention as it was new to several on board.
Number two genoa sheet to Leeward – Randall Reeves

Running the number two genoa to leeward can save a trip forward when sailing through a low. Credit: Randall Reeves
When running off in a gale, one may wish to avoid unnecessary trips forward.
So, if I know a low is on the approach, and once I’ve chosen my tack, I will often run the free/windward number two genoa sheet to leeward and feed it through the most forward sheet block and back to the cockpit.
This means that when it comes time to roll in the number two to that ‘storm’ position, I simply move the readied sheet to the working winch and I thus avoid a trip forward to reposition the sheet block on decks often underwater.
Lower your furling sails – Rachael Sprot

Flogging can put stress on furling sails. Make sure you check them regularly. Credit: Graham Snook/Yachting Monthly
Our furling sails can take quite a battering – they’re regularly half rolled up yet still under tension, they flog unceremoniously when they need pulling in quickly and often the halyard tension gets left on in port.
Back in the days of carrying multiple different headsails you would naturally be lowering and raising sails each time you went out and casting an eye over the gear for damage.
Every month or so it is well worth lowering your furling sails and inspecting everything carefully.
You need to look out for chafe on the halyard and at the head of the sail; check that the top furling unit moves cleanly and that the halyard is securely attached, and go over the stitching on the sail to identify where things might be getting worn.
This may save you from that fate of having the sail half in and half out because something has got jammed at the top of the mast.
Mainsail reefing clip – Randall Reeves

A spring-loaded clip will help the mainsail cringle stay in place. CreditL Randall Reeves
On my 45ft sloop, Mo , the mainsail tack reefing cringle slips into a spring-loaded clip rather than the standard ramshorn hook, a quick customisation your boatyard can do.
This ensures that the cringle stays in place while the crewmember at the mast goes about getting the rest of the sail reefed.
Reefing on a reach – Rachael Sprot

Scandalising the main will make reefing easier. Credit: Lester McCarthy
When you’re sailing on a reach and decide you need to reef it is often hard to de-power the sail enough to allow the sail to drop. In sheltered water you can always luff up a bit, but if you’re in a big sea state that can be difficult.
Luffing up also results in an increase to the apparent wind speed – the last thing you want when you’ve decided you need to reef.
Before altering course there are two things you can do. The first is to raise the boom higher using the topping-lift or the vang. This will ‘scandalise’ the sail, opening the leech, making it much easier to de-power.
Option two is to sheet the headsail in tight to help backwind the sail. The tell tales on the genoa may complain, but may just give you enough airflow to backwind the main and put a reef in.
To reef or not to reef? – Helen Melton

Reef early to make cruising more comfortable. Credit: Helen Melton
Through the years of sailing, there have been plenty of times when we’ve been flying along on a reach, toe rails underwater.
It’s an exciting way to sail, but can be scary for youngsters.
Our current boat has two single-line reefs and two slab reefs.
The section of the sail above the fourth reef is reinforced so that it can act as a storm sail, cutting the need to rig a trisail.
On a boat with a young family crew, this is a much easier manoeuvre.
Weighing about 15 tonnes, SeaEye reaches well once the wind hits 10 knots and when it hits 18 knots, we consider putting a first reef into the mainsail.
The boat sits up more stably in the water with no loss of speed and the crew feel secure
Singlehanded mainsail handling – Dr Roger Geary

Sail handling Keep the sail tie around the sail until you have hoved to and secured the halyard. Credit: Dr Roger Geary
Lazy jacks and stack packs are brilliant for stowing the mainsail, particularly shorthanded. Getting the sail back up, however, is a different matter.
Lashing the tiller or using an autopilot to stay head to wind can help, but there is an easier way, and that’s to heave to under headsail alone and lash the tiller.
Modern boats will need some headsail to remain furled and be stable enough to hove to.
I then go forward on deck and lower the leeward lazy jacks.
You will then need something to hook the lazyjack lines round somewhere near the gooseneck in order to obtain an ‘L’ shape, holding them down and out of the way of the main with a cleat, winch, ramshorn or even a bungee cord with toggles that can be looped around the boom, or mast below the gooseneck, and hooked around the lines.
If you put a sail tie around the sail before doing so, you will stop it spilling on deck.
The step-by-step procedure is as follows: leave the berth having unzipped the stackpack and attached the main halyard, and put a sail tie round the sail.
Choose a sensible place to heave to. If it is windy enough to put a reef in, it is windy enough to clip on!
Lower the leeward lazyjack halyard and hook the lines at the gooseneck. Undo the sail tie and hoist the main.
Re-tension the lazyjack halyard and retreat to the cockpit. Come out of the hove to position and sail away. S
ome think this is unnecessary and that all that is required is to sail close hauled under headsail and hoist the main.
Whenever I do this I end up with a batten catching the lazyjacks!
Enjoyed reading Expert advice: sail handling tips and tricks?
A subscription to Yachting Monthly magazine costs around 40% less than the cover price .
Print and digital editions are available through Magazines Direct – where you can also find the latest deals .
YM is packed with information to help you get the most from your time on the water.
- Take your seamanship to the next level with tips, advice and skills from our experts
- Impartial in-depth reviews of the latest yachts and equipment
- Cruising guides to help you reach those dream destinations
Follow us on Facebook , Twitter and Instagram.
- Forums New posts Unanswered threads Register Top Posts Email
- What's new New posts New Posts (legacy) Latest activity New media
- Media New media New comments
- Boat Info Downloads Weekly Quiz Topic FAQ 10000boatnames.com
- Classifieds Sell Your Boat Used Gear for Sale
- Parts General Marine Parts Hunter Beneteau Catalina MacGregor Oday
- Help Terms of Use Monday Mail Subscribe Monday Mail Unsubscribe
Cutting a mainsail down to size
- Thread starter Larry Wilson
- Start date Nov 21, 2006
- Forums for All Owners
- Ask All Sailors

Larry Wilson
I have been gifted with a brand new main sail. Unfortunately it is not the correct sail for my Columbia 8.7. The foot is almost perfect, but the luff needs to be shortened around 6 feet. Is this feasible, and if it is, at what cost, both financially and from a performance standpoint?

Amast there matey!!! Ross, Thanks for that insight!!! Now instead of spending a couple of hundred to cut the sail, I need to budget $7,000 for a new mast? Anybody else have a different answer?
Larry, I really don't think that recutting the leach and head will be TOO big a deal. Your best bet is a chat with a sail maker. He will have to start at least from the top reef point and taper the sail to a new head board. Since it is a brand new sail, Do you have access to the original sailmaker? If no then just take it to a well regarded local man. I think for this kind of work they will charge by the hour.

Larry, I believe it can be done The cost is the question. If you have your old sail you could attempt it. Most sail makers cut panel then sew them together. If you look closely at the seam lap, you will see the as you move to the luff from the leech of the sail, the seam will get wider. This is how shape is incorporated into the sail. Some panels also taper to the leech. The sailmaker would most likely attack your sail from the leech edge. Removing the leech line and the binding on the leech. (it may be bound by a seperate piece or the sail panel is folded over to create a pocket for the leechline) The cut will affect the batten pockets. They will be removed ( they can be reused after the sail is cut. The sail will then be faired and cut with a roach. The leech pocket redone and the batten pockets reinstalled. The headboard reinforcement sewn on and the headboard reattached. If you were going to attempt this yourself, I would buy the videos on SailRite before touching your sail. The other option would be to have a sail maker look at it and if he/she would let you, have you remove everything to save a few bucks. That way all they have to do is cut and sew. I am going to rework an over size main this winter for my boat. good luck r.w.landau

Moody Buccaneer
Main Sail Larry, You need to call Dan Winters Sail in Hampton. This is right up his alley. He has cut a number of sails in the Deltaville area that did not fit. Call and talk to Sam, Dan's wife, and Brett, Dan's son. Their number is 757-722-5711. See you on the water!
Thanks for the insights Thanks all for the replies. Also thanks for the contact info. I'll talk to the sailmaker that does my repairs and see what he says. Worst case is that I trade it for credit on a new sail, take it to Bacon's, or try and sell it myself.
- This site uses cookies to help personalise content, tailor your experience and to keep you logged in if you register. By continuing to use this site, you are consenting to our use of cookies. Accept Learn more…
How To Reef Your Sails (Mainsail, Jib, Furling, Loose)
Learning to reef your sails is a critical skill for on the water safety and enjoyable sailing. When the wind picks up, you want to know the best way to keep your boat under control, and reefing is your first response to building breeze.
What is reefing your sails? Reefing is reducing sail area in the sail without removing or dousing the sails. Depending on your boat, you can reef sails by partially furling them, or the halyard and tying them off. With reefed sails, your boat will be easier to handle in heavier weather.

On this page:
When should you reef a sail, what happens when you reef, how do you reef the main sail, how do you reef the headsail, preparing boats for reefing, preparing for various reefing scenarios.
Reefing is not hard to learn. An important part of how to reef is knowing when to reef. Also know that reefing is a normal strategy for sailing . It's not just a survival skill for extreme conditions, it's a skill that lets you sail better in heavy wind.
Our rule for when to reef was when someone asks "do you think we should reef?" Meaning the first time the weather and wind build enough to give us some discomfort about the developing conditions, it was time to reef.
Because we had furling main and headsails, reefing was quick and easy for us so we reefed early. After all, you can always shake out the reef if conditions don't continue to deteriorate. You can't really reef too early. If you are uncomfortable with what you see happening on the water, reef the sails.
Reefing early when you're learning is smart because it takes time, especially if you have to leave the cockpit to do it. While you work, the wind may continue to build as conditions deteriorate, so the longer you wait the harder it may be to reef. You'll get faster as you do it more often, but when you're learning it's better to get an early start.
Specific signs that it may be time to reef:
- Sustained increase in wind speed, especially with large, powerful gusts.
- Out of control feeling to the boat that you can't ease by de-powering the sails.
- Storm/dark clouds on the horizon, especially in the direction you're sailing.
- Building wind-lashed waves and chop
Situational awareness when you are sailing into big breeze is critical. You don't want heavy wind to sneak up on you.
A reefed boat will sail well with a balanced helm, so get in the habit of reefing when you feel you're fighting the boat and the wind. Once you've mastered the skill you'll know when it's time, and you'll know when it's faster and more in control to reduce sail.
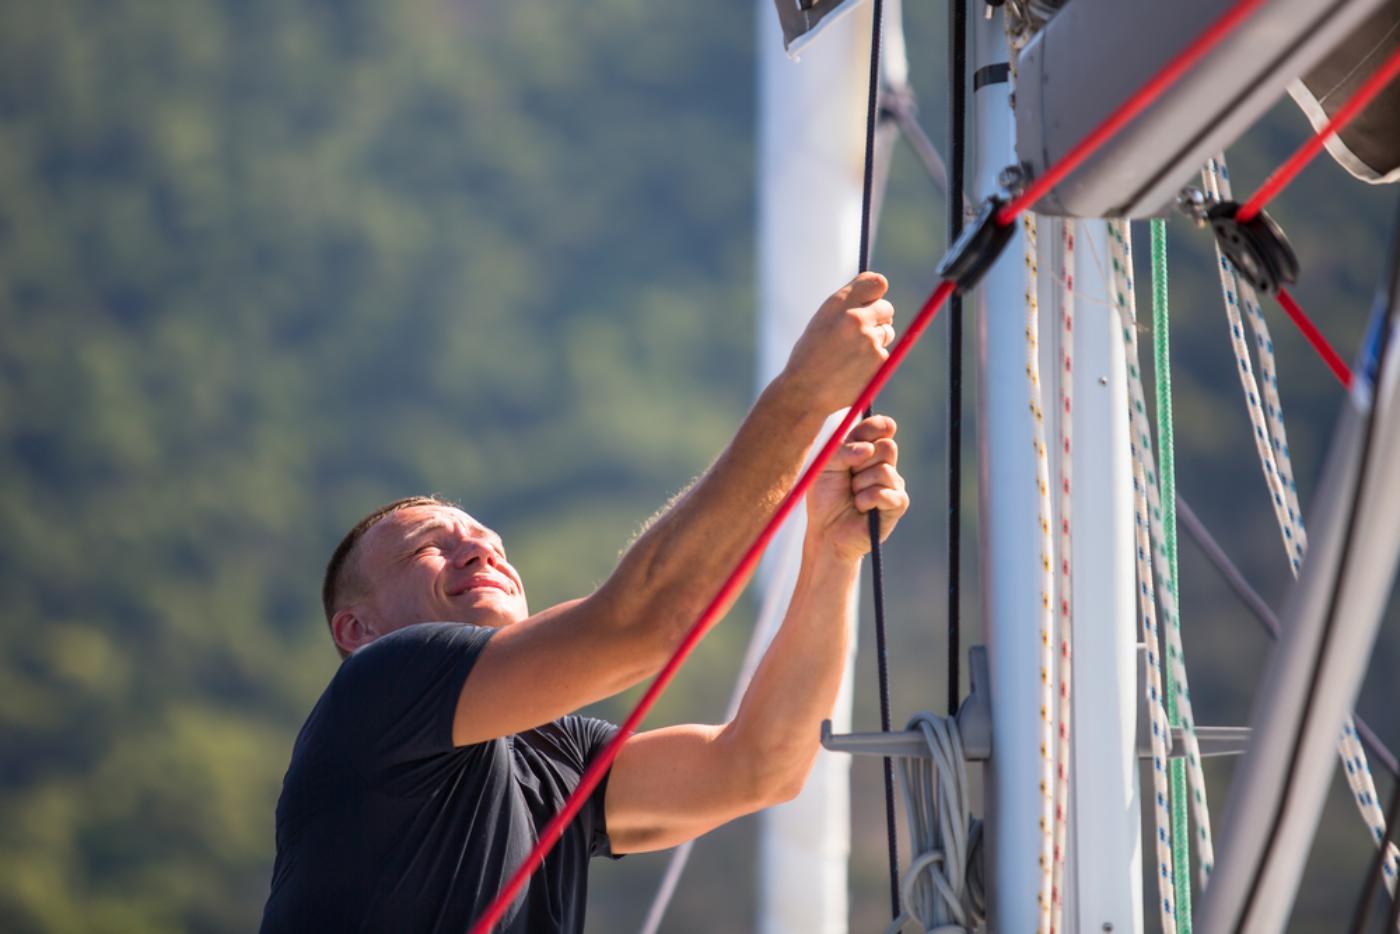
The aim of reefing is to reduce the sail area that you expose to the wind. This lowers the forces on the boat, reduces heeling, and restores control to the helm and sail controls in overpowering conditions. You are reefing so you can keep sailing, but with more control and less power in the rig.
One downside to this is that you often lose some sail shape. Sails are cut to be flown full, but shortening sail can impact the efficiency. When you need to reef there's usually enough wind to keep the boat moving, even with a suboptimal shape that's harder to trim. The major performance impact is on upwind sailing. Without that nice headsail shape, you may not point as high.
You'll often find that sailing reefed is as fast as sailing with all your sails out, because the boat is in control and spends less time with the rail buried, rounding up, and sailing all over as you fight the rudder to keep the boat straight. And you'll be more comfortable.
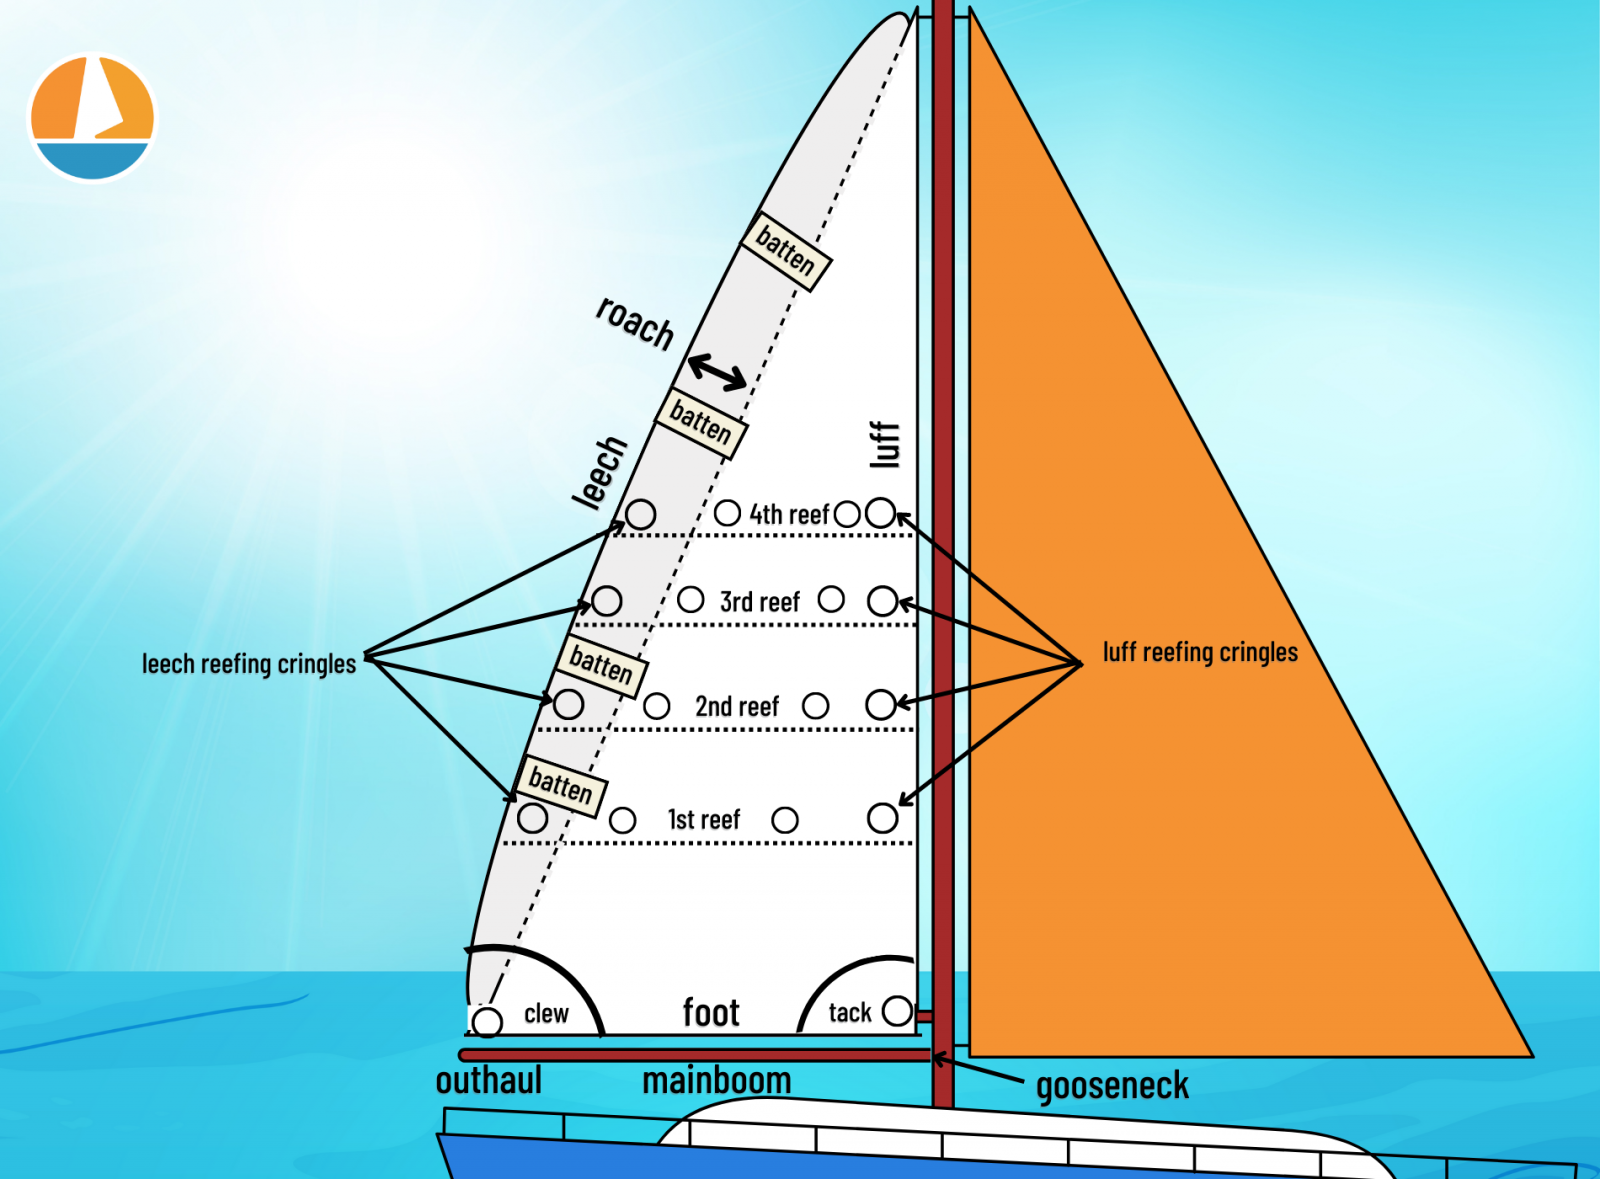
To reduce your main, you either furl it in if you can, or you drop the halyard to a set point and tie the main off on the boom with sail ties and reefing lines. The specifics vary with your rig, your equipment, and your boat and how you've set things up beforehand.
Reefing the main sail with jiffy or slab system
For boats without furling or sail handling systems, jiffy or slab reefing is the most common and easiest main reefing. You will need to leave the cockpit and work on deck to use most of these setups.
Your sails will have one or more reef points on them. Each reef point is a row of holes with grommets (called cringles ) through the sails and parallel to the foot, with a larger hole on the luff and leach of the sail. Many boats will have a reef hook , a metal hook with the end facing the deck, on the boom or near the gooseneck. Reef lines are rigged through the large cringles on the leech and tie to the boom, with one line per leech cringle. Some sails may have tie-down lines at the cringles, but this is less common on newer sails since they add weight and drag. For most sails, you will also need sail ties - short lengths of line or web meshing - for each cringle between the leech and luff.
The basic process for most mainsails follows these steps. Follow this for any reef point on the sail.
- Sail upwind to center the main and take the load off. You can work with the main to the side, but it's more difficult.
- Snug up the topping lift (if needed) to keep the end of the boom from dropping.
- Ease the mainsheet and vang a little.
- Ease the main halyard until it's far enough to attach the luff cringle to the reefing hook (if there is one) or until it's at the boom if you need to tie it.
- Hook the luff cringle to the reefing hook, or tie it firmly to the boom with a sail tie.
- Pull the matching reef line down until the leech cringle is tight to the boom and tie it off.
- Gather the body of the sail into folds.
- Put a sail tie through each sail body cringle and around the boom and tie them off so the sail is tight against the boom.
- Snug the main halyard to add appropriate luff tension, ease the topping lift, and trim the vang.
The sail is now reefed, and you can sail normally and trim it again.
To "shake out the reefs" or unreef the sail, reverse the process. Ease the halyard, undo the ties, ease the reef line, undo the reef hook, and hoist the main halyard back up.
Reefing an in-mast furling main sail
In mast furling has a lot fewer steps, since you're just putting the main partially away. It’s like fully dousing the sail, but you only go partway and stop.
Most in mast furling systems have a way they like to be put away to avoid jams going in and out, and it's important that you keep this in mind when you reef. Our furler liked the boom centered and parallel to the deck, and a little tension on it as we furled. If we reefed with the boom way out over the side on a broad reach, we were taking our chances if we didn't shake the reefing out before we furled fully. We also eased the backstay before furling in or out normally, which isn't practical when the wind is hooting up.
As a good rule of thumb, always take the reef out of your main and stow it normally after you reef . Don't just keep furling the sail in if you've reefed with a different boom and sheet tension than usual, as you may end up jamming your sail.
So keep in mind how your furler works and what you need to do for smooth furling, and don't violate those guidelines as you do these steps.
- Head upwind to take tension off the main.
- Center the boom as much as is practical.
- Ease the outhaul as you furl the sail to reduce sail area. You may have to get a little ahead with the outhaul as you ease.
- Trim the outhaul properly after you finish furling.
That's all there is to it. To unreef, just ease the sail back out all the way while unfurling. If possible, do this without changing sheet or vang tension from when you reefed in, just to be sure the sail doesn't bind.
Reefing a boom-furling main sail
When boom furling, you'll need to ease the halyard as you furl the sail to the reefed position. Because the sail furls on the boom, the foot stays taught just like a slab reefed sail, but you don't need any lines to hold it.
Like main furling, if there are any specific steps you need to take like setting the boom height or position on the boat, take care to do as much of this as possible when you reef.
Different boom furling systems have different tolerances for furling and reefing at different wind angles. Some furlers do not work will furling off the wind, while others are fine on almost any point of sail. Consult your manual for your model boom furler for directions about furling and unfurling on different points of sail, and follow them when reefing.
- Head upwind to take tension off the main halyard.
- Ease the halyard to the desired height while furling the sail.
- Check halyard tension in case you got ahead furling.
Just raise the sail again to shake out the reef when the wind drops.
Headsail reefing is easier with roller furling, but hank on sails have a few challenges if they aren't set up for reefing.
Reefing a furling headsail
Like furling mainsails, reefing a furling headsail is just putting the sail partially away. Sine the sail isn't attached to the boom, it’s even easier. All you have to change are the jib cars.
To reef a furling headsail:
- Head upwind to take load off the sail.
- Furl the sail partway to the reefing point.
- Adjust jib cars forward for new sail length.
Removing the reef is just unfurling the sail and moving the jib cars back.
Reefing the headsail with hank-on sails
Most sailors with hank-on sails "reef" by swapping the headsail out for a smaller sail. But if a hank-on headsail has reef points, it may be less work to reef it then douse and bend on a new sail.
A jib rigged for reefing will have a cringle on the luff to attach near the deck, and a cringle at the leech for a second attachment point for the sheets. Note that most hanks are not strong enough to handle the load as the tack attachment point on the sail. You want a dedicated cringle with a sturdy grommet to attach the new tack point while reefed.
To reef a jib with a hank-on headstay:
- Ease the jib halyard so the cringle in the reef point is near the deck.
- Attach the luff cringle to the reef hook or tie it to the base of the forestay.
- Move the sheets from the normal clew and tie them to the leech cringle, or use a second set of sheets if you have them.
- Bunch up the sail under the reefed areas as you can and tie with sail ties or bungees so it doesn't flap.
- Re-tension the halyard to the new position and trim the sail.
As you can see, there's going to be extra sail on the deck, which isn't as easy to contain without a boom to tie it to, and moving the sheet takes more work than main reefing.
With no preparation, boats without furling systems cannot reef those sails at all. And if you have everything you need, if you don't prepare it in advance, reefing will be much more work.
Adding foam strips to furling sails
Furling headsails lose shape and get baggy when reefed, but a sail with foam strips to stiffen the luff keeps its shape better. It won't be perfect, but it will reef in a better shape with the support.
Getting hank on and track sails
For non-furling sails you will need:
- Reef points on the sails.
- Reef lines.
- A reefing hook is best, but you can tie the sail.
In addition, you'll need to run the reefing lines through the sail before you can reef. Where the reefing line runs to on your boat varies, but the far end of each line must go through the leech cringle for that reef point then down to the boom, where it ties with a bowline around the boom or to an installed block or ring.
Most sailors don't leave reefing lines rigged because they flop around and add drag to the sails. They aren't used often in fair weather sailing and many just don't go out when a big breeze is expected. But if there is wind in the forecast, take the time to rig one or more reef points so you don't have to do it in building seas and heavy wind.
Mark your main halyard for each reef point to save time and make it easier when you're dropping the halyard. Iit will get you close enough to get the job done before you do the final trim. Use a sharpie or put a few stitches of high visibility thread in the cover at each point.
Reefing sails is the same on monohulls and catamarans, as it's the sail and rig you're worried about and the hulls have little to do with it. But other rigs and configurations beyond a sloop rig may require different or extra steps.
How you can reef when solo sailing
Reefing takes a lot of steps, and it's not always easy to do with one hand. Sailing by yourself, there won't be anyone to hold the wheel or ease lines as you haul others and tie things off.
For furling systems, the easiest way to reef with one hand (or person) is to do it step wise. As you head upwind, wase the outhaul (main) or sheet (headsail) a little, pull in the furler. Ease again, pull in again, until your sail is reefed where you want it. You can use the autopilot or your other hand to keep you on course.
For non-furling sails, single-line reefing systems can simplify the operation, as does running your reef lines, halyards, and topping lift to where you can reach them from all one place or with minimal movement.
Bring a single-line reefing kit
A single-line reefing system is a kit you install with several blocks and lines on the boom and mast to pull the tack and clew of a sail down together. It gets you out of hooking the luff cringle onto the reefing hook, since it pulls the luff down with the leech. If you need to tie down the middle of the sail, you still will need to move forward, but with the right setup, you can reef from the cockpit. It is more complex to install, but can be faster to use.
Leave a comment
- Search Please fill out this field.
- Newsletters
- Water Sports
A Beginner's Guide to Sailing a Sailboat
Key Information for Beginners and Sailors
There are many ways to learn to sail:
- You can just jump in a boat with a friend and try to learn from experience
- You can sign up for a formal course at a sailing school
- You can buy or borrow a small sailboat and do it all on your own
No matter which way works best for you, it helps to understand the boat and what's involved in sailing first before you're out on the water, where suddenly you might get into trouble.
The Basic Steps of Sailing
Sailing involves both specific knowledge and skills. The following are the basic steps of learning to sail- as much as you can learn while not actually on a boat. You don't have to follow this order; skip ahead if you already know some of the basics. If you're mostly new to sailing, you might want to proceed through these steps like chapters in a manual.
- Understand Basic Sailing Terms. To get into sailing, you have to understand the words that are used to talk about the sailboat and the skills used to sail. Start here with a review of basic sailing terms. Don't worry about memorizing everything as many of these terms and concepts will become clearer as you read on about how to do it.
- Learn the Parts of the Boat. Before you go on the boat, it's helpful to know the words used in different parts of the boat. Even if you have an instructor, he or she won't say "Grab that rope over there and pull it," but instead will say "Haul in the jib sheet!" Review the basic boat terms you'll need to know.
- Start an Online Course. Now you're ready to learn more about what all those parts of the boat are used for. Here you can start an online learn-to-sail course by learning more about the parts of the boat along with a lot of photos, so you'll see what to do.
- Rig the Boat. Read to go sailing now? Hold it a minute- you have to rig the boat first by putting on sails and making other preparations. Here again are a lot of photos of what to do on a typical small sailboat used by beginners.
- Review Basic Sailing Techniques. OK, now you have the boat ready- so what do you do now to make it go? Manage the sails to go in the direction you want by learning basic sailing techniques.
- Discover How to Maneuver. Sailing in a set direction is reasonably easy, but eventually, you'll have to change direction. That often involves tacking and gybing. Take a moment to learn what's involved in these critical maneuvers.
- Recover From a Capsize. Now you've got the basics down. But did anyone ever tell you that small sailboats often tip over if the wind is gusting? Be prepared and carefully see how to recover from a capsize .
- Dock or Anchor the Boat. Now you're out there sailing and you've got the boat under control. Learn how to go faster, dock or anchor the boat and use some of the equipment you've ignored so far. Take a look at some of these additional sailing skills.
- Practice Tying Knots. For thousands of years, sailors have used times where it is cold or raining by doing things like tying knots. Knots are important on a sailboat and you will need to learn at least some basic sailing knots to sail at all.
- Sail Safely. At this point, plus practice on the water, you're good to go. However, it's good to remember that water is a dangerous place. Learn the basics about sailing safety. Staying safe makes it easier to keep having fun out there.
Related Articles
More related articles.
IMAGES
COMMENTS
The downhaul or Cunningham acts on the tack pulling the sail down. Downhauls are also used to pull a sail down. In a Junk rig there could be a downhaul on each batten. ... The main halyard attaches to the head of the sail. In square sails such as sprit and lugs the top side of the sail is the Head and the corner nearest to the mast is the ...
Lowering the sails. Lowering the sails basically involves carrying out the sail hoisting procedure in reverse order. First the jib is lowered or furled, then the main. The jib can be furled anytime. The boat does not necessarily need to be pointed into the wind, but heading on an upwind tack or being in irons will help the jib furl tighter and ...
A sail, which is a large piece of fabric that is attached to a long pole called the mast, uses the wind to pull a sailboat across the water. It has various parts, such as the head, tack, clew, luff, leech, foot, mainsail, jib, and batten. These components determine the shape and efficiency of the sail.
A jib is used to improve handling and to increase sail area on a sailboat. This helps to increase speed. The jib gives control over the bow (front) of the ship, making it easier to maneuver the ship. The mainsail gives control over the stern of the ship. The jib is the headsail (frontsail) on a front-and-aft rig.
The sails are your boat's primary driving force. Your boat is designed to sail, and with good wind it will be faster and more comfortable than using the engine. ... But the detailed answer for sailing upwind is more complex, so come join us for a deep dive into the reason sailboats work and can sail up, down, and across the wind. It's going to ...
In this instance try to blanket the sail behind the genoa and mainsail as best as possible, take a deep breath, channel your inner octopus and gather it down the fore hatch. Parasailors are designed to be flown pole free, and without the mainsail up for simple downwind cruising. Photo: Richard Langdon/Ocean Images.
A basic sailboat is composed of at least 12 parts: the hull, the keel, the rudder, the mast, the mainsail, the boom, the kicking strap (boom vang), the topping lift, the jib, the spinnaker, the genoa, the backstay, and the forestay. Read all the way through for the definition of each sailboat part and to know how they work.
The sail lashing at the head of the TradeWind also chafed through, tearing the sail as it came down. Which leads us to other sail handling problems… Sewing sail repairs on the Contest 50CS Athena.
The helm eases the halyard enough for the crew to haul the sail in, but not so much that it touches the water. Cruising chute. With four lines and no pole, a cruising chute is the simplest downwind sail. A cruising chute, also known as an asymmetric spinnaker, is one that has its tack and clew at different heights.
Broach: When a boat sailing downwind accidentally ends up sideways to the waves and heels over dangerously. This can be caused by large seas or poor steering. ... Lying a-hull: When a vessel is drifting with all of it's sails down. Mainsail: Pronounce main'sil. The primary sail of a boat that is hoisted up or unfurled from the mast.
Step by Step Guide on How to Change Sails on a Sailboat. Changing damaged sails on a sailboat can be a daunting task, but with the right tools and knowledge, it can be done quickly and efficiently. In this blog post, we will go over the step-by-step process of changing damaged sails on a sailboat.
The closer you are to the wind (or the "no-go zone"), the more to "point" your sailboat will be. 3. Close Reach. As your sailboat "bears away" (moves away from the wind), it'll enter the close reach point of sail. This point of sail sits right in between the close hauled and beam reach points of sail on either the port or ...
Tacking and jibing (gybing) A boat changes direction by either tacking or jibing. Sailing upwind, a boat tacks when the bow passes through the eye of the wind until the boat is sailing on the opposite side or "tack" creating a zig-zag course. When sailing downwind, the boat jibes when passing the stern through the wind.
Although you have to take the sail down and put it back up to do that, sticky-back is the answer to this problem. ... Fabric is one of the most vulnerable parts of your sails. Most of the time, when a sailboat uses its slab reefing it will subsequently wear out the webbing attachments to the tack rings. Therefore a failure of the webbing ...
When properly trimmed (adjusted or positioned), the sail's leading edge—the luff—points into the wind, creating higher pressure on the windward side (the side facing the wind) and lower pressure on the leeward side (the side away from the wind)." The sail "lifts," or moves, toward the lower-pressure side causing the boat to move.
1. Attach the sails. Secure the bottom front ( tack) of the mainsail and jib to their respective shackles on the boom and the bow of the boat. There will be a small line ( outhaul) attaching the rear corner of the mainsail ( clew) to the end of the boom. Pull it so the foot of the main is taut, and cleat.
Hoisting the mainsail may require attention and skill, but dousing is a breeze - and the best part of sailing with lazy jacks! If conditions and crew size permit, send a crew member forward to stand in front of the mast and evenly flake the luff of the sail as it comes down. Steer to point the boat's bow into the wind and loosen the mainsheet.
Aerodynamic force components for two points of sail. Left-hand boat: Down wind with stalled airfow— predominant drag component propels the boat with little heeling moment. Right-hand boat: Up wind (close-hauled) with attached airflow—predominant lift component both propels the boat and contributes to heel. Points of sail (and predominant sail force component for a displacement sailboat).
A sloop-rigged sailboat typically features a mainsail, a headsail, and an additional light-wind sail, such as a spinnaker or Gennaker. The mainsail is rigged aft of the mast, while the headsail is attached to the forestay. The two most commonly used headsails are the Genoa and Jib. The sails are vital parts of a sailboat since you obviously ...
To stop the boat you let go of it and steer into the wind. The Cunningham also keeps the sail tight from top to bottom. The main halyard pulls the sail up while the Cunningham pulls it down. SAILING IN STRONG WIND. If the wind gets too strong, you sometimes want less sail up. Sailing can be fun in stronger winds!
In the old days, your sailmaker offered you one kind of mainsail, and sailors were generally happy with the result. You got a sail with a moderate roach, four battens to support that roach, a few reefs and some sail-trim devices, like a cunningham or a flattening reef. Today, however, mainsails seem to come in all shapes and sizes, with a wide ...
Sailing under headsail in French Polynesia 1. Sailing downwind on a headsail only. We'll start with what is by far the simplest technique: sailing under a genoa or jib alone. Though it's relatively uncommon to see a boat under headsail alone in your local harbor, we and many other bluewater sailors use this configuration with great success.
Get clear of other boats one day, and slowly mash the throttle all the way to the limit. Leave it there for five minutes or so. You won't hurt your engine. Check the engine temperature to make sure it stays under about 180 degrees. If it doesn't, it's time to give your cooling system some love.
If it is windy enough to put a reef in, it is windy enough to clip on! Lower the leeward lazyjack halyard and hook the lines at the gooseneck. Undo the sail tie and hoist the main. Re-tension the lazyjack halyard and retreat to the cockpit. Come out of the hove to position and sail away.
Mizzen headsails are attached at three points and provide lots of power when sailing off the wind. The head is attached to the mizzen, the tack is attached to the aft bast of the main mast, and the clew is sheeted through the end of the mizzen boom. The sail is set flying, with no stay supporting its luff. As a result, easing the halyard will ...
Main Sail. Larry, u000bYou need to call Dan Winters Sail in Hampton. This is right up his alley. He has cut a number of sails in the Deltaville area that did not fit. Call and talk to Sam, Dan's wife, and Brett, Dan's son. Their number is 757-722-5711.u000bu000bSee you on the water!
Some sails may have tie-down lines at the cringles, but this is less common on newer sails since they add weight and drag. For most sails, you will also need sail ties - short lengths of line or web meshing - for each cringle between the leech and luff. The basic process for most mainsails follows these steps.
Take a look at some of these additional sailing skills. Practice Tying Knots. For thousands of years, sailors have used times where it is cold or raining by doing things like tying knots. Knots are important on a sailboat and you will need to learn at least some basic sailing knots to sail at all. Sail Safely.
Sailing a small boat provides a direct interaction with wind and weather that uses all five senses. Feeling (and smelling) the breeze tells us so much about what the day will bring—dry or damp, light winds or zesty. ... Aim for a spot about a boatlength to leeward, and then head into the wind to slow down. It takes a lot of practice to ...
"Vessels aren't designed to be out sailing in that weather - 65 to 85mph that's the top of what a vessel would be out in and that's with its sails down," he said. "They aren't designed to sail ...